Monday, November 30, 2015

Pot Holders - The Perfect Project for Orphan Blocks

Our pot holders were starting to look a bit worn and dirty. It was time for some new ones. Normally, I break out my scrap bin to whip up a few improv pot holders but this time I decided to dig into my bin of orphan blocks. That bin is getting a bit full and I thought it would be faster to start with something that was already pieced.


I'm not sure it was any faster because I was having a good time going through all the pieces and parts from other projects.


I eventually culled it down to some reasonable possibilities. A couple of things I have learned is that light fabrics are not the best for pot holders. Maybe that is obvious to most of you but I had to learn that the hard way.  I tried to stick with medium to dark colors for these.


Sometimes it was just a matter of cutting a larger block into a square.


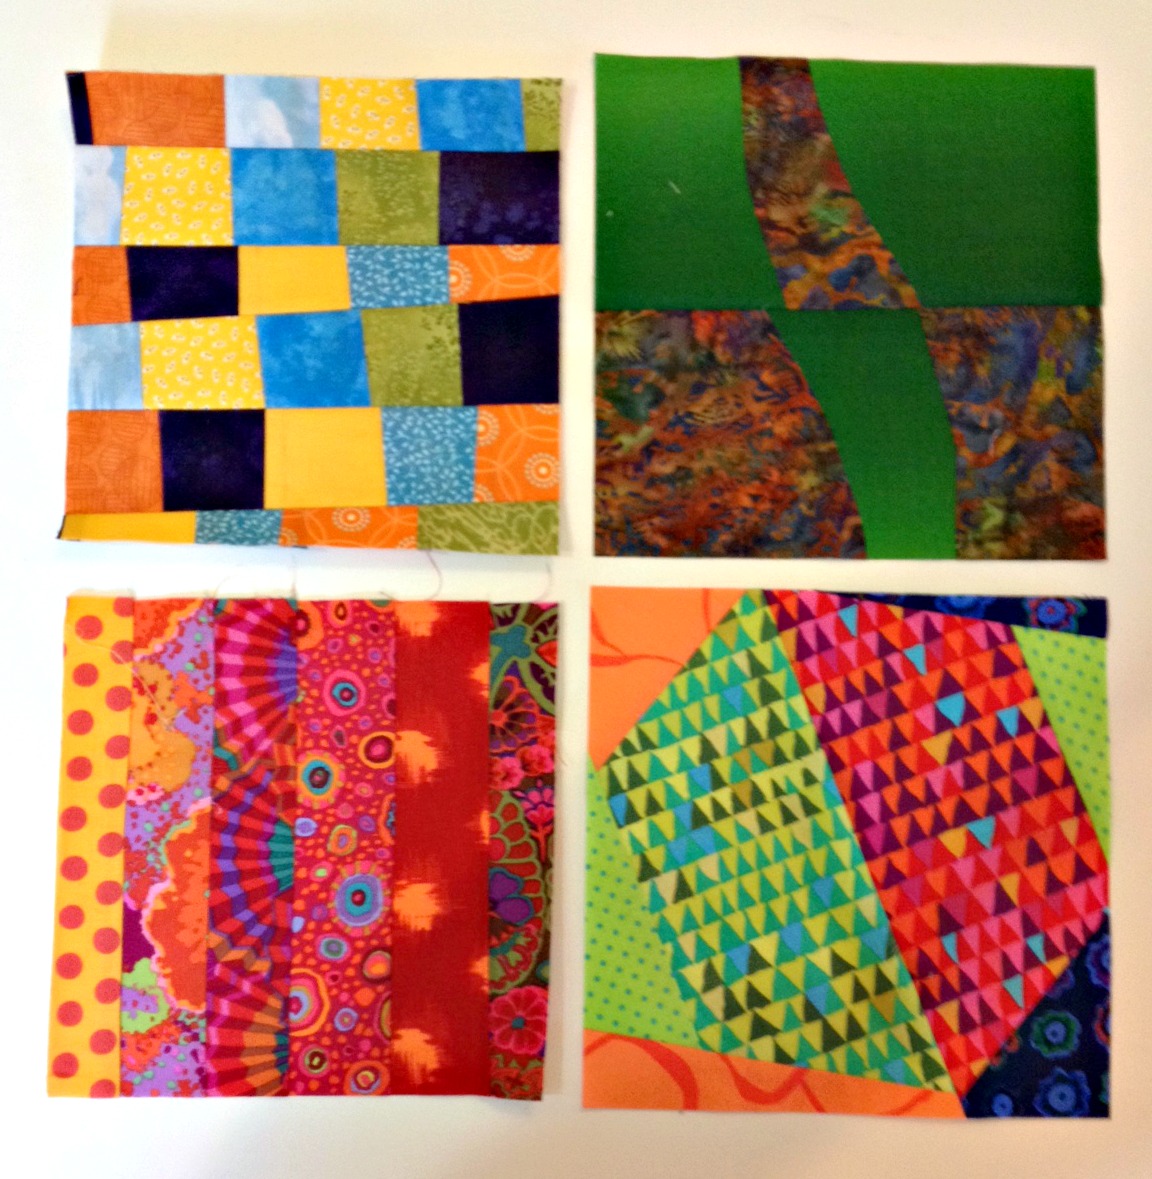
Eventually, these four tops were ready to go.


Then I had to choose backs for each one. While I was looking for backs, I ran across the Amy Butler print in the upper right. I love that print so a fussy cut square became the fifth pot holder in the set.

Here they are all layered up and ready to quilt. I just finished the last lesson of my Craftsy Creative Quilting With Your Walking Foot class so  I decided these would be a great way to practice those skills.

When I make a pot holder, there are either five or six layers. From left to right: the backing fabric is face down, then a layer of Therma-Flec shiny side down, then a layer of batting, then another layer of Therma-Flec shiny side up, then the top fabric face up. If there is a sixth layer, that means I have used two layers of batting in the middle. I decided to just go with one this time.

Before I share the finished pot holders with you, I just want to say it was not a great binding day. So please don't judge me for my bad binding. Even with that, I think these are super cute and I'm looking forward to using them.
One of the suggestions for quilting from the class is to echo quilt in each shape of the quilt. That is what I did with this one, and it was fun. I can't imagine doing that much rotating with a large quilt, but it is perfect for something small.
The quilting just blends into the back of this one, although I love this fabric.
Here's a better look at the quilting. Note that this pot holder is the only one with a hanging loop. I've done loops before, but this one gave me a really hard time. You might notice a bit of angry quilting making sure it was well secured. I have never hung my pot holders anyway so I skipped the loop for all the rest.
This one demonstrates radiating lines from a single focal point. I used painters tape to mark each line one at at time so they were evenly spaced and stayed nice and straight.


Some of these look better from the back than the front. This is one of them.
Here's a closer look at the quilting.
This one is quilted with wavy lines. They are hard to see on the front.
It was easy to be inspired by this backing fabric. At first, I thought I would try to follow the lines in the fabric but decided it would be easier to quilt down the middle of some of the stripes.
Here is a closer look at the quilting.
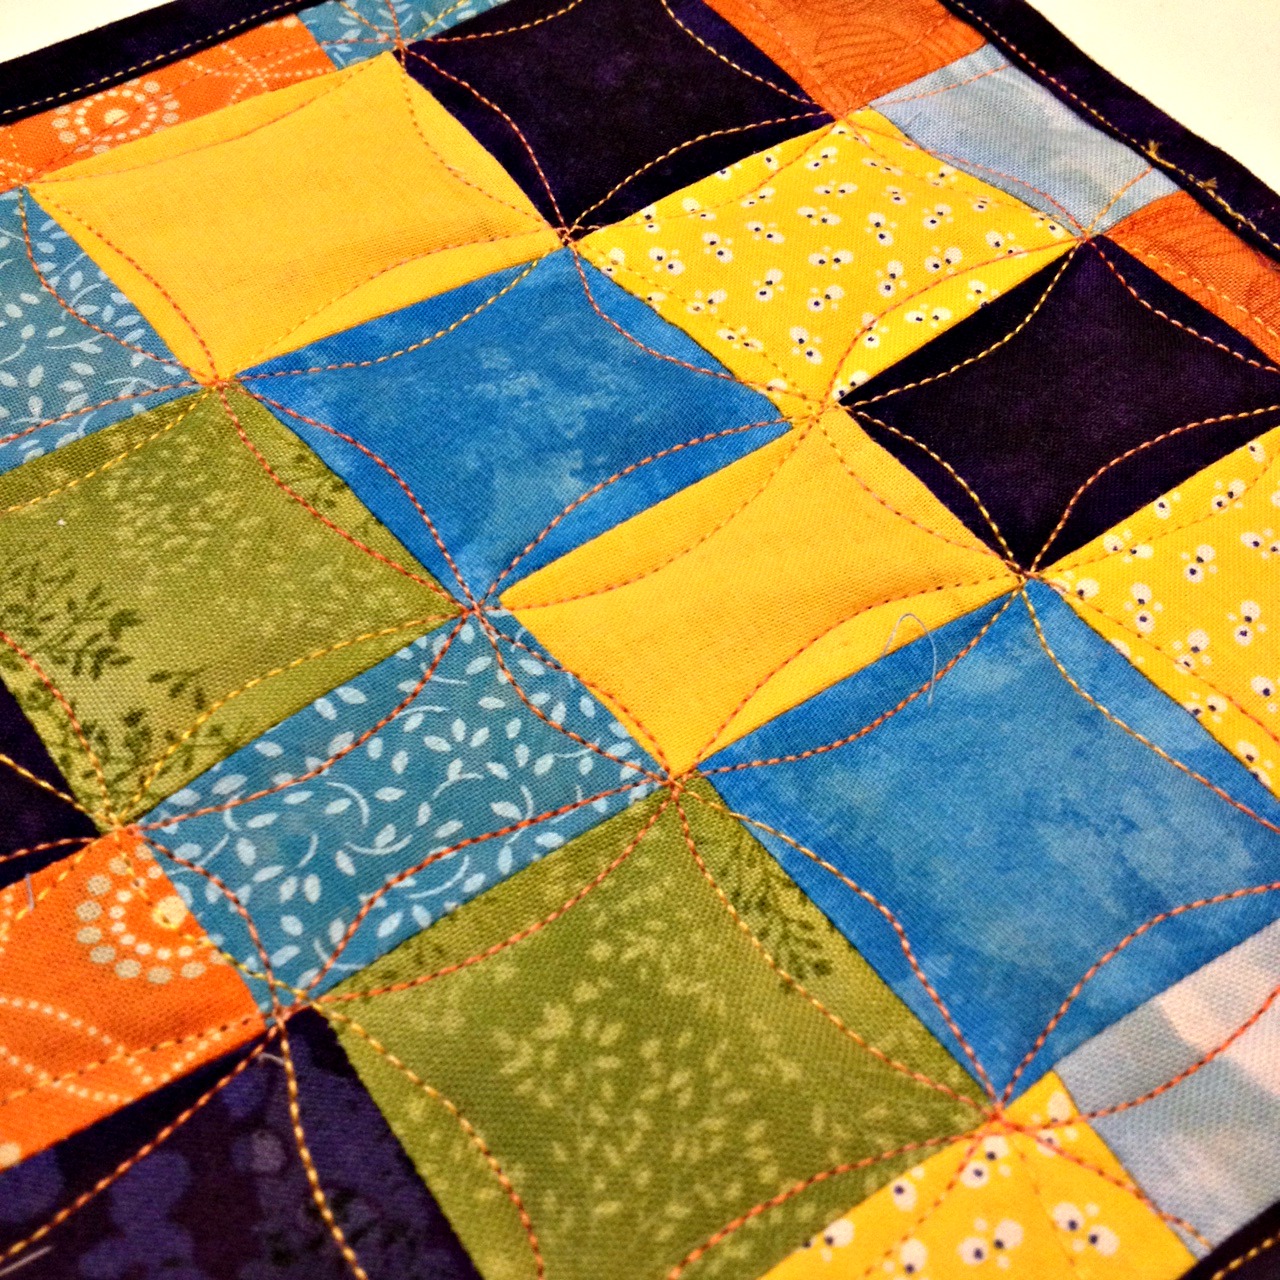
These were some orphan strips that I stitched together to make a square. They were never intended to be perfect rows with matching points. I wasn't sure this orange peel style of quilting would work with their wonkiness but I gave it a try anyway. I like the result.
Here is the back. Owls!
Here is a better look at the quilting.
I think this one might be my favorite. It is quilted with a spiral. And I may be just a bit taken with that Amy Butler fabric.

The spiral shows up better on the back.
Here's a closer look at the quilting from the front.
This is all of them from the back.
And one more time from the front. I had the best time making these. I used up some orphan blocks, practiced some quilting skills, and now have a bright, colorful set of pot holders to cheer up my kitchen.

Linking up with Design Wall Monday at Patchwork Times and Monday Making at Love Laugh Quilt. Also linking up with Sew Darn Crafty at Sew Many Ways and Fabric Tuesday at Quilt Story.

Friday, November 27, 2015

Cross Stitched Christmas Tree


Recently, I had some major surgery that I thought was going to keep me away from my sewing machine for weeks. As you can imagine, I was not very happy about that prospect. I am not very good at doing nothing so I prepared in advance with some small hand sewing projects like this pretty cross stitch Christmas tree. The good news is that I am recovering far faster than I ever imagined. Four days post surgery I was in the sewing room happy as could be. There won't be any large quilt projects going on too soon, but there are plenty of small ones to keep me entertained.


I started this little project while I was still in the hospital and I was excited to finish it up this week, just in time for holiday decorating to begin.


The pattern came from Pinterest. It was relaxing and easy to make.


This frame had a generic picture in it so it was ready to be re-purposed and works just fine for framing up this little project. Here is to the start of holiday decorating!

Other posts with cross stitch:
Mom's Cross Stitch
Two Projects Finished Just in Time

Thursday, November 26, 2015

Perfect Gift Ideas for Quilters - Basic Supply Needs

This post contains affiliate links.

Sometimes, shopping for a quilter can be a challenge. Generally, we all have tastes and preferences for fabric which can make it hard for non-quilters, and other quilters for that matter, to know what to give as a gift. I have long been a fan of Craftsy for classes, but have only recently started becoming familiar with their large assortment of supplies.

For us quilters, there are some basic supplies that we always need. It's sort of like tires for the car. They are necessary, but not necessarily fun to purchase. Not as much fun as shopping for fabric anyway!

I did a little browsing earlier this week and made a list of supplies that almost any quilter would be happy to receive. If you think your special quilter (or you!) would like to purchase any of these, all you need to do is click on the picture and it will take you straight to that product.


Aurifil Best Selection Box 


Thread - I cannot say enough good things about Aurifil thread. While thread can be a very specific thing, all quilters need a good assortment of neutral colors and Aurifil's 50 weight cotton thread is the perfect choice. This assortment would be better than a box of candy for any quilter. And Craftsy's prices for Aurifil thread are the best I have seen, even when they aren't on sale.

Schmetz Sharp/ Microtex Machine Needles 5ct


Machine Needles - A good quilter will change their machine needle after every project. A fresh, sharp needle can make a big difference in stitch quality. I generally use more of the 80/12 and 90/14 size and love the Schmetz Sharps.


Clover Patchwork Glass Head Pins


Glass Head Pins - These pins are the best for quilting. They are fine so as not to cause distortion or bulk and stay very sharp. This is another supply that it is good to have extras. Because these pins are fine, they can bend easily causing the supply to dwindle over time.

Dritz Purple Ergonomic Seam Ripper 


Seam Ripper - This is one of those supplies that likes to disappear mysteriously from the sewing room, which means that multiples are a very good thing. I prefer a seam ripper with a good handle. Some have very wimpy handles that are hard to hold in any steady manner. These have a solid handle that is easy to hold and don't tire your hand as much if you happen to have a lot of stitches to pick out (which I hope you never do!)


Clover Water Soluble Marker


Clover Water Soluble Pen - I use these pens all the time for marking free motion designs or other important points on my quilts. The marks disappear when sprayed with water. I have never had an issue with the marks not coming out. It is very frustrating to be in the middle of marking a project and have one of these run out. Extras are a very good thing.

Clover Chaco Liner Pen Style Chalk


Chalk Marker - I don't have a lot of experience with these but after watching Lori Kennedy use these in her Divide & Conquer free motion quilting class, I decided to add them to my collection of must have supplies. Light colors are for dark fabric; dark colors for light fabric. It is good to have an assortment.

Clover Hera Tool for Marking


Hera marker - This tool is great for marking your quilt when you really don't want to use either chalk or a water soluble pen. Really, a quilter only needs one of these but they are relatively small and easily lost in a busy sewing room, so it would be good to have a back up on hand.

Other supplies that are great basics for a quilter are cutting mats, rulers, and batting. These are supplies that most quilters are a little more particular about but if you have that intimate quilting relationship, these would be great options, too.

There are a couple of other extra special things coming from Craftsy that I would like to share with you as well...

http://www.shareasale.com/m-pr.cfm?merchantID=29190&userID=1182760&productID=603079969

http://www.shareasale.com/r.cfm?B=797328&U=1182760&M=29190&urllink=

Here is wishing you a calm and peaceful holiday season. Isn't it great that we can enjoy doing much of our shopping from the comfort of our home? I love not having to fight the crowds.

Wednesday, November 25, 2015

Be Grateful - A Favorite Quilt


This quilt hangs in our dining room turned office. I can see it easily from the kitchen. It is intended to be a seasonal quilt, but it has managed to hold its place year round for a few years now. I'm okay with that as the message is for all seasons. Here in the United States, it is Thanksgiving eve and I can just feel the buzz of activity all over the nation as holiday preparations are under way.

I have much to be thankful for and love pausing and reflecting on all that entails. You are one of the things I am thankful for. Thank you for reading and commenting and for teaching me something new each and every time I am here. I hope you have much to be thankful for as well.

Happy Thanksgiving, America!

Monday, November 23, 2015

Kaffe Fasset Mini Quilt: A Quilt Swap


I've never participated in a quilt swap before but one of the quilt shops I keep up with, Intown Quilters in Decatur, GA, is hosting a Kaffe Fassett mini quilt challenge and swap. This is all in conjunction with Kaffe's upcoming birthday and it sounded like great fun.

I knew right away that I wanted to make some sort of wild raw edge applique flower.


Then I was gifted with these lovely flowers and my color inspiration was found.


The final dimensions for the quilt have to be somewhere between 12 inches x 12 inches and 24 inches x 24 inches. I taped together four pieces of standard card stock and settled on something around the 18 inch mark. The flower was quickly sketched and I started wondering if it was going to look like a flower or some sort of single celled microscopic thing but moved forward anyway.


It can get a little messy in the sewing room when you are looking for just the right combination of fabric for a project.


This set ended up as the winning combination. I probably took seven or eight different pictures of what I thought was the "final" set, then would walk away for a while and come back to make one adjustment or another.


I did not have a big enough piece of anything Kaffe for a suitable background so I constructed one from a couple of different prints. That center square will be fully covered up by the flower so it really did not matter what went there.


To cut out each layer of the flower, I simply lay the cut out cardstock template on top of the fabric, pinned it down, and cut it out with scissors. It did not have to be perfect so it was a quick and easy way to get it done. This is after the first layer was complete and the template was cut down to the next layer.


After two layers.


Three layers.


Four layers.


Five layers.


Six layers. And I decided I really did not like that center. That is easy enough to fix.


Much better with just five layers. I'm glad I fussy cut that center. This is all laid out as a dry run. Nothing has been stitched at this point.


To hold each layer of fabric in place for stitching, I lightly sprayed the back of each layer with some 505 temporary adhesive spray. It worked great and avoided the stiffness that using fusible webbing can sometimes create. I worked from the outside in and stitched approximately one half inch from the edge. Again, this did not have to be perfect. I was a little nervous about those center layers since they would be stitched through so many layers of fabric (five layers of fabric, batting, and backing for the center) but it stitched very easily.


The only quilting is some free motion leaves at each corner and a few curls to add some interest. I got a little over confident and went straight to stitching with an olive thread and a completely inappropriate leaf design. So after five minutes of stitching and an hour of unstitching, I did a little bit of drawing and switched over to a lime green thread before starting again. Much better.


I used scraps from the flower layers for the binding.


I think the colors are pretty true to their inspiration. All of the pictures up to this point are before washing and drying the quilt.


Here is how it looks after washing. Just the results I was hoping for!


If I have any regrets about this project, it is that I did not try harder on the back. I just went with whatever I had that would not require piecing. It is still pretty, just not a great complement to the front.


I made this label for it, which I will print and hand stitch to the back before sending it off to the shop. It is nice they are allowing out of towners to participate. I won't receive a mini quilt back until after the first of the year. The shop will be displaying all of them throughout December. Maybe I will be able to make a special trip to see the display. The shop is about an hour and a half from home.


Here it is on the back deck, out in the bright sunshine. Fall has set in solidly here in Georgia, so the bright colors really stand out among all the brown, gold, and green of fall.

Thanks, Intown Quilters, for giving me a reason to play with my Kaffe stash. I hope the recipient of this little quilt loves it as much as I do.

Other posts about mini-quilts:
Faith, Family, and Friends
Scrappy Blue Kaffe Quilt 
Shadow Blocks Mini: A Finished Quilt 

Linking up with Design Wall Monday at Patchwork Times and Monday Making at Love Laugh Quilt. Also linking up with Design Board Monday at Bits 'n Bobs and Work In Progress Wednesday at Freshly Pieced. More link ups... Whoop Whoop at Confessions of a Fabric Addict, Finish It Up Friday at Crazy Mom Quilts, and Let's Bee Social at Sew Fresh Quilts.
Related Posts Plugin for WordPress, Blogger...