Friday, September 30, 2011

Sewing Room Face Lift

It all started with a phone call from someone I had only met a few times. She is a fellow quilting professional and just happened to think of me. I love this industry. We all do what we can to take care of each other. She says, "We're getting ready to move and I have a cutting table and some storage cubbies I'm not taking with me. Would you like to take a look at them?"

Duane (my handy husband) and I went to her home to have a look. I was overwhelmed. I wish I had taken pictures of her basement studio. It was, for the most part, packed up, but it was a fabulous space. And she didn't mean just a few cubbies. She meant over 70 cubbies. I was in organization heaven. The cutting table was 4 feet by 8 feet, which is huge! And she was giving me all of this free. It's probably as close to winning the lottery as I'll ever get. It was much more than I expected so we headed back home to get our trailer, some tools, and a teenager to help. After deconstruction and reconstruction, we have finished the first phase of this project.

Here's my sewing room before the new additions. The chair on the right is pulled up to my cutting table.


Pay no attention to the ugly sofa. It's the dog sofa and the only piece of furniture the dog can lay on.


Here's the room after.


Much neater and more organized. Here's a closer look at the table. It was too big for the room so Duane cut it down to 4 feet x 6 feet. It is fabulous.

That is an 18"x24" cutting mat, to help you get the perspective of how big this table really is. The first thing I did was put a skirt on it. The two sides that can be seen as you enter the room are covered in a dark blue fabric. Here's why:

Look at all that storage! My son told me it looked like a whole basement was under there. All of my overstuffed plastic bins fit under there perfectly and all of the supplies I like to keep close by are right beside me in the white cubes.

Remember, there were over 70 cubbies. Duane reconstructed, reinforced, and painted nine of them. He will be building two more identical units to go with this one.

I love being able to see everything in the open cubes. The glass jars on top hold all of the scraps I have been cutting. Each jar holds a different size square or rectangle. It's been fun watching them fill. There is definitely a scrap quilt in my future.

This was a totally unplanned and unexpected project. I have always appreciated having a dedicated sewing space, and these latest improvements just enhance the joy that sewing and quilting bring me.

Friday, September 23, 2011

Photo Shoot

You just never know what is going to happen next at Dragonfly Quilt Shop. One evening this week, photojournalism student Kimberly Parks spent some time taking pictures of me at the shop. She is a good friend of my daughter and needed subject matter for an environmental photo assignment. I didn't understand exactly what that meant but learned that she needed a photo of a professional person doing what they do best.

I hate, hate, hate having my picture taken, but I know this is something I just need to get over and hey, I'll do just about anything to help advance the education and career of an up and coming photojournalist. And I also keep getting asked to make YouTube videos for stuff at the shop so there's another reason to just do it. Yep, it won't be long before you can see me in awkward poses not only in still photos but videos, too! Life just keeps getting better.


One reason Kimberly wanted to use me for her subject is that she had a new flash for her camera that she was not familiar with and thought it best to fumble around with someone she sort of knew rather than with a total stranger. Let me just say that she caught on to that flash pretty quickly. I was impressed.

After walking around the shop a bit and talking to me about what I do, she decided to set me up at the cutting table. My only job was to act like I was cutting fabric and look directly into the camera.

She proceeded to take pictures from all positions and angles while trying the flash at all different angles and exposures. I just stood there and looked into the camera. We had to reposition a few things to get the shot the way she liked it, too. And I just stood there. Modeling is definitely not in my future. I know you were all wondering about that.

After we finished with her assignment, she offered to take some head shots of me so, you know, when I become famous, they'll be right there ready for publication. Here are the final results:


Thank you, Kimberly, for taking great photos and pushing this camera shy girl into the spotlight for a bit.

Friday, September 16, 2011

Kanzashi Challenge Results

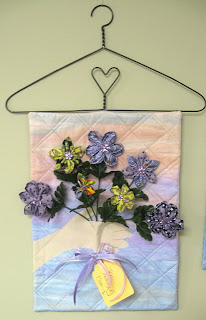
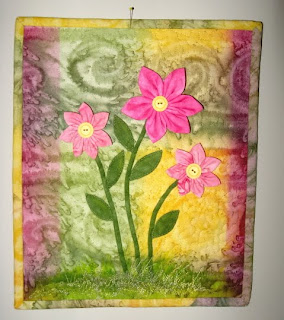
The Kanzashi Flower Challenge projects are on display at the shop throughout the month of September. I love the variety of projects that were completed. It is always inspiring to see the many interpretations of a single idea.

Fay Rawls made this cute necklace...


...and this bouquet of flowers.


Pat Schroder made these darling teddy bears. Apparently, they've been rolling in the flowers. She called her creation "Evolution of a Honey Bear".


Shirley Bryant made a beautiful floral piece. Shirley has an excellent eye for color.


Holley Downs made two projects for the challenge. The first is "I love ewe". This was the first project turned in for the challenge and when I saw it, I knew this was going to be a fun challenge.


Holley's second project is a conversation quilt. And she was right; we had a great time standing around the cutting table talking about the various elements in her quilt. I love the paint stick and clothes pin hanger.


And here's my finished pillow.


So, of course my mind is spinning with what we should do for the next shop challenge. Ideas welcome!

Monday, September 12, 2011

Sample Sewing for the Shop

The hint of changing seasons always reminds me that it is time to make other changes, too. I've been sewing away on some new samples for the shop. The first two went up last week with many more to follow.

This pattern is a good one for a fast project to show off a beautiful fabric. It's a good size for a baby quilt, too. One lesson I learned on this one is to wait until after the border is pieced to cut the center square. My center square was smaller than my border so I added a skinny border to make it the right size. This was one of those happy mistakes since this quilt would be really bland without the splash of color the skinny border brings. I'll also bind this one with the darker color. I just love how the pink, brown, and gold work together in this quilt.

This table runner is one of my favorite go to patterns when I want to show off new fabric in the shop. It's fast and its classy. The pattern is Mirror Image by Pieced Tree Patterns. We've probably used this one four or five times in the shop. This time it is showing off fabric from Nancy Halvorsen's newest fabric collection, Bittersweet.


I just finished this one this morning. It is an Atkinson Designs pattern called Happy Holidays. The pattern has instructions for three sizes so it can be a table topper or Christmas tree skirt. This is the smallest size. I was going for a subtle holiday look. The trick to success for this project is accurate 1/4" seams. Those 60 degree triangles become uncooperative in a hurry if your seam allowance is too big or too small.


I made these placemats over the weekend. They work best on a round table. This was a fun project. Rather than choose just one fabric layout for all four placemats, I used each fabric in a different place each time. This was a good study on how the same fabric and the same pattern can yield some very different results.

There are three more projects waiting for me on the sewing table. I'm excited to get the shop all freshened up for fall!
Related Posts Plugin for WordPress, Blogger...