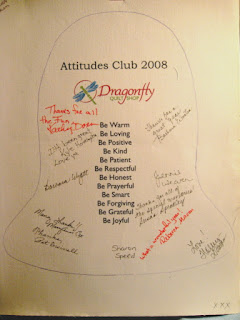
I was looking through some of my books last weekend, trying to find lettering for another project, when I came across this:
In 2008, I hosted a year long club based on Nancy Halvorsen's Be Attitudes book. We had a great time in this club, making projects from the book and making other projects, too. I wanted the group to have a memory of our year together so I printed the club name, the shop name, and all of our attitudes onto Printed Treasures fabric sheets. Then we all passed them around and signed each others. All of these ladies were so kind and supportive of me and the club. Two of them have since passed away and a few others have moved to other parts of the country. I really loved the time we spent together and can't believe I tucked this away and forgot about it.
So, naturally, a Nancy Halvorsen memory should be made from Nancy Halvosen fabric, right? I dug into my scraps and found plenty to play with.
I stuck with traditional red, green, and gold and also found a batting scrap that was a tad bigger than the printed bell. I used a sew and flip method, using the batting as my foundation. First, put two strips of fabric right side together, covering the bottom of the batting. I wanted a wonky look, so I didn't care if the strips lined up perfectly.
I sewed a quarter inch from the top edge all the way across the strip. Then I flipped the top strip up and pressed.
The next strip is placed right side down on top of the red one, then sew, flip, and press. Work your way up the entire piece of batting.
Next, lay the bell template (or whatever shape you desire) on top of the sewn strips, pin, and cut. The bell template that I used can be found here (the large size is for the door hanger and there is a smaller one that can be used for a bell ornament). Cut out your printed sheet and lay it face down on top of the strip set. If you want to add a hanger, now is good time to do it. I used ribbon, and just tucked it in so it would be sewn into the seam. You can see it peeking out of the top and you can also see where I backstitched to make it good and strong.
Sew around the outer edge, leaving an opening for turning. If you are working with a curved shape, be sure to clip the curves so they will lay nice and smooth when it is turned right side out.
I try to leave the opening along a straight edge when I can.
Turn it right side out. I use a bamboo skewer with a relatively blunt point to push out the edges so they will be nice and crisp.
I tucked another piece of ribbon with some jingle bells on it into the seam when I sewed it shut. You can hand sew it closed or machine sew a line close to the edge to close the opening.
Now, I can enjoy this memory year after year. This is a great idea for you, too. It doesn't have to be something printed on the computer, but could just be a piece of muslin that everyone signs. Wouldn't it be great to do this at large family gatherings and see how the hand writing changes over the years for the growing children in the family? So fun to look back in time. And, you can use any shape or size. Our club ended in December, so a Christmas bell was fitting for this special group. This was a fun project that was made extra special by giving me the opportunity to reflect on good times and good people.


This brought back some truly wonderful memories of good times and good friends! I learned so much from you and other Quilters. I love the idea of having family sign a bell and then displaying it every year at Christmas. Love Nancy Halversen, too! Thanks for the wonderful memories!
ReplyDeleteWhat a wonderful idea and a great way to use the printed sheet. And such a good idea to have created that in the first place, for this great future use!
ReplyDelete