There are lots of great sources for fonts and letters, but often, the answer is even easier than that. For the sewing machine cover I recently made,
And it's okay to go so big that only one letter fits on a page. They are going to be cut apart anyway. Now, it's time to play. You can cut the letters apart and pin or lay them on your project. Once you're happy with the size of the letters, then it's time to transfer them to your fabric.
What if you want something a little fancier than the fonts available on your word processor? Then it's time to go exploring. My favorite site for fonts is dafont.com. It offers a huge selection of fonts and most of them are free. I also like that it tells you what you are allowed to do with the font once it is downloaded. Most of them are free for personal use, which is perfect for anything you are making for yourself or as a gift. If you are making something that might later be sold or developed into a commercial pattern, make sure that the font is free for commercial use. I am a strong believer in respecting the copyright of all creative things, including fonts.
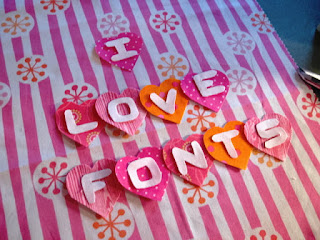
Can you tell I have Valentine's Day on the brain? Plenty of love for all, even fonts.
Once the font is selected and the size is chosen, it's time to put it on fabric.
To do this, you need two-sided fusible webbing. There are many different brands out there, some good, some not so good. Your local quilt shop can help you make a good choice. In my experience, whatever product you use to learn this technique, it is the one that becomes a favorite. My favorite product is Steam-A-Seam 2. It comes in two weights, and while both work just fine for this application, I prefer the Light version. It comes in packages and by the yard from a roll.
Because the fusible goes on the back of the fabric, the letters must be traced in reverse. To do that, turn the printed page of letters over and use a sharpie to trace the letters. This makes them easier to see when they are traced onto the fusible web. I only traced around one of the letter Os because I can reuse the first one as I'm tracing.
Next, decide which side of the fusible web to write on. To do this, pull apart a corner of your fusible. One paper will pull away clean and one will pull away with sticky stuff on it. Don't pull the paper all the way off yet. This is just a way to figure out which side to write on. Write on the paper that has the sticky stuff.
Now, trace your letters. I use a mechanical pencil for this. The lead is fine and it's easy to correct any mistakes. The letters can be traced close together. They don't have to be spaced as they will be on your project.
Once everything is traced, pull the papers apart. The blank page should pull away clean and can be thrown away. Place the sticky part on the wrong side of your fabric and press it according to the manufacturers instructions for your product.
Since this is a two layered font, I also need to trace, fuse, and cut out hearts.
Before committing to ironing everything down on your project, it's a good idea to do a dry run. In this example I left the paper on the back of each piece, but if I had lots of little pieces, I would pull the paper off and position it on the background. It isn't going to permanently stick until it is ironed.
Once it all looks good, press it down, again following the instructions that come with your fusible product.
At this point, there are several options for finishing. Some of that decision depends on how the finished product will be used. Here are some choices:
- Stitch around all the edges using a zig-zag, blanket, or other decorative stitch. This choice will keep your raw edges from getting ragged, especially if the project will be washed regularly
- Straight stitch just inside the raw edge of each fused piece. This option will hold everything in place for projects that will be washed but may result in the edges getting a little ragged over time. Sometimes that is the desired result.
- Let the quilting serve as the stitches to anchor the pieces. If the pieces are going to be quilted over anyway, this can be enough to secure the letters
- Do not add any stitching. This works for projects that are decorative and won't be handled or washed.
This project is going to become a decorative pillow in my studio so no additional stitching will be added to the fused pieces. Of course, the two-sided fusible web can be used for anything you want to raw edge applique on a project. Just keep in mind...if your project needs to say something, put a letter on it!


Love using letters on my projects ... Especially the appliqué part of it! I would really like to borrow your font child to find me some of the cute fonts that she finds for you? :-)
ReplyDelete