Showing posts with label Christmas. Show all posts

Friday, December 25, 2015

Merry Christmas


My mother-in-law collects nativity scenes. We usually visit her on Christmas afternoon with as much of the family as can be there. There is always a sign on the refrigerator: There are 26 (I think that is how many there were last year) nativity scenes around the house. Can you find them all?

At which point all the kids and some of the adults start to scramble to see who can find them all first. It is lots of fun and a good distraction while we wait for Christmas dinner to be served.


These are the nativities on display at my house this year.


My favorite version of the Christmas story is the one told by Linus on the Charlie Brown Christmas show. Linus’ King James version scripture reading from Luke 2: 8-14, read:

And there were in the same country shepherds abiding in the field, keeping watch over their flock by night. And, lo, the angel of the Lord came upon them, and the glory of the Lord shone round about them: and they were sore afraid. And the angel said unto them, Fear not: for, behold, I bring you good tidings of great joy, which shall be to all people. For unto you is born this day in the city of David a Saviour, which is Christ the Lord. And this [shall be] a sign unto you; Ye shall find the babe wrapped in swaddling clothes, lying in a manger. And suddenly there was with the angel a multitude of the heavenly host praising God, and saying, Glory to God in the highest, and on earth peace, good will toward men.
That’s what Christmas is all about, Charlie Brown.


Merry Christmas.

Wednesday, December 23, 2015

Handmade Holidays All Around The House


Handmade decorations will always be my favorite, especially when I know the maker. Here is a little tour of the handmade decorations around my home.


This is probably our oldest handmade decoration. It is my husband's stocking that he made when he was a little boy.


This tree. My mom made this when ceramics were all the rage. This was always my favorite part of decorating when growing up. Plugging this tree in and adding all the lights was when the Christmas season officially started.


I love the simplicity of this cross stitch. This is one of the first handmade Christmas decorations that I made as an adult.


When these Christmas stockings were first made, we were a family of four. The kids helped design their stockings. The additional two were made just in time for their first Christmas.


These Santas are an adaptation from a Nancy Halvorsen pattern. I love the international twist. This was a shop sample. We all selected the fabric, I cut and fused the pieces; Ruhanna hand blanket stitched them all, then passed it back to me for finishing. It is intended to go on a mantel but I drape it over the window in our kitchen.


This snowman table runner is on the coffee table in our living room. It is usually covered with stuff, like remotes and game controllers and such.


This wall hanging is another Nancy Halvorsen project. We start December 1st and add a new piece each day. This was way fun when the kids were younger and excited to count down the days. These days, we find ourselves adding two or three at a time because we forget to do it each day.


This little bag hangs close to the wall hanging and holds all the parts while they wait to be added.


The candles hang by the front door.


This bell hangs on the front door. Here is a tutorial for this project.


Nancy Halvorsen was quite popular when my shop was open. I have lots of projects from her books and fabrics. This card holder is one of my favorite projects.


Another countdown decoration. We keep up with this one fairly well. It is in a spot that gets walked by often.


This special gift was given to me by my friend Holley.  She has many talents and always comes up with special handmade gifts.


Here is another decoration made by Holley. It is a photo album and each page is made with a special paper. There are little tags between the pages to write information about the photos. 


This is one of my scrappy projects. Every holiday needs a set of coasters and a pot holder.


This fun pillow sits in front of our fireplace, when there is not a fire going of course.


This medallion quilt hangs in our dining room turned office. While it is Christmas colors, I forgot to take it down last year so it hung all year round.


Another friend, Judy, made the Santa, and my youngest son decorated the reindeer.


These hang in my entryway. They are all fused down, but never stitched. I'm safe as long as I don't wash them.


These nativity pillows sit under my grandmother's treadle sewing machine.


This quilt and pillow keep us warm and comfy all through the holidays. I see the dog had to get in on the action in the upper right corner.


This is the quilt I made for the Moda Bake Shop earlier this year. The stairway needed something and this quilt works perfectly.


This twisted wreath is the latest addition to the handmade goodness all around the house.

Wow, I did not realize how much handmade there was around my house. I am sure that this collection will continue to grow over the years. Are any of your holiday decorations handmade?

Thank you for being here with me this year. This may be my last post until the new year. I might try to sneak in one more but I may find myself enjoying time with my family. As the kids have grown, we are not often all together anymore. Everyone will be home for Christmas and I want to enjoy every moment of that time. I wish you all peace and joy as the year comes to a close. 

We will have lots of fun quilting together in the new year.

Friday, December 11, 2015

Star Christmas Tree Topper


Our Christmas tree has been without a real tree topper for several years. We always say we will get one but somehow never have the time or just don't see anything that we like. This year I was determined to have something on the top of the tree.


I decided to go for a simple star since we had an old topper that could serve as the base. I had all these small pieces of gold from an old fabric sample folder. Some are metallic; some are not. They looked like a good possibility for a scrappy, strip pieced star.

Each sample was about 6 inches square. I cut them into 1 1/2 inch strips and made three strip sets, which were then sewn together so the fabrics lined up into one long strip. The paper template was to see if the strip set was wide enough.

Here is the star that determined the template. It is a tree topper itself and is made of a dark metal. Its holder is too short and wide to actually stay in place on the top of a tree and since the star is hollow, the whole thing gets lost. A piece of PVC pipe was hot glued to the base to make it more sturdy.


It sits on the top nice enough now. It just needs to be dressed up a bit.


There were several forms of fusible interfacing used in this project, mostly because they are all stored in the same bin together. As soon as I found one that I thought would work, I'd give it a try. I know there is Steam A Seam 2 and Decor Bond in this project. They make it so easy to finish a project fast. The only sewing is the strip set that forms the star. Here the star is traced and ready to cut.


Now things are looking better. Once the gold star was cut out it was a little bit too small and needed something to make it stand out. Placing it on a black background made it look a lot better. I even fused the fabric to the PVC pipe. That was some tricky pressing. See those white interfacing edges showing? A touch of black Sharpie around the edges took care of that. It sort of looks like a magic wand laying on the table.


Each star was hot glued to the original metal star. I can't say this will be a forever tree topper but it looks better than no tree topper at all.


While I was making the star, this tree topper appeared. It would have been fine with me if this one stayed, even though it might have startled me in the middle of the night.

Here it is when it first went on the tree. I decided the star was just a little far from the rest of the tree so we gave it a little trim.

I like this proportion much better. This year, our little tree has lights, ornaments, AND a star on top. I love sitting by the tree in the quiet of the morning. There are lots of stories in those ornaments.

Friday, November 27, 2015

Cross Stitched Christmas Tree


Recently, I had some major surgery that I thought was going to keep me away from my sewing machine for weeks. As you can imagine, I was not very happy about that prospect. I am not very good at doing nothing so I prepared in advance with some small hand sewing projects like this pretty cross stitch Christmas tree. The good news is that I am recovering far faster than I ever imagined. Four days post surgery I was in the sewing room happy as could be. There won't be any large quilt projects going on too soon, but there are plenty of small ones to keep me entertained.


I started this little project while I was still in the hospital and I was excited to finish it up this week, just in time for holiday decorating to begin.


The pattern came from Pinterest. It was relaxing and easy to make.


This frame had a generic picture in it so it was ready to be re-purposed and works just fine for framing up this little project. Here is to the start of holiday decorating!

Other posts with cross stitch:
Mom's Cross Stitch
Two Projects Finished Just in Time

Wednesday, November 4, 2015

A Christmas Quilt - What I Learned in Craftsy's Divide and Conquer Class

This post contains affiliate links.


This is what happens when you get into the Craftsy class you are taking. I finished all the lessons for Lori Kennedy's Divide and Conquer free motion quilting class and could not wait to make my first project to practice all that I had learned.

Divide & Conquer: Creative Quilting for Any Space

It's a great class and clicking on the class icon will take you to all the information for it. This class helped me in a lot of ways, but specifically, it helped me with designing the quilting for any given project.


The first step is to plan. I'm not good at this step. I tend to want to just dive right in and hope for the best. But this time I thought it through. One of the things I learned (again) is that for the quilting to really stand out, the fabric needs to be solid. So I started with a Moda Bella solid in Porcelain for the main fabric and framed it with some yummy scraps of Christmas fabric from my stash.


I decided to go for a framed composition and scoured Lori's blog for fitting motifs. The class offers lots and lots of motifs. I chose the grid pop motif from the class and then added Christmas motifs from Lori's blog for my project. The center motif will be a poinsettia, then grid pop, pretty packages, and snowflakes.


The threads were selected to complement the colors in the border fabric. One mistake I tend to make in projects like this is to overdo with too many motifs or too many different thread colors. I'm trying to be a tiny bit more conservative with that, so deciding which colors to use and where to use them took a bit of time. As the project progressed, I only used two of the threads pictured: the cream Aurifil 50 weight cotton thread and the 30 weight Sulky Blendable in red, gold, and green.

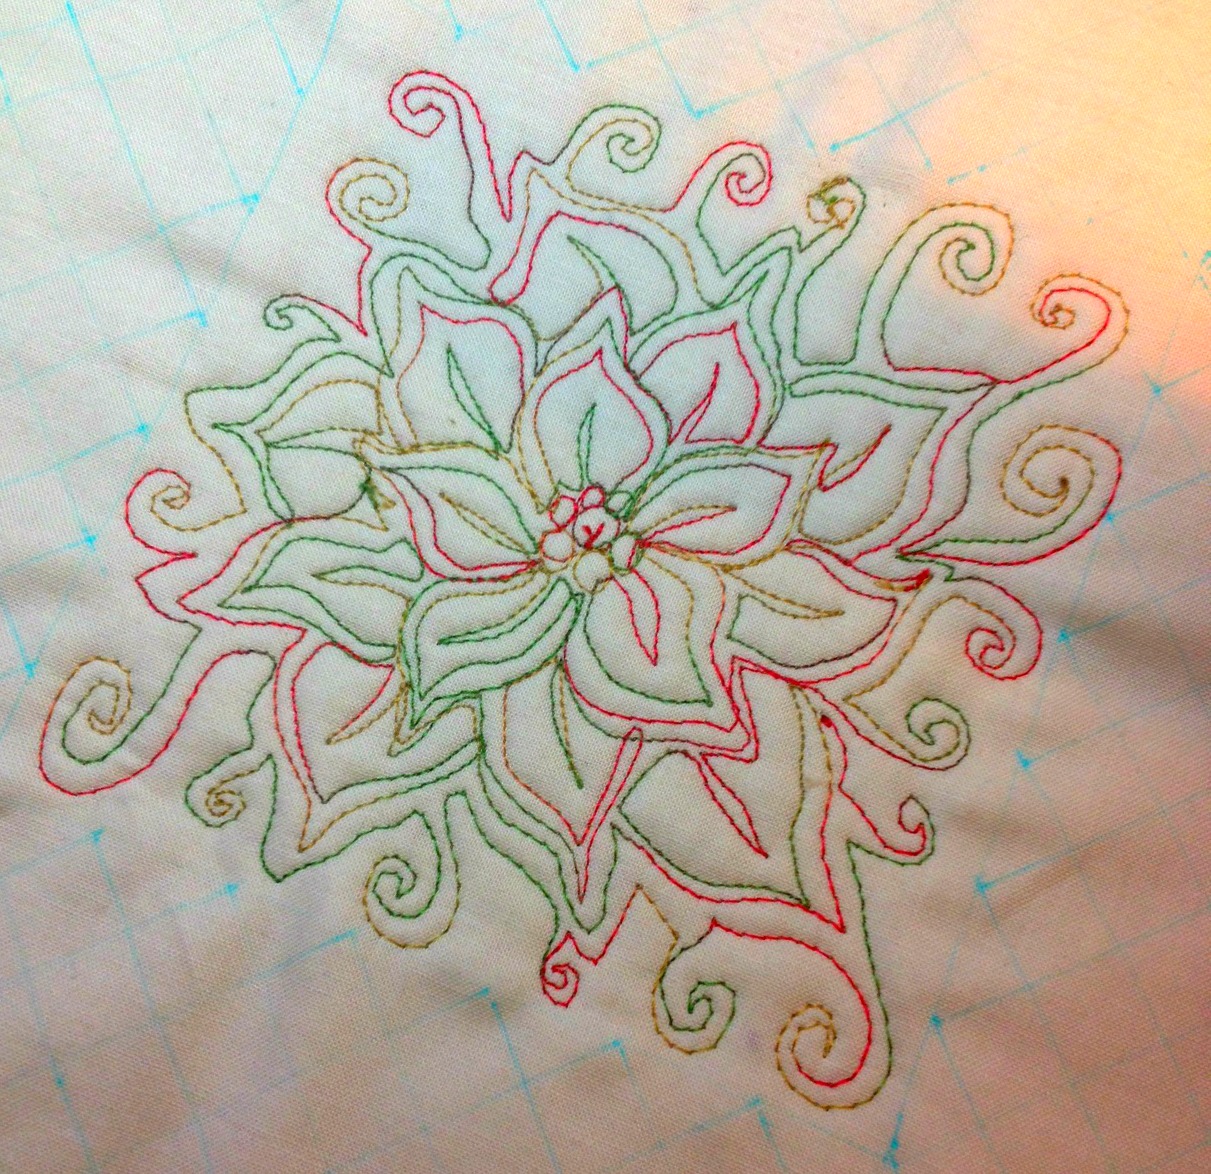
The first motif to quilt was the gorgeous poinsettia in the center. Here is a link to Lori's tutorial for the poinsettia motif.


I doodled it first to get a feel for the motions of sewing it. The hardest part of this motif for me is the curly cues around the outside. I had to go really slowly drawing them so that is a good heads up to slow down when stitching them, too. The poinsettia petals became a little challenging on the third round. I tended to want to make them much bigger when doodling them. I had to erase and try again with that part. The only other adjustment I want to make is with the veins in the petals. I like the pointy tip rather than the squared off tip for those. With my new found doodling knowledge, it was time to try stitching it.


There were a few thread breaking issues, probably because I was going extra slow for some parts. It is far from perfect but very pretty for a first try. I love how this motif turned out. It is so fitting for the holidays.


The second round of the composition is the grid pop. This is the grid. Grid pop is not for the faint of heart. There is a lot of stitching in this motif. It was a bit tedious to stitch, especially at a half inch scale. I used matching thread so that the texture would be the focus. The grid is drawn in blue water soluble pen. Rather than stay perfectly inside the frame, the goal was for each line to extend to the poinsettia to fill the space. That mostly worked.


The texture of grid pop is worth the effort. It frames the poinsettias perfectly.


The third round is Pretty Packages. Here is the link to Pretty Packages. This motif was really easy and fast to stitch.


The last round is snowflakes. I had this pretty icy blue thread selected for the snowflakes. I thought it would look nice with the border fabric. However, it was a wool thread, and after a few attempts at threading my machine needle with it, I gave up. The matching thread works just fine for this motif. Here is the link to Snowflakes.


The border fabric is stitched with a simple free motion wavy line.


I finished it with an envelope back so that it could be used as either a small quilt on a table or wall, or as a pillow cover. This project is going to be a gift so I like that there are choices for how to use it.


Lori Kennedy is a wonderful instructor. Now that I am through the class, I have already gone back several times to look through the Ideas and Inspirations section at the end of each lesson. She shows some really pretty quilts and I plan to use many of her ideas as a starting point for my own quilts.

Divide & Conquer: Creative Quilting for Any Space


I can't wait to share more projects from this class with you.


Linking up with Fabric Tuesday at Quilt Story and Work in Progress Wednesday at Freshly Pieced. Also Finish It Up Friday with Crazy Mom Quilts.

Related Posts Plugin for WordPress, Blogger...