Thursday, February 7, 2013

Faith, Family, and Friends


Recently, I started a quilt that had lots of raw edge fusible applique (see that work in progress here). At first, I thought that the scraps from that project would just go in the trash. They couldn't go back in my regular stash since there was sticky fusible on the back side of each piece. But as the scraps piled up, I decided there must be something I could do with the leftovers. And that's how this project started.


I had seen a sign on Pinterest that said, "Faith Family Friends". I liked the sentiment and the reminder of what is important in life. The project was added to my wish list of new projects for 2013. Using these scraps for this project was the perfect combination of making something new out of something that *almost* went in the trash.

The first step was to decide on a font. My daughter, Erica, helped me with that, since she has a "thing" about fonts and collects copyright free fonts. This font is called "return to sender". Do fonts get named by the same folks that name paint colors? We blew it up to a good size, printed it, and then traced the letters onto two-sided fusible, which, as a reminder, should always be traced in reverse. Not that I forgot that...again...ahem.

Using a water soluble marker, a rectangle was drawn on the background to frame the letters. A second rectangle was drawn two-inches outside the first one. This formed a boundary, or frame, for the scraps.


I used a method often called "snippets". The paper from the fusible is peeled off the back of the fabric scraps and small pieces are cut at random and scattered within the borders of the frame.


I tried to relax and let the pieces fall where they may, but there was some manipulation needed to make them line up around the borders correctly. I did not iron the letters down until after the frame was complete.


Once the frame was filled with fabric, the whole piece went to the ironing board to get it all fused down.

Here's a close up of all those little scraps. It makes it look like a whole new fabric.


To quilt this, I sewed around the letters using a straight stitch with matching thread. Then, with cream thread, I outlined the frame with a quarter-inch inside and outside the frame. For the last quilting step, with a variegated thread, I used a free motion back and forth stitch, covering all of the frame, just to make sure none of those scraps decide to loosen up and escape over time.

When I first showed these to my family, the first comment was, "Don't let anyone see the back!".


Which means that I absolutely have to show you. These are some Martha Negley prints that were in my stash. I knew I wasn't likely to use them in a project, and they do make cute backs...even if they are sideways. Who's gonna know? The back will be up against the wall, so I'm okay with crazy backs...and crazy family members who worry about such things.
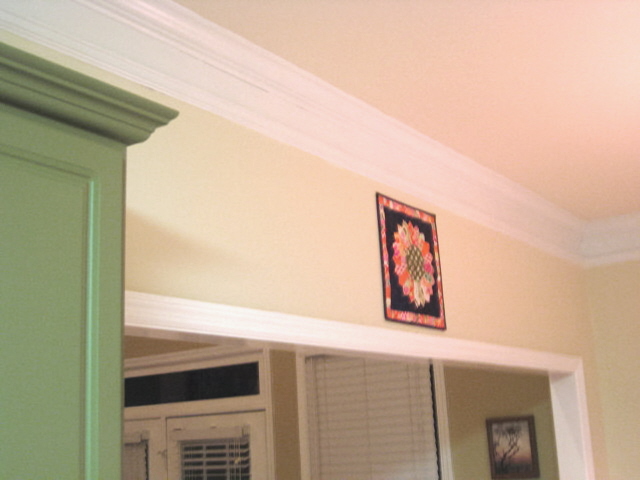

The wall these will go on has always been kind of bare, with just a small project or clock hanging in its center. It was screaming for something more.


And now, this wall makes a great statement. This was such a fun project to make, and I'm happy for another finish for the year.

Monday, February 4, 2013

A Lovely Year of Finishes: February

After posting recently about all of my unfinished projects, I found a great way to make some progress. A couple of blogging gals put together "2013: A Lovely Year of Finishes". It's fun to be part of an encouraging group of folks all focused on the same goal...finishing one project each month. And even better, for each successful finish, there is a chance to win some fabulous prizes. It's a win-win, right?

Here's my project for February. Doesn't it look finished? I made this sample in a hurry when Marti Michell came to the shop to teach this class, way back in 2008 I think. It is pieced; it is layered; the edges are finished, but there's NO quilting. Not a stitch. It never bothered me until I started focusing on improving my quilting. Now it looks so empty, so blank. This is the month it will be finished. And it isn't just going to get a little quilting; it's going to get a lot of quilting.


A big flower in the center of each block, some pebbles all over the header, and something yet to be determined in the bands around each block. I used fusible batting when I put it together, so I'm hoping the layers are smooth and stable enough so that I don't get much shifting and puckering. They even have a cool button that I've added over on the left side of my blog.


Even though I already had a loose plan to make some progress on all those unfinished projects, this is going to be just the thing to make 2013 "A Lovely Year of Finishes".


Friday, February 1, 2013

Quilting Practice - Leaves


Quilting practice continues with an attempt to quilt leaves. The quilting designs are getting more challenging as I go. This one was mostly a challenge of memory motor skills. Some of the leaves would develop with ease while others evolved with many awkward starts and stops as I figured out where I wanted to go.


I enjoyed practicing on this block since there was lots of quilting real estate. I was able to both intentionally and unintentionally play around with the size of my leaves. There isn't a "real" project lined up for this quilting design yet. This one will require a little more practice before fully diving in.
 

Three of the twenty blocks I made last year as part of Craftsy's block of the month class are now quilted. My plan is to bind them separately and hang them as a group. I have a vision of all twenty blocks hanging together to make the appearance of a "quilt" while they remain as twenty separate pieces. The vision and the reality don't always come together, and we'll just have to see how this one evolves.


Paisleys are next on the practice list. They are similar to the leaves except they don't have points. They just *might* be a little easier.

Monday, January 28, 2013

Unfinished Project Inventory

I am a finisher. Really, I am. And yes, I'm being defensive. You'll understand why in just a second. These are my unfinished projects in their bins.


And here they are out of their bins. They aren't all pictured here. There are 37 in all. 37!!! Most of them are unfinished tops that hung in my now closed quilt shop. When the shop was open, there was a constant need to promote new fabric, a new book, or a new pattern. A quilt top was usually enough to get the message across, and that's how this stack accumulated.


I want to finish them, and will finish them, and then will probably put them up for sale in my etsy shop once they are done. On the positive side, there won't be a shortage of projects to use for quilting practice for a long, long time. My thought is that I should go on an every other project plan. Make a new project; finish an older one, though the new projects seem to grab hold of me before I decide on an older one. At least there are lots of styles and options to choose from.


This one was made while I was teaching a class based on Debbie Caffrey's patterns.


This one was made to show off a new Moda fabric group and a new book about quilting with Jelly Rolls.

This cute baby quilt top was appliqued by my friend, Holley, and was made to show off Kaffe Fassett fabric and a new book.

This bold, festive, Christmas quilt, was made to showcase Michael Miller fabrics.

And this was made from batik fabrics from a book full of charm square quilts.

Looking through these quilts is like a walk down memory lane. There are a lot of things I miss about the quilt shop, but I am happy that I can spend my sewing time doing my own thing these days. While my days as a retail shop owner are done, there's still a quilting career in my future somewhere. It's nice to explore and ponder those possibilities. It's a winding path that is bound to eventually lead to another fun adventure. Until then, I'm going to see what I can do to subtract a few from the unfinished inventory.


Friday, January 25, 2013

Work In Progress - Circular Reasoning

After dropping some really big hints, Santa kindly left this pattern in my stocking.

Pattern by Emily Cier of Carolina Patchwork
I am especially drawn to quilts with words and letters and this one definitely caught my eye. I don't purchase many patterns, preferring to do my own thing most of the time, but when I saw this version on Emily's blog, I was hooked.

From the blog of Emily Cier, Carolina Patchwork
This quilt will look fantastic in my office, and is something I will not tire of quickly. Her rainbow example is made with scraps, which I love, but am not willing to invest quite that much time to make. My version will use Kaffe Fassett prints instead. As with most projects, things have to get a little messy in the beginning.


I auditioned just about every Kaffe Fassett print I own and made lots of changes before being happy with my choices. One thing I really liked about Emily's rainbow example is the way the light and dark fabrics are arranged. It give the quilt a dimensional feel.


I mimicked that as best I could, knowing there would likely be more substitutions along the way.


It really makes a difference going from blobs of fabric to the actual letters. I'm liking it so far. The letters are temporarily pinned to the background. I'm not quite ready to commit to fusing them to the background just yet.

There's no rush on this project. I'm sure it will be picked up and put down many times along the way. Once I fuse the letters down, I plan to stitch around each one. I'm not sure if I'll blanket stitch or straight stitch yet. And this one will be fun to quilt, too. It might take a while, but I'll keep you posted as this work in progress continues.

Tuesday, January 22, 2013

Superhero Bags


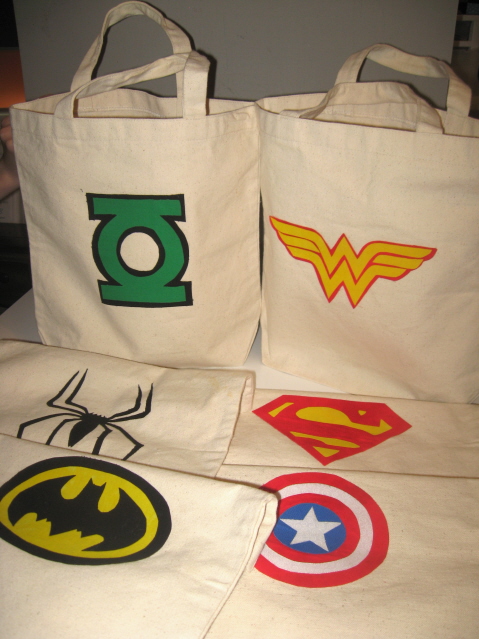
There was a gift giving occassion some time back where we agreed that we all needed to be creative and frugal. Duane had been saying that we needed more reusable grocery totes, so that is what I decided to do for him. Now, in general, grocery bags are not exactly an exciting gift, so I needed to do something to spice them up.


Discussions around our dinner table often involve discussions of upcoming movie releases and there had been much discussion of superheros during this time. Who has the best power, who has the best costume, etc. Duane has always been a Green Lantern fan, so I knew that would have to be in the mix.


The bags are small canvas bags that I picked up on sale at Michaels. For the logos, I simply searched images online until I had all that I needed. These were traced onto two-sided fusible web, then ironed to fabric scraps that were then cut out and ironed onto the bags. There is no stitching around them so we'll see what happens once they are tossed in the wash. Maybe they'll stick, and maybe they won't. It's really not a big deal since they are easy enough to make again.


They were a big hit at home and they are always an item of conversation at the grocery store. The guys that bag groceries think they are the most awesome grocery totes ever. And I have to agree.

Saturday, January 19, 2013

Sewing Machine Cover


Near the end of last year, I really began to notice (and be bothered by) the amount of dust on the top of my sewing machine. I'm fairly good about cleaning out my machine between projects, but I hadn't paid much attention to the top or other areas of the machine that weren't directly involved with sewing.

As I was making a list of projects for this year, I decided it was time to make a sewing machine cover. My sewing machine is one of the most important things in my life and deserves to be treated with extra special care.


There were two guidelines for this project. First, it had to include selvedges, and second, it needed to include some of the new quilting designs that I have been practicing. I sketched out a few ideas to work out the design and figure out measurements, then got busy selecting fabric.


I wanted something fun, bright, and cheery. The main fabric is a Kona solid in coral. My daughter, Erica, chose the background fabric. The main body of the cover is divided into five long, narrow sections. One section is made from selvedges, and the other four will be mostly open space so that it can be filled with quilting.


To add a little pop, three circles that mimic the circles in the selvedges line up right across the front of the cover. It was a little bit of math and a little bit of guessing for where to place these. It all worked out just fine.


At first, I planned to put the numbers 1, 2, and 3 on the circles, but decided that a word would be better than numbers and what better word than "sew" could possibly exist for this project?


The circles and letters are fused to the main fabric, then sewn around using a straight stitch just inside the raw edge. The quilting includes straight lines, pebbles, and swirls.


The construction is completed in exactly the same way as a basic, lined tote, minus the handles. I used a fun owl print for the lining. Most of the time my sewing machine is in mid-project so the top is up and thread is on the spool. The cover sits up higher during those times.


For the times when I am between projects and the top of the machine is closed, I can turn a little cuff up on the bottom of the cover so that it still sits snugly on top of my machine and I can enjoy an extra bonus of owls around the base.


I enjoyed going outside my normal comfort zone, so much so that I'm thinking about putting together a tutorial for this project, or maybe even developing a pattern. For now, I'm just going to enjoy a cleaner sewing machine that calls to me every time I walk by....s-e-w!


Related Posts Plugin for WordPress, Blogger...