Monday, November 28, 2011

New Christmas Coasters

This is the first time I've been home the Saturday after Thanksgiving in several years. To celebrate, we invited a few family and friends over to decorate for the holidays. I made chili and fixings and there was the constant hum of college football in the background. It was a great day that certainly put me in even more of a holiday mood. After everything was out, one of the kids noticed that there were no holiday coasters. I took care of that right away.


I had some bright Michael Miller Christmas prints left over from another quilt top. There were lots of strips and some other scraps. I decided to make some funky strip coasters. I cut 5" squares of batting and backing fabric. There were enough different prints so that each of the eight coasters has a different back.


I then took all of the strips and sewed them together into one long piece. I did not measure them at all and didn't worry about whether they were straight or right side up.


I took my ruler to the strip set at any crazy angle I desired and cut 5" squares. I was able to get seven squares from the strip set. I had to piece the scraps to get the last one. It is shown in the upper right.


To sew them together, I put a batting square on the bottom, a backing square right side up, and a pieced strip square right side down. I sewed around three sides and half of the fourth side. I like to leave a fairly big opening to turn the coasters right side out. I get frustrated easily when things are hard to turn.


Once they were all turned right side out, I stitched once around the outside about an eighth of an inch from the edge to close the opening. After that, I experimented with quilting them. I tried quilting on either side of the strip seams and near just some of the strip seams. In the end, I decided that the extra quilting didn't add anything to the coasters and settled on an extra line of stitching around the outside edges, about a quarter inch from the first one.


This was a fast project that adds fun to our holiday decorations. There are just enough scraps left over for me to make a matching potholder!
Thursday, November 24, 2011

Mom's Cross Stitch

Many years ago, my mom passed along some of her cross stitch pieces to me. She had never framed them and didn't think she would ever invest in finishing them. I pulled them out the other day and decided that now is the time to finish them.


I'm planning a wall hanging that pairs each season with a complementary quilt block.


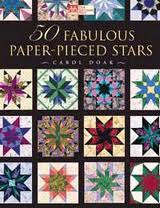
I enjoy paper piecing and haven't done any in a while so I pulled out a Carol Doak book, 50 Fabulous Paper Pieced Stars.

Each cross-stitch block is about 6" x 10". I'll downsize the stars to be six-inch blocks.


I decided that soft batiks would be a nice complement and make pretty stars.

This may become my mom's Christmas gift.

We'll see how much progress I make in the next week or two.

Wednesday, November 23, 2011

BOM Top Finished


I really gain momentum as I get closer to finishing a project. Every step I finish leaves me energized for the next. Here is the finished quilt top for the Block of the Month quilt I've been working on.

One of my concerns was that this quilt was going to be too pink. It is not. The gold in the setting triangles tones down the pink just enough. Next step is to choose a back and send this one off to the quilter.

Tuesday, November 22, 2011

Carry It All Folio Class

The shop was all a buzz last Saturday as a fun group of gals made a Carry It All Folio with Mary Ann Mauney. I love this project and hope to make one for myself soon.


I wish I had taken a picture with all of them open. You can see from the one open on the table that there are some fun fabric options with the pockets on the inside. It is so easy to personalize these by changing up the pocket sizes and by adding embellishments to the outside. If you look closely, there's a beautiful felted wool bird on the outside of the green one second from the left.

I love a class where the students leave with a finished project. Everyone here left with plans to make more. Fun to make and fun to give!

Wednesday, November 16, 2011

BOM Blocks Finished

It's just awesome how a little bit of dedicated sewing time can go such a long way. The last six blocks for next year's block of the month are complete!

My favorite one is the bottom right. Not only do I think it's pretty, but also because it is the last block I made. I had that happy "I can't believe it's the last block" feeling the whole time I was working on it.

I even had time to get the sashing, setting triangles, and borders cut. There are four more blocks to piece that are cornerstones for the border. My goal is to have this hanging in the shop after Thanksgiving. I think I'm going to make it!

Tuesday, November 15, 2011

Another lingering project

A couple of years ago, I came across these fat quarters and knew instantly who should have them.


I especially like the note "Lunch w/ Deb Tues 12:30." I should give that to all of my friends and have lunch dates for life! Okay, back to the project. I mailed the fat quarters to my friend John with a promise to turn them into something wonderful. Several times over the next year or so we talked about what to do with them. Message board? Mouse pad? Laptop case? He was never very excited about any of these. What to do? When all else fails, make a quilt.

I ransacked the stash and found some friends for the fat quarters. Since two fat quarters is all there was for the featured fabric, I went with a disappearing nine-patch. Simple and good for letting a small amount of fabric shine.

Since John's birthday is this week (Happy Birthday, John!), I let him see the work in progress. There are nine blocks and they haven't been sewn together. We decided that it needed a little something more. I'll be adding some black sashing between the blocks and then will figure out something for the borders.

I'm hoping this one will get finished before the end of the year.

Sunday, November 13, 2011

More BOM Progress - Blocks 5, 6, and 7

While a few side projects have slowed me down a bit, I made good progress this weekend on the block of the month sample I'm working on for next year. Here's block 5:


Block five is the only other block that uses templates and it is the most challenging so far. Accurate template cutting is a must and I cut mine in too big a hurry the first time around. Once I had all those flat flying geese units together, the rest went together fairly quickly. Block six and seven were a breeze after the challenge of block five.


Block seven may be my favorite so far. Its simple structure makes the star shine and I like the movement of the star and swirl fabrics together. This means I'm over half finished with the blocks. Some dedicated sewing time tomorrow should get this project closer to the finished line.

Monday, November 7, 2011

The Danger of the Half Finished Gift

Last year I gave my mom a finished quilt for Christmas. I gave my mother-in-law an unfinished quilt (the top was complete) with a promise to return it finished before the next holiday season rolled around. Honestly, the only reason my mom got a finished quilt is because I sent it out to be quilted.

The panic started to set in this year when the calendar page turned to November. While it might be time to start thinking about gift giving, I still had commitments to finish from last year. This past weekend was devoted to finishing her quilt.


I spent many hours hunched over the machine quilting away. It is finally finished.


This is my favorite block today. I rejoice at the completion of this project.


And I have learned a valuable lesson. This year, the only gifts will be finished gifts.

Sunday, November 6, 2011

BOM Block 4 and a Distraction

Two of the blocks in this block of the month set use templates. This is one of them.


However, I dodged making templates and used the Tri-Rec ruler. There's nothing like the right tool for the right job. I love extra pointy star blocks.


With four blocks down, I started thinking about sashing and borders. I should keep making blocks but what about the sashing and borders? I wasn't going to be able to make another block until I figured this out. My mind's eye is terrible at remembering colors. I brought home every possibility I could find. You can sort of see them lined up between the blocks.


I really, really wanted that first Amy Butler print to work but the colors were just too different *sigh*. None of these really worked for sashing. They were all too busy and took away from the blocks. I finally gave up and took the blocks to the shop. After more auditioning than I want to admit, and a fresh eye from my friend Holley, here are the winners.


The solid will be the sashing, the gold will be cornerstones and setting triangles (yes, this baby is set on point!), and the green leaf print will be the border.

Now I can get back to making blocks!

Saturday, November 5, 2011

Fabric Covered Cork Boards

The sewing room is complete. One fun little project I added was some fabric covered cork boards on the end of one of the cube units.


It was easy enough to use two-sided fusible to attach yummy fabric to the cork squares. I used the sticky part from some 3m Command Hooks to attach the cork to the furniture. Now I'll have plenty of pretty to look at among my notes.


Enjoy your weekend!

Friday, November 4, 2011

BOM Block 2 and Block 3

Oh, I'm such a sucker. I made the first block for this block of the month and I was so happy that it went together quickly. I thought these blocks are going to be a piece of cake. I can make at least three each day. Right? Right... Silly me, I should know that projects such as this get more complex as it goes along.

Here's block 2...

and here's block 3.


I'm happy with the contrast in the blocks, and I like that the tone on tone prints allow you to really see the structure of the blocks. However, I usually go for wilder prints in my quilts so there may have to be some interesting action when this gets to the sashing and border stage. Three blocks down, ten to go!

Thursday, November 3, 2011

New Block of the Month

A new block of the month will be introduced at the shop starting in January 2012. To prepare, I'm working on a complete quilt top to hang at the shop along with a second set of blocks and block parts to use for teaching the class. The entire quilt uses only five different fabrics. The blocks use three fabrics and the other two are sashing and border. The cover picture of the quilt does a good job illustrating the five fabric version so my sample is going to be made scrappy style.


Most of my stash is sorted by color, but a few special designers get their own bin. Nancy Halvorsen is one of those designers. She has been a staple in our shop from day one. With at least two fabric collections a year, I've built up a good assortment of her fabrics. Another advantage in going with this designer is that no matter how much time passes, or whether her collections lean toward brighter or more muted, they all work together.

The first step was to dump the bin and sort it all by color family. Then it was time for consultation. "Hey hon, if you could only choose three colors for a quilt, which three would you choose?" Red, green, and yellow were his choices.


I didn't want this to turn into a Christmas quilt, but those color choices were certainly leaning in that direction. Time to add more definition to this project. I sorted the chosen colors by value.


The yellow is definitely the light. To the right is green as medium, red as dark. To the left of yellow, pink is medium, green is dark. For this project, the left side won (I decided not to go for another consultation!). I'll choose a different fabric from each group for each block.

Here's the first block:


Only twelve more to go!

Wednesday, November 2, 2011

Holiday Sewing UFO Style

Pulled this cute project from the unfinished bin a couple of days ago. It's the perfect start to holiday sewing.


The pattern is Little Scraps Spring Garden by This & That Patterns. It uses a little more than one charm pack. I didn't read the pattern closely enough to realize it took more than one charm pack but it was easy enough to supplement from my stash. I caught myself humming holiday carols while sewing, which is a good sign for this season of sewing.

Tuesday, November 1, 2011

Just Cutting Scraps

It almost happened again. I was cutting scraps into usable sizes and I found another set of half-square triangles. It was really late at night and I was too tired to cut much more and too tired to sew, but not too tired to play. Here's what was left on the floor when I went to bed:


Oh, the temptation was great, but I didn't know what I would do with the finished pieces and I decided I'd rather have a bigger quilt. Everything was neatly stacked and kept together.


Whenever I get back to them, they're going to become an awesome quilt.
Related Posts Plugin for WordPress, Blogger...