Saturday, February 13, 2016
Bee Blocks: An Elephant Parade
It is my month to be in charge of our quilt for the Believe Circle of do. Good Stitches. I was up for making something cute this month so we are making the Elephant Parade quilt which was a quilt along last year over at Sew Fresh Quilts.
Were you expecting to see some elephants? There will be plenty in the finished quilt. I assigned all of the elephant blocks out to my bee mates who are busily stitching away on them. I am making the accent blocks which are full of cuteness themselves.
The instructions for this quilt are very well written which makes stitching them up all the more fun.
The eyes on the frog and turtle are fused down and still need some stitching to secure them and the birds need some eyes and feet. I'll add all of that after I receive all the blocks and decide on a final layout for the quilt.
I will more than likely stick with the layout shown as part of the quilt along but you never know when I might decide to deviate and do my own thing.
I can't wait for those elephants to start showing up in my mailbox. This quilt will be a March or April finish and I will be sure to share it here when it is done. These blocks are making me wish for spring.
Linking to Design Wall Monday at Patchwork Times and Monday Making at Love Laugh Quilt.
Labels:
believe circle
,
bird
,
do.Good Stitches
,
flower
,
frog
,
turtle
Wednesday, February 10, 2016
Spell It With Moda Hangman Style
This is our third week with our Spell It With Moda project. Three more letters have been added as requested in last week's comments: I, H, and R. To help see what it says, here it is in more hangman style:
___ ___ ___ I ___ ___ E
T H ___ ___ E
___ S ___ ___ ___ ___
___ ___ T ___ E
___ ___ R ___ ___
My teenage son pointed out that generally when you play hangman and someone asks for a letter, you give them ALL of that letter. That isn't what we are doing here. If you ask for it and there is one, I'll give you one. There may be more, but they won't show up until they are asked for again. And, since that wasn't clear, the letters that are complete on the quilt so far are S and T.
Keep those comments coming! It won't be too many more weeks before this quilt puzzle will be solved. Let's take a closer look at the fabric used in this week's letters. The fabric collection is Flow by Zen Chic. It should be available at your local quilt shop or favorite online shop in March.
We have an I in that yummy, grungy, pink.
Next up, an inverse H. The color is the background and the letter is neutral. That pink makes me think of a relief map. You will see soon enough why some of the letters are made inverse and others are not.
Pretty letter H.
Our last letter for this week is R. The instructions for all of the letters are very well written. While an R has a lot more steps, it is still an easy one to make. It just takes a little longer.
Pretty letter H.
Our last letter for this week is R. The instructions for all of the letters are very well written. While an R has a lot more steps, it is still an easy one to make. It just takes a little longer.
Or, if you want a quick resource with everything in one place, check out the Spell It With Fabric booklet available at many local quilt shops and online stores. I did a quick Google search and found some great resources for purchasing the booklet.
Monday, February 8, 2016
Quilts Inspired By Art: Goodbloom Week Two
This is our second week working with this art print by Goodbloom. Check out last week's post for an introduction to this month's project. I decided to go with a close replica for my first project. That meant I would be studying the piece closely so that other inspiration could hit while focusing on the details of the print. And other inspiration definitely hit. I'll show you the second project in progress after we talk about this one.
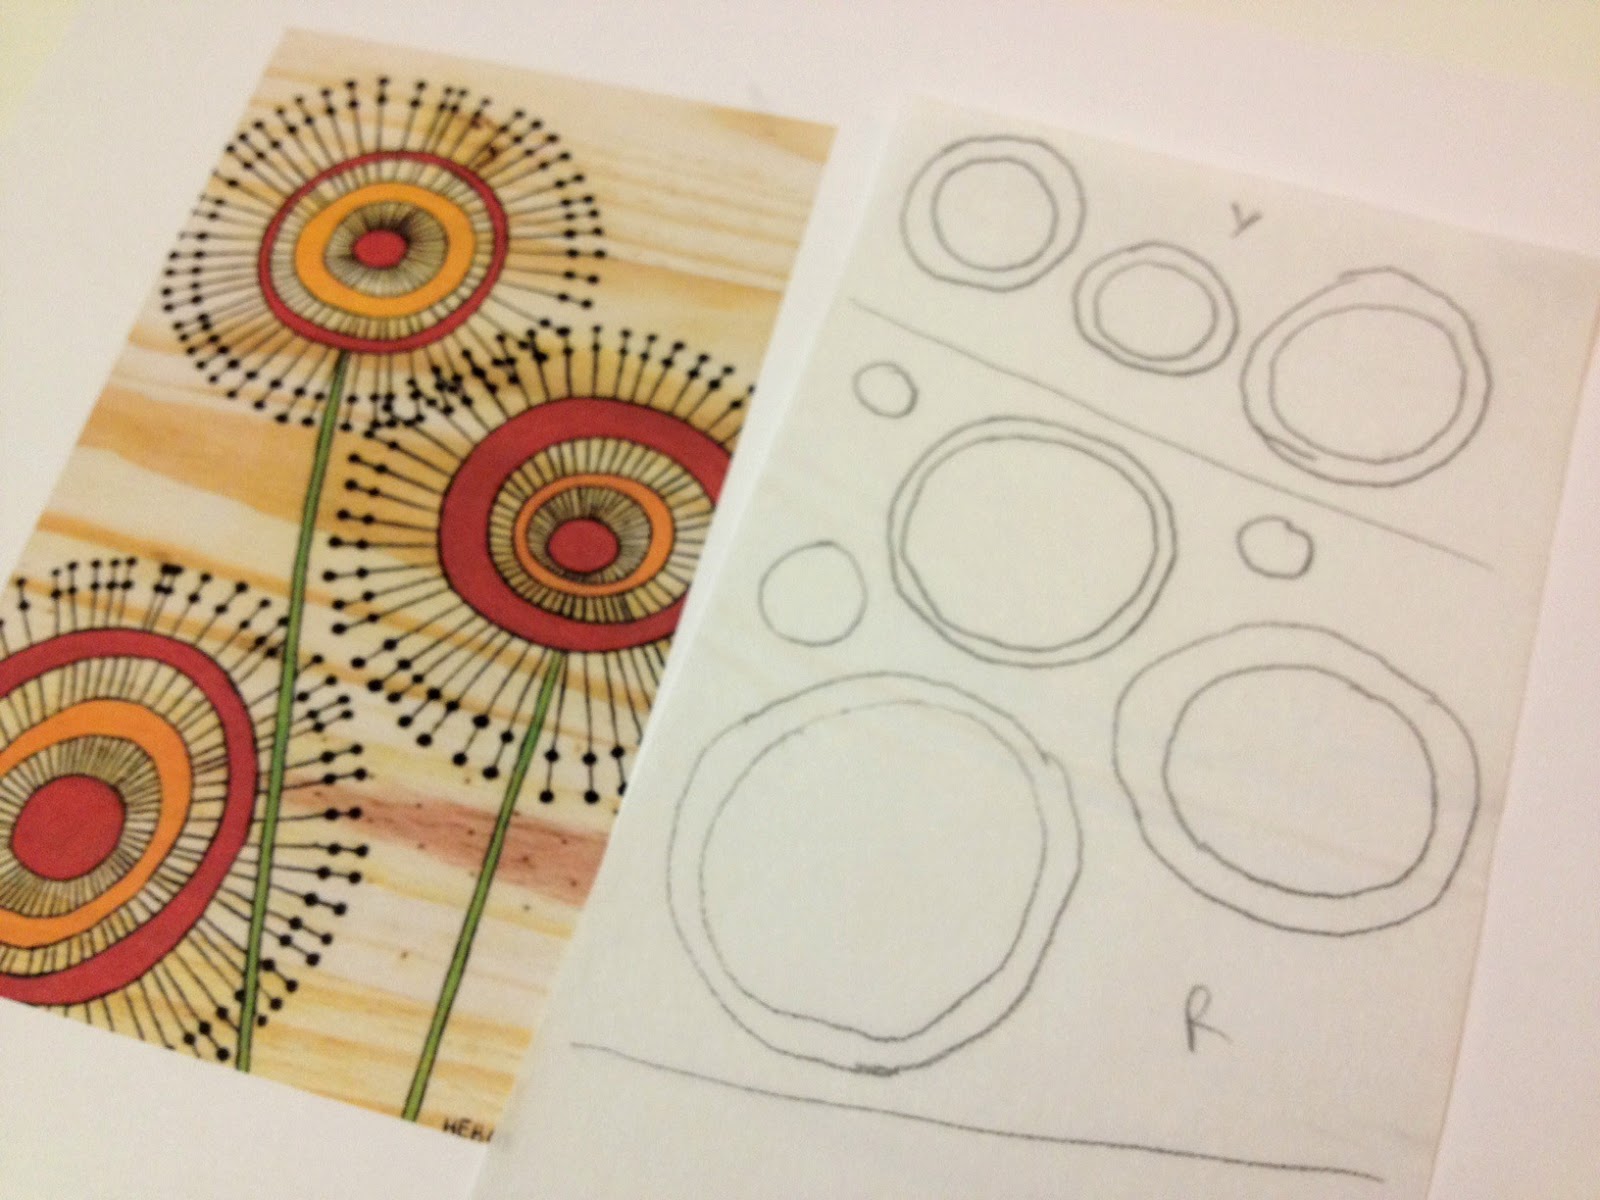
For the red, green, and yellow, I used the same fusible applique technique we learned last month. After printing the art in a 4x6 format, the shapes were easy to trace.
The next step is to press the fusible to the wrong side of the fabric.
I did a test run of the applique pieces. It looked a bit plain to me. At this point I decided to do the quilting before the applique.
I needed to give myself some quilting boundaries and this lid was the perfect size. I traced around it for each flower.
It took a bit to get into the rhythm of the design but once I got going it went quickly.
Now that all the black quilting is complete, it's time to add the applique pieces.
Since this is a piece that is not likely to be washed, I could have fused the pieces and called it finished, but I decided to go ahead and quilt them to be sure they would stay in place. Some neutral quilting in the background and some binding finished it off.
Here is a closer picture of the quilting. Wouldn't this be pretty with black seed beads instead of the free motion dots?
Another up close shot.
The finished piece is 6 inches by 8 inches or so. I like the center. I'm on the fence with my binding choice and I need more practice binding small projects. There are a couple of wavy spots but overall I am happy with it.
I was ready to dive right in to the second project once this one was finished.
Those black and white fabrics kept catching my eye. I was determined to include them. This next project is a little more traditional. I started by cutting 2 1/2 inch squares.
At first, I was attempting a more random design, but ended up moving to this very traditional trip around the world look. There was no red in the beginning either, but it definitely needed it. There are several different beige prints to keep it from being too boring and also because I did not have enough yardage of a single fabric. I thought the black and white stripes distracted from the overall quilt.
I like it much better with the more dominant black fabrics. No more stripes. The design is 10 squares by 11 squares so without borders it will be 20 inches by 22 inches. I will decide about a border after it is stitched together.
For next week I'm hoping to have this inspiration piece finished and hopefully have one more underway to share.
I hope you are enjoying this exploration of quilts inspired by art. I can't wait to see what next week brings!
Linking up with Monday Making at Love Laugh Quilt and Design Wall Monday at Patchwork Times. Also linking up with Whoop Whoop at Confessions of a Fabric Addict and Finish It Up Friday at Crazy Mom Quilts.
Labels:
flower
,
machine quilting
,
miniquilt
,
quilts from art
,
raw edge applique
Sunday, February 7, 2016
Friday, February 5, 2016
Organizing Fabric: The Final Round
Over the past couple of years, I have been adding three drawer units to each of my fabric cubbies. Originally, each cube had haphazard stacks of fabric that would get messier and messier every time I would look through them. It was a lot easier on me and my budget to do one here and one there as the mood struck. This week, I completed the last of this project.
I saved the best for last. I called this my every color cube. If I had any doubt at all about what color a fabric should go with, it got tossed in the every color cube. The reason this one was so much fun to sort is that each fabric is distinctive enough for me to remember its story. Why it was originally purchased, what project(s) it was used for, etc. It was a good walk down quilting memory lane.
I spread it out on my cutting table as best I could. It was a very loose interpretation of light to the right and dark to the left.
There are some great pieces in there.
Here's how it looks all organized in drawers. There is black with bright, traditional, Amy Butler, white with bright, 30s and floral, and stripes and novelty. Loosely organized of course. There is often room for interpretation.
Now I will be able to focus on the quilt making rather than get frustrated searching for a fabric. When I told my family I was finished with this project, they responded with a "yeah, right". And while I absolutely am finished with the three drawer units, there are those bins of scraps to deal with. Hmmm...
Linking up with Whoop Whoop at Confessions of a Fabric Addict.
Labels:
fabric drawers
,
organization
,
sewing room
Wednesday, February 3, 2016
Spell It With Moda - More Letters
There has been some progress with our Spell It With Moda project. Three more letters have been added as requested in last week's comments: T, T, and S. To help see what it says, here it is in more hangman style:
___ ___ ___ ___ ___ ___ E
T ___ ___ ___ E
___ S ___ ___ ___ ___
___ ___ T ___ E
___ ___ ___ ___ ___
I'll be happy to take requests for next week's letters, too! Let's take a closer look at the fabric used in this week's letters. The fabric collection is Flow by Zen Chic. It should be available at your local quilt shop or favorite online shop in March.
First, we have an inverse T. The color is the background rather than the letter. The blue is a combination of a linen look and a grunge look. I like it.
I don't have every detail of this project worked out just yet, and one challenge is that there was not enough in one jelly roll strip to make the complete background for this block. There is supposed to be one more strip on the right side and bottom of each letter. We'll see how that one works itself out.
The next two letters both come from the pink fabrics in this collection. I really like the pink. It is more of a hip, modern pink rather than anything that comes off as overly girlish.
S is the most complex letter sewn so far. It wasn't bad. There were just more parts to keep up with.
More yummy pink in the letter T.
Or, if you want a quick resource with everything in one place, check out the Spell It With Fabric booklet available at many local quilt shops and online stores. I did a quick Google search and found some great resources for purchasing the booklet.
What letters should we try for next week?
Linking up to Work in Progress Wednesday at Freshly Pieced and Finish It Up Friday at Crazy Mom Quilts.
Monday, February 1, 2016
Quilts Inspired By Art: Introducing Goodbloom
Hello! Welcome to the second month of quilts inspired by art. This month our inspiration comes from this print created by Holly Bartos. I found this print on Pinterest and tracked it down to Holly by way of her Etsy shop goodbloom. Holly has been on hiatus from her Etsy shop for a while, but a note there says that she intends to reopen in early 2016. That is great news. Holly describes her art as retro and whimsical.
I loved this piece of art for a quilt because it offers so much opportunity for techniques, sizes, and interpretations. It would make a perfect fabric postcard, a cute miniquilt or wall hanging, and could also be made as a block that is repeated for a bigger quilt.
Let's break down the pieces of this print. First, the background.
Wait. Let's take a brief pause and do a little clean up. I'm not as far along with this project because the first step was to look at the cream and tan colors of the background and this was the state of my cream and tan fabric.
A few hours later we were in much better shape and can easily find what we need. I have been slowly organizing my fabric into these drawers and this is one of the last sections that needed cleaning up. Nothing like a project for a little motivation!
There are several options for creating the background, which is an actual piece of wood.
I pulled a good selection of light to mediums. These could be improv or strip pieced to form a background similar to the print. Or, a print that contains most of the tones could be used as a single piece. It would be a different look but remember, the original art is an inspiration. We are not necessarily trying to replicate it.
The flowers are primarily red, orange/yellow, and black.
Here is the complete pull. The flowers could be cut shapes that are appliqued to the background or they could be layered with black fabric behind them. The black lines and dots could be machine quilted or hand stitched with embroidery. There are lots of options with this piece and I'm hoping to explore several of them throughout the month.
While there isn't any black and white in the art print, I pulled these because of the line and circle pattern that is similar to those in the flowers. We will see if they make it to any of the finished projects. I was also thinking about doing a cool color version with grays, blues, and greens.
Next week I'll have some sample tops and blocks put together to share along with instructions for how to create one of your own.
Linking up with Monday Making at Love Laugh Quilt and Design Wall Monday at Patchwork Times.
Subscribe to:
Posts
(
Atom
)