Saturday, March 1, 2014

The Any Color Quilt

Oh, the quilt. Oh, the story. I just love this quilt. But it wasn't always that way.


It was my turn to be in charge of the quilt for the Believe Circle of do. Good Stitches in December. I wanted to be extra, extra nice to our great group of stitchers since December is such a busy month for most folks. I wanted the block to be super easy. Here's what I sent to the group:
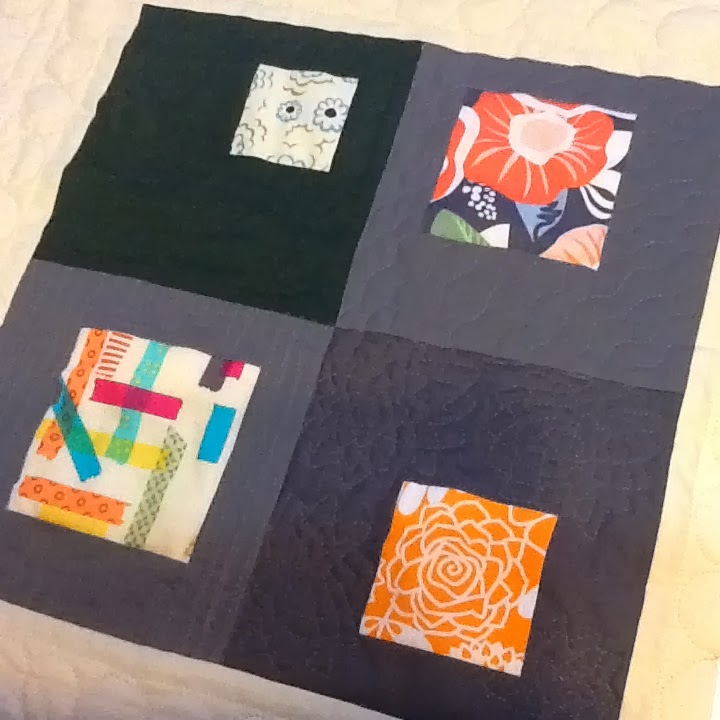
We're doing some simple improv this month. And, we've all done great over the past few months gearing our quilts towards boys, so for December, think girl, girl, girl. What I'd like to receive from you is one 12.5" block and four 6.5" blocks using a square in a square block. The inner square can be big or small. It can be centered or off set. I would like for them to all be straight, so no wonky squares please. The center square should be a focus fabric and the frame should be a solid.

As you can see from my inspiration blocks, just about any color will work. It would be great if your outer frame was at least 1.25" after sewing (meaning cut at 1.5" so that it would finish to be an inch wide on the quilt. For most of my blocks, I cut the solids much wider than necessary, then squared up the block after sewing so that I could have a little bit of control over where that center square sat in the finished block.
So, perhaps I should have taken the hint when one of our stitchers sent the question, "Any color?". Note to self: some semblance of a color palette is a REALLY good idea.


Everyone rallied to the cause and mailed in their blocks. And they are all great and I'm so excited about getting started. And I start laying out the blocks...design after design after design. Nothing works. There are too many variations; too much chaos. Nothing in common. My excitement wanes. My frustration increases. Walk away. Try again tomorrow.


A new day, a new idea. Depending on the design, there are enough blocks to make two quilts. Two quilts! Awesome. I divided the blocks into two sets, warm colors and cool colors. Much, much better. Still, the warm color version was being stubborn. All of my non-traditional ideas just looked too busy. I finally came to the conclusion that this was just going to be a basic design. Once the top was assembled, well, it was okay. It's pretty, but it isn't stunning. What's a girl to do. Sleep on it.


After sleeping on it, I decided that rather than use an overall design for the quilting on this one, it would be quilted sampler style, using a different design in every block. I thought this might improve the quilt overall and it would definitely provide some much needed free motion practice. This is when this project turned fun for me. I love all things quilt making, but once I got into the quilting of this project, it took on a life of its own. I started with the designs I was familiar with. The first block, the yellow block of love, was quilted with spirals.


Then some leaves on the border and a bit of meandering in this block.


 I know those were the first two blocks I quilted. And I can remember the last blocks. The middle is all just a quilting blur. A very satisfying blur, but a blur just the same. Here are the rest of the big blocks. A simple, wavy border with some outline quilting in the center,


a meander, 


wavy lines and pebble paths, 


and a paisley pattern.


The more I quilted, the more comfortable I became. Finally, I stopped trying to "figure out" what quilt design to use, and drew from each focus fabric. Asterisks, kites, pizzas, flowers...all sorts of quilting designs began to emerge. It was fun, really fun. Here are the small blocks, lots and lots of small blocks. The bright orange block:


This was an attempt to quilt branches for the bird. The upper left is tolerable, but then I got a bit carried away so the rest looks like a bunch of busy lines.


A simple pebble fill.


I was trying to combine spirals and pebbles in this one. The spirals overwhelm the design but it was good practice. 


Some scribbly lines to mimic the writing in the block.


The light orange block:


Rows of asterisks. This is one of my favorites.


Waves for the fishies.


Flowers.


And paisleys. 


The dark gray block:


More flowers.


Rectangles. This is another favorite.


Flowers. Of the flowers, I like this one the best.


Gentle, wavy lines.


The pink block:


Flower vines,
 

apple trees, 
 

scallops,
 

and carnations.


The red block:


The center fabric of this block makes me think of beach balls, but when I was quilting the shape on the border all I could think about was cutting a pizza into slices. I must have been hungry.


Dots, circles, and lines.


Fronds. 


Kites. Love the kites.


The yellow block. The red and yellow blocks were the last two blocks quilted for this project. This was the home stretch.


Little posies.


A big flower.


Loopdie-loops. 


A wavy grid.


Each block is surrounded by circles in the sashing.


The back is fun, too, with some Kaffe Fassett Buttons fabric and a panel of solid orange and extra blocks. The busy print on the back is nice since it proved to be quite forgiving for those occasional quilting tension issues. It just all blends right in.


It is finished with a Kaffe Fassett Paperweight fabric for the binding. Headed to the post office next week to ship this quilt off to My Very Own Blanket.


Next, I'll be working on the cool color version of this quilt. The top is finished. Here's a peek.


Have to credit my husband for suggesting the triangles. That got this design off the ground. My intention is to mellow a bit for the quilting on this one. We'll see though. You never know what might happen once the quilt gets under the machine.


Sunday, January 12, 2014

First Finish for 2014 - A Quilt for Adam


My last finish for 2013 led straight to my first finish for 2014. Generally, my boys (there are three of them) don't pay much attention to the quilts I make. But when I shared with my youngest son that this quilt


would be a gift to my sister-in-law, he had a few things to say about that. "You can't give this quilt away. I love this quilt!" Wow. I was shocked. He'd never noticed before. I told him that if he liked that quilt that much, I would make him a quilt next. However, it would not be the exact quilt, but one that had all the things he liked about this one. I really don't like to make the same quilt twice. There's usually enough repetition in one to last.

He and I sat down and went through all the quilts on my Pinterest page to find a good design. The only rule was that his quilt had to come from fabric that I already had on hand. The thing he liked most about the original quilt was the colors. Once we found a pattern, we pulled what he wanted to use from my stash. The pattern can be found here.

First, we pulled blues, then he said he'd like some green in it, too. It really needed a second color so to add some interest, so I'm glad he thought of that on his own. Next, I made some test blocks.

He loves wolves, so that's where I started. He was very happy with these blocks so it was a go to move on with the full quilt. I went ahead and paired the fabrics and cut the blocks.

Then put it all together. I thought this quilt would take me into at least early February but once I get started on a project like this, I tend to get a little obsessive. It didn't take long to have all the blocks sewn.

We've had a whole lot of wet and dreary days here lately, which is good for sewing time, but not so good for taking pictures. Here is the finished top. The guy who is getting this quilt is peeking over the top.

I use the garage floor to layer my quilts. Don't let the sun shining on the quilt fool you. I think it was 20 degrees on the day of layering.

The quilting consists of three lines of quilting on the sashing between the blocks and some free motion circles around the inner square of each block.

Adam's birthday is in January and about the time I was ready to start the quilting, I thought that maybe, just maybe, this quilt could be finished for his birthday. Two days before his birthday, I embarked on a binding marathon.

This quilt finishes at 67 x 89, which is bigger than most quilts I make and it did get finished in time. It was washed and dried on his birthday so he could sleep with it that night.

This is the first time he has really paid attention to each step of making a quilt and he made me tell him each time I finished a step. Once the top was put together, he would take the quilt after each step, put it over his head, and do some sort of crazy song and dance. It was really funny.

Another closer look at the quilting.


The back is done in wide stripes.

It's great when stash makes both the front and back of a quilt.

He loves his quilt and I love it that I was able to make something just for him.

His brother has taken notice and has asked for a quilt to be made just for him as well. We've gone through the designs and he has chosen something far different from his brother. I'm sure there will be another special finish before too much longer.

Sunday, December 15, 2013

Blue Nine-Patch Quilt

Every quilt teaches me something and this one taught me to always be flexible and keep an open mind throughout the process. This was supposed to be a dachshund quilt.


My sister-in-law loves dachshunds and I intended to make a quilt for her with that in mind. It just never worked out. I had a dachshund on this quilt at one point, but after soliciting several opinions, I decided that the dachshund had to go. The background was to be a scrappy blue patchwork, so I had quite a pile of blue nine-patch blocks.

I started playing with them on the design wall and liked the way this was shaping up.
After adding some sashing and some blue setting triangles around the border, this quilt was a go.
Once the design was set, I became a little obsessive about seeing the finished top and finished it up the same day.
It sat for a few days while I pondered the quilt design. I really wanted to do concentric circles, and started working on those, but my circles weren't exactly circle shaped. After stitching the first three rounds, I abandoned that idea and did a bit of unstitching until I could practice a little more.

Some simple straight line quilting seemed the next best choice. Diagonal lines are stitched through the nine-patch blocks using 50 weight Aurifil thread in a pretty blue 2735. Then I added three lines of Aurifil 2000 on each row of sashing. Looks like my straight lines could use a little practice, too, but I will just say that the lack of perfection adds to the whimsy of the quilt.

There were a few leftover blocks so those were incorporated into the quilt back.

I think my sister-in-law will be happy with this quilt, even if it doesn't include a dachshund.

Saturday, November 30, 2013

Believe Circle Finish and Progress

My quilting life has slowed down a good bit this fall. The majority has been focused on the Believe Circle of do.Good Stitches, which has been great fun and kept the creative juices flowing.


I was the assigned quilter for October and I just finished up our quilt this weekend. This quilt was adapted from a similar design which you can see in the first post I wrote about this quilt. I just love the way it turned out. It says boy all over.


The quilting is simple straight line quilting set one inch apart. One of the blocks is the center for the quilting and the lines radiate from there.


The back is a huge off set square in a square block. The center matches the center point of the quilting on front.


It's nice when the back of the quilt is a good stash buster, too.


The red on the back is also the binding. This quilt will go in the mail to My Very Own Blanket today.

While I've been finishing up the October quilt, the work of the circle has continued. In November, Nicole mailed us all some fabric to use for making disappearing nine-patch blocks. She sent enough fabric for about half the blocks and we supplemented with our stash. Here are my blocks:


In December, it's my turn to be the quilter again. Since it's such a busy time of year, I decided to go with a very simple block, and to go for a really girlie quilt since our circle has done such a great job of focusing on boy quilts for the past few months. We're making simple square in a square blocks for December in an improv style which means the center square can be any place and any size within the square. The outside of the block should be a solid fabric.

I had fun going through my stash to make some inspiration blocks for the group.


And here are the resulting blocks.


Each person in the circle will make one 12.5" block and four 6.5" blocks. Can't wait to start receiving these in the mail.

I'm hoping to squeeze in a Christmas project or two, but I'm not making any firm commitments. It's going to be a relaxing December for me, at least in the quilting world. Hope you all are finding time to be creative as we wind down for the year.

Friday, September 27, 2013

Block Tutorial - Which Way Block Adaptation

These days, much of my quilt inspiration comes from Pinterest. Hardly a day goes by without me pinning some new and fabulous quilt to my "Pretty Quilts" board.

Quilt made by Steffi from just Quilts

I'm always looking for new quilt ideas for the Believe Circle of do.Good Stitches. My turn to choose the quilt always comes around faster than I expect it to, so it's good to have a little stash of ideas to pull from. I was immediately drawn to this one because I thought it could be perfectly interpreted for a boy. The charity we support, My Very Own Blanket, has shared with us that they could really use a boost in quilts for boys. The arrows in this one make me think of directions, cars, trucks, construction, signals, and all sorts of boyish ideas.

The original quilt and tutorial can be found over on Steffi's blog, Just Quilts. Steffi generously granted permission for me to adapt her design to a block format (the original quilt is sewn in rows rather than blocks) for our October Believe Circle project.

I haven't figured out what the final layout of the quilt will be. This is going to be one of those designs that evolves as we go. Here is the block that I have designed based on Steffi's quilt.


Fabric required to make one 12 1/2" block:

Four arrow fabrics - From each fabric, cut (1) 9 1/4" square and (1) 2 1/2" x 4 1/2" rectangle
Background fabric - (4) 2 1/2" squares and (4) 2 1/2" x 4 1/2" rectangles

From each 9 1/4" square of arrow fabric,


cut across each diagonal. You will only use one of these triangles for your block. You can always save the others for more blocks!


Take all of your cut pieces and lay them out as follows:


First, sew the triangles together. Here, I've sewn the red to the green and pressed to the red, then I sewed the blue to the neutral and pressed toward the neutral. The key is to press the sewn seams in opposite directions so they will nest together nicely when the two bigger triangles are sewn together.

After the triangles are all sewn together to form the center square, sew the background squares to the arrow rectangles on the left and right side of the block. Press seams toward the background fabric.


Sew the left and right sides to the center square. Press the seam toward the center.


Sew the background rectangles to either side of the arrow rectangle. Press toward the background.


Sew the top and bottom strips to the center. Press seams toward the outside of the block.


The other thing I like about this block is the way the arrows all point to each other. The finished quilt will go to a foster child, and I often think of children in that situation as having only themselves to depend on. This arrow design makes me think "strength from within" which says so much about these precious children.

Believe Circle members,
For our October quilt, choose bright colors for the arrows...think traffic signal colors...red, yellow, green, and also blue. Try to stay away from girlie fabric designs. Feel free to throw in one neutral fabric for an arrow in one of your blocks. I do like how that gives your eye a place to rest in an otherwise bright design. For the background, choose a dark color...black, brown, blue, gray, or green....just make sure they are very dark. Each block should finish at 12 1/2" square. Please make two blocks.

Can't wait to receive all of your blocks throughout October. Look for a finished quilt before the end of the year!
Related Posts Plugin for WordPress, Blogger...