Saturday, March 2, 2013

Quilt Show Eye Candy

Every two years, the Cotton Patch Quilt Guild puts on a quilt show for our community. Though I'm not a member of that guild right now, I have been in the past, and I know how much work goes into putting on a successful show. This year, it is happening March 1-3, so if you're thinking of going, you still have tomorrow afternoon to check it out.

Erica and I headed over there today to ogle and drool over the great display of quilts. I believe there were about 180 quilts there and all of them were spectacular. I only took pictures of a few, and I'm sorry to say that not all of my pictures are super clear, so you might have to use your imagination just a little.

**Note** If you see your quilt here and would prefer that it not be shown, please let me know and I'll take it down right away.

This is only a very small sampling of my favorites.


This quilt was made by Cleo Ward and is both hand appliqued and hand quilted. I don't think I've ever seen this much hand quilting on one quilt before. 


She has some great color choices here, too. Someday, I hope to have the patience to do more hand work.


This is Sylvia Schaefer's quilt. I love this one because of its crisp colors, gentle curves, and modern appeal.

Unfortunately, I can't remember who made this one, and I'm not usually drawn to quilts with Asian flair, but the geometry of this one pulled me right in.


The fun thing about this show for me is that I know most of the participating quilters. That adds an extra element of fun in that I can try to guess who a quilt belongs to before getting close enough to read the tag. This whimsical piece was made by Fay Rawls. I used to see Fay on a regular basis and I would always learn some new quilting something or other from her. Miss you, Fay!


This quilt won best of show and was made by Terri Jarrett. I love Terri's depth of design, both in her piecing and in her quilting. Terri also has a great sense of humor. Her studio is "where the magic happens," she says. Her quilts are definitely magical.


Here's a close up of Terri's quilt. I should have put my hand up so you could see how tiny those four patches are. They finish at two inches, I think. They may be even smaller than that. It was impressive, for sure.

There was a section of quilts that were part of a one word quilt challenge: zoo. This quilt was made by Frances Arnold. Erica is a big fan of zebras so this quilt was a favorite for both of us.


This quilt was made by Marybeth Tawfik. Marybeth has a long arm quilting studio in Athens, Georgia, and has won many awards for her work. This quilt was part of a quilt challenge that required using two complementary colors.


Here's a long view of one row of quilts,


and here's another.

One of the things I enjoyed most about this show is the variety of quilts included. Often, local shows have strong leanings toward traditional or modern or some other narrow category of quilts, but this show had a very diverse range of styles, which I found both inspirational and refreshing.

Thank you Cotton Patch Quilt Guild for another great show. See you again in two years!

Friday, March 1, 2013

Pin and Earring Quilt


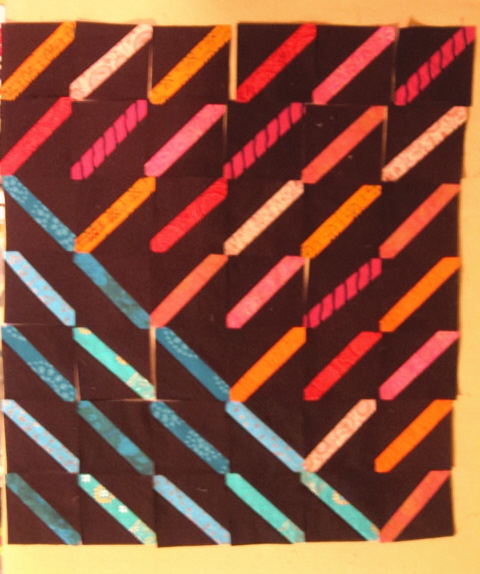
Recently, I wrote about all the dragonfly decor around my home. There's also quite a bit of dragonfly jewelry in my life, too. Rather than have it hidden away, I thought it would be fun to make a quilt to display it.


There's also this pretty fabric that was gifted to me by a friend who brought it back from a trip to India a few years ago. Brightly colored, beautiful fabric from India paired with sparkly dragonfly jewelry seems like a good combination.


Light background or dark background? After auditioning several options, I settled on a dark, chocolate brown solid. It's an older piece from my stash, most likely a Robert Kaufman Kona, but I'm not positive about that.


The India fabric consists of eleven, 6 1/2"-ish squares, so I needed a design that would make the most of it. A one-inch diagonal strip on each block did the trick.


The squares were cut into four 1 1/2" strips, with a little leftover, and the background was cut into 5" squares. I didn't have a specific block size in mind, but wanted to go as big as possible. After cutting the background squares in half and sewing them on each side of a strip, I was able to square it up to 4 5/8".


Once all the blocks were made, it was time to play with the layout.


I got a little carried away with this part, 


but it was lots of fun.

I had to ask Erica to help with the arrangement, just to get myself back under control.


She captured the essence of the original design perfectly.


Thank you, Erica. Quilting is next. I wanted the center of each square to remain unquilted so that it would stand out more and be more amenable to having pins attached. 


I decided to quilt circles around the edge of each square.


The circles remind me of  a string of beads surrounding each center.


Then there is the larger space at the bottom. It needed some filler. I chose a design from Leah Day's Free Motion Quilting Project. I chose the design Pebble Paisley to fill in that area. A simple curvy loop takes care of the small outer border. I didn't have a dark brown thread on hand for the quilting so I used Aurifil 50wt cotton in black. It worked just fine. I like that the quilting recedes on the front and simply adds texture.


The back is another matter.


There are no secrets on the back. Every wobble and jerk can be seen. It's okay, though. The wall will never give away my secrets once the quilt is hung.


Time to add the pins and earrings!


There was a happy surprise as I was pinning everything on. I thought I was going to have to rig up something for the earrings, but I accidentally let one of the earrings slip into a seam. Aha!


The seam worked perfectly. Nothing extra needed.


It makes me so happy to have found a way to show off my collection of dragonfly jewelry AND use some very special fabric.


Tuesday, February 26, 2013

Treadling Away


Many years ago, my mom became the caretaker for my grandmother's treadle sewing machine. She invested in refinishing the cabinet, and as a piece of furniture, it makes a beautiful show piece. Somewhere along the way, my mom decided that it would become mine and it could go ahead and move to my house.

Recently, I became more interested in this machine. We had always said that it would work great if it just had a belt installed. I wanted to know if a belt really was all that it needed. We had a new belt, and Duane installed it fairly easily. Then it sat for a little while longer, because it was going to take some effort to figure out how to wind a bobbin and thread the machine.


A few YouTube videos later, the bobbin was wound, and the machine was successfully threaded. It was time to sew. One of the things I was worried about is how I would look using this machine. My hand-eye coordination isn't the greatest, so I had this fear of my head bobbing like a chicken while my feet went up and down on the treadle. No, I did not record myself sewing on it, and I'm fairly certain that it wasn't an overly embarrassing experience.


The really exciting thing is that it sews a fairly good stitch. For a machine that hasn't been sewn on in probably thirty or more years, it works great. I've got to figure out a good way to mark a 1/4" seam allowance. This machine is going to get used.


I love the contrast of the old machine with the modern thread. This machine deserves all the tender loving care it can get, and Aurifil thread will help keep it going long and strong.


With the excitement of being able to sew on this machine, I decided to see if I could find out more about its history. A quick search for the serial number shows that this machine was manufactured in 1911. Wow, 102 years old and still sewing strong. They just don't make them like they used to.

My grandmother was born in 1915. She and her husband raised a family of three daughters in McDonough, Georgia. They were a farming family, which meant it was often a challenge just to meet basic day to day needs. This machine was purchased as a used machine from a newly married couple in the community that had fallen on hard times and needed money more than they needed this sewing machine. My grandmother told me that she remembers how sad the new bride was when they picked up the machine from her home.

My mom told me that she used this machine often growing up and that she could make it go a hundred miles an hour. I can't wait to see her give it a try next time she visits.


Check out the decal detail. A winged sphinx on a Singer sewing machine. An interesting combination. I'm going to do some research to see how to clean this machine up. It has a good bit of rust that I want to try to clean off, but certainly don't want to cause any further damage. I'm also going to figure out a project to make exclusively on this machine. It will be something small that can sit in a basket next to it so that I can work on it a little along. It's fun to think that I am sewing on the same machine as my mother, my aunts, my grandmother, and maybe even my great grandmother.


Saturday, February 23, 2013

Lovely Year of Finishes: February Finish


I'm a "to do" list kind of girl. Nothing gives me more pleasure than marking something off my list as DONE. Maybe that's why I'm enjoying participating in a Lovely Year of Finishes so much. This is only my first month in, and I'm pleased to report that my project for February is complete. Here's where this project started at the beginning of the month: a "finished" quilt without one stitch of quilting on it.


How can that be?


It's bright enough, pretty enough, but no texture at all. It's just ho-hum.

The actual quilting of any project is an intense process for me. I think that's because it's the step where I feel the most insecure. That's one great thing about the Lovely Year of Finishes; once I commit, it's a done deal. So, for this quilt, it was fairly easy to decide what to do with the centers...flowers...flowers like I learned to make in the Craftsy Quilting Negative Spaces class.


Because this project doesn't really have negative space, the flower adds more texture than floral appeal. It shows up best on the darker hexagons. I used a lime variegated thread for all of the flowers. They just sort of blend in on the rest of the hexagons.


The header of the quilt is quilted in pebbles. I'm becoming a big fan of pebble quilting. It's fun and fast.


The hardest part was deciding what to do in the borders around each hexagon. At first, I thought I'd just make each flower bigger and have it flow into the border. I tried it on one and decided against that very quickly. It was not a cohesive or pretty look. No, not straight lines, not pebbles, not flowers...finally I settled on a loop design, that probably has an official name, but I don't know what it is called. It makes me think of fish bones.


First, I quilted all the blue borders because the design shows there the least and I needed all the practice I could get. Then I did the orange, then the green. It wasn't until they were all done that I started feeling okay about the whole thing. Maybe I lack the vision to see the finished quilt, but it never looks good to me in the half way stage. That doesn't slow me down, though.


Once I have decided what I'm going to do, that's when the intense part kicks into high gear. It has to be done, and it has to be done NOW. Which is, of course, the same moment my younger children decide that we haven't had enough family time and everyone should pick their favorite game or activity so we can spend the whole day together. On the outside I smile and say, "That's a great idea!" On the inside I'm saying, "Can't you hear that quilt calling me? I can't just leave it up there like that!" My sanity compromise was to add that we would take breaks between each activity, you know, so we wouldn't all get worn out too quickly. I stitched like a mad woman on every break, so the quilt got done, and the family stayed happily intact. Whew.


I'm already poking around my unfinished projects to see what might be a good choice for March. Thanks, Lovely Year of Finishes, for the motivation and camaraderie.

Wednesday, February 20, 2013

Whale and dolphin tote bag

My daughter, Erica, is a sometimes sewer. Sometimes she'll get an idea for a project and have to sew it up right away and sometimes she sews out of need, especially when it comes to making cute gifts for her friends.


This time, her friend Jacqueline is heading off for an internship in Hawaii to study dolphins and whales (how's that for an awesome internship!). It's also Jacqueline's birthday this month.

I just happened to have an old fabric panel that had a square of whales, dolphins, turtles, and manatees. The whales and dolphins were the perfect thing for the front and back of a basic tote bag. Erica was a little bit worried that it wasn't going to be young enough or hip enough with the panels. We spent a good bit of time digging through my fabric stash looking for something to add a modern touch. Once we found these dots, she knew it was going to work out just fine. She quilted the panels by outlining the major lines in each picture and adding some wavy lines.


The orange dot forms a pocket on each side of the bag. The original pocket was way too deep for a hand to fit in, so a quick line of stitching to shorten it up took care of it. The pocket is just right for a phone or sunglasses.


The inside is lined with a Kaffe Fassett paperweight print in a light color so it's easier to see the contents inside the bag. There's a bright yellow divided pocket on one side.


Erica doesn't have quite the passion for sewing that I do, but she certainly "gets it" and is super supportive of everything I do. It's fun to have a partner in crime from time to time, and fun to watch another creative mind turn out a fabulous project. I think Jacqueline is going to love it.
Related Posts Plugin for WordPress, Blogger...