Showing posts with label tree. Show all posts

Friday, December 11, 2015

Star Christmas Tree Topper


Our Christmas tree has been without a real tree topper for several years. We always say we will get one but somehow never have the time or just don't see anything that we like. This year I was determined to have something on the top of the tree.


I decided to go for a simple star since we had an old topper that could serve as the base. I had all these small pieces of gold from an old fabric sample folder. Some are metallic; some are not. They looked like a good possibility for a scrappy, strip pieced star.

Each sample was about 6 inches square. I cut them into 1 1/2 inch strips and made three strip sets, which were then sewn together so the fabrics lined up into one long strip. The paper template was to see if the strip set was wide enough.

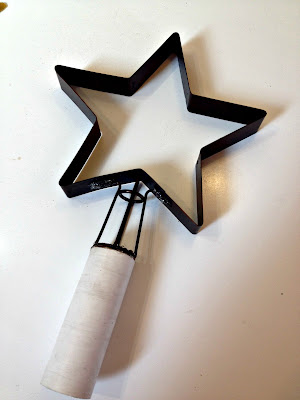
Here is the star that determined the template. It is a tree topper itself and is made of a dark metal. Its holder is too short and wide to actually stay in place on the top of a tree and since the star is hollow, the whole thing gets lost. A piece of PVC pipe was hot glued to the base to make it more sturdy.


It sits on the top nice enough now. It just needs to be dressed up a bit.


There were several forms of fusible interfacing used in this project, mostly because they are all stored in the same bin together. As soon as I found one that I thought would work, I'd give it a try. I know there is Steam A Seam 2 and Decor Bond in this project. They make it so easy to finish a project fast. The only sewing is the strip set that forms the star. Here the star is traced and ready to cut.


Now things are looking better. Once the gold star was cut out it was a little bit too small and needed something to make it stand out. Placing it on a black background made it look a lot better. I even fused the fabric to the PVC pipe. That was some tricky pressing. See those white interfacing edges showing? A touch of black Sharpie around the edges took care of that. It sort of looks like a magic wand laying on the table.


Each star was hot glued to the original metal star. I can't say this will be a forever tree topper but it looks better than no tree topper at all.


While I was making the star, this tree topper appeared. It would have been fine with me if this one stayed, even though it might have startled me in the middle of the night.

Here it is when it first went on the tree. I decided the star was just a little far from the rest of the tree so we gave it a little trim.

I like this proportion much better. This year, our little tree has lights, ornaments, AND a star on top. I love sitting by the tree in the quiet of the morning. There are lots of stories in those ornaments.

Friday, November 27, 2015

Cross Stitched Christmas Tree


Recently, I had some major surgery that I thought was going to keep me away from my sewing machine for weeks. As you can imagine, I was not very happy about that prospect. I am not very good at doing nothing so I prepared in advance with some small hand sewing projects like this pretty cross stitch Christmas tree. The good news is that I am recovering far faster than I ever imagined. Four days post surgery I was in the sewing room happy as could be. There won't be any large quilt projects going on too soon, but there are plenty of small ones to keep me entertained.


I started this little project while I was still in the hospital and I was excited to finish it up this week, just in time for holiday decorating to begin.


The pattern came from Pinterest. It was relaxing and easy to make.


This frame had a generic picture in it so it was ready to be re-purposed and works just fine for framing up this little project. Here is to the start of holiday decorating!

Other posts with cross stitch:
Mom's Cross Stitch
Two Projects Finished Just in Time

Tuesday, June 23, 2015

Holiday Tree Quilt on Moda Bake Shop


Last week I was a very lucky girl in that my first Moda Bake Shop pattern was published. It is a very bright and cute tree with horizontal pockets so you can add all sorts of fun things to the quilt. It's a little hard to see, but there is a toy car and a harmonica peeking out from these pockets.


You can check out the full pattern, called Treats for a Holiday Tree, over at the Moda Bake Shop. Enjoy!


Tuesday, September 23, 2014

A Scrappy Holiday Tree Quilt

A few weeks ago, I attended a reception for a quilt display at our local library. It was from one of our local guilds, Big Springs Quilt Guild. It was a fabulous display. This is a small guild of thirty or so ladies, but they make a big statement with their quilts. While I was there, the leader of the group, who is also my good friend Holley, asked me if I would teach at one of their meetings. I have not taught a quilt class in almost three years. My first reaction was...No. I don't have any idea what I would teach. Then, as I was looking at all of their work, I thought...I could teach a project. It doesn't necessarily have to be a skill. So I said YES, because really, there is nothing I wouldn't do for Holley.
As is usually the case these days, it all started with a picture I saw on Pinterest. The original source for this project can be found here in the Moda Bake Shop. I changed up the finished size and the design of the background but the original is the inspiration that started it all. There was also a pile of Christmas scraps on my sewing table that kept staring at me. The background from the inspiration picture was a single piece of fabric, and that was my intention too. Until I realized that I didn't have a big enough piece of fabric to do that. I really love the checkerboard background and it happened completely by happy accident.
This project is perfect for practicing matching corners and making half square triangles. I will talk about different ways to make half square triangles as part of the class. So a skill lesson developed after all. Decided to go subtle with the star on top by quilting it rather than piecing or appliqueing it.
The trunk in the border was a late addition when one of my sons commented that the trunk was missing. I thought about adding another row to the quilt top, but I like how it just sits right in the border. The quilting is all done with a walking foot. Diagonals for the tree and a grid for the background.
I used a red on the back. I also did the binding all by machine. I'm usually a hand stitch kind of girl for binding. With a little more practice, binding by machine might grow on me. It is definitely much faster.

This sample will be delivered to Holley next week so she can share it with the girls at their October meeting. Class is planned for the first Saturday in November. I am really excited to be teaching again. I need to get the supply list completed so that it can be delivered next week as well.
While this project was made using Christmas fabric, it could easily be adapted to other color schemes for seasonal trees. It finishes at 24" x 30" and as a bonus, I'll be sharing with the class how to make it bigger (all the way up to a king size quilt) and smaller (using tiny one inch squares).
Related Posts Plugin for WordPress, Blogger...