Showing posts with label strip piecing. Show all posts

Sunday, May 14, 2017

Tutorial for May Believe Circle Blocks


May is my month to choose the design of our quilt for the Believe Circle of do. Good Stitches. While I did get my idea out there at the first of the month, the instructions were very general and I had not even made my own blocks to share. There was some feedback that maybe my instructions were a bit too general so hopefully this tutorial will help.


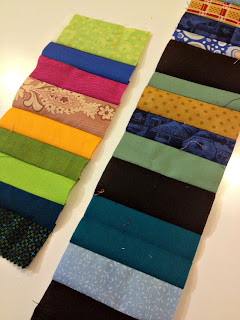
The strip pieced portion of the block is created using a foundation behind the strips. Since the strips may be from scraps that are not on grain, the foundation stabilizes the piece and keeps it from getting stretched or distorted. The strip piecing should somewhat grade from light to dark and there should be two bold color strips added in the darker side of the strip set. I went through my stash and cut a lot of strips, then laid them out in the order I preferred in the block. There is no set width for the strips but mine ranged from 1 1/2" to 3" wide.


The strip pieced portion of the block will be cut down to 10 1/2" square so make sure your foundation square is at least that size. A little bigger is better.  The foundation fabric should be thin and light. Batiste works great. I have a good bit of older fabric in my stash and some of it is less expensive lighter weight fabric that I keep just for this purpose. Lay the center strip right side up on top of the foundation fabric. Lay the fabric that will go next to it right side down on top of the center strip. Stitch a 1/4" seam. Flip the second strip right side up and press. Continue this way until your foundation piece is covered by strips.


This is what it will look like from the back before you cut it to size.


And here is the strip pieced square once it is trimmed to a 10 1/2" square.


Next you will need two 2 1/2" x 10 1/2" strips in a very light color. You will also need a 3" square from the very light fabric and a 3" square of one of the bright colors from the block.


Draw a diagonal line from corner to corner on the wrong side of the very light 3" square. Put the 3" squares right sides together and stitch a scant quarter inch seam on either side of the drawn line. Cut along the drawn line. Press open the two units and square them up to 2 1/2".


Lay the block out as pictured. Stitch one strip to the side of the block and one half square triangle to the end of the second strip. Be sure to position the bright triangle corner to the upper right.


Now stitch the bottom strip to the top block and strip and your block will be complete.


What about the extra half square triangle? For Believe Circle members, please send the extra in with your blocks. It will be used in the outer border of the quilt.


Believe Circle members should make two blocks. I made one using warm colors.


And the other block is with cool colors. You don't have to do that with yours. The most important thing is to use bold, bright colors.

The inspiration for these blocks comes from a quilt I saw on Pinterest.


Thanks for your patience, Believe Circle. I am looking forward to making a beautiful quilt from your May blocks.

Friday, February 19, 2016

Yellow Scrappy Strip Quilt Top Finish


Thanks to all of the encouragement you guys provided when I last posted about this quilt, it is now a finished top.


There are twenty blocks in a 4 by 5 formation. Each block finishes at 15 inches so that makes this top 60 x 80 inches. That is the size of a queen size mattress so I am thinking about adding a border or two so that it can easily be used on a queen sized bed. My bed maybe? I'm not sure about that part yet.


Each of those larger blocks is comprised of 16 half square triangles. When I got close to the finish line for these blocks, I was ONE half square triangle short. Instead of making another scrappy strippy one, I simply made one from a single print fabric. I liked that there was just one that is not like the others. A Where's Waldo for half square triangles. It took me a while to find it in the full front view photo. Every quilt needs a little secret so that is my secret for this one.


I first posted about the idea of this quilt last June. The earlier posts have links to block instructions, pinterest inspiration that helped me figure out the layout, and the story of how this quilt came to be.


The story of this quilt isn't over, though. There will be borders and quilting and binding. Eventually. I'm just happy to have made it this far. I imagine you will see it again one or two more times before it is finished. Thanks for letting me share it with you.

Friday, January 29, 2016

Scrappy Strip Quilt Making Progress


Wow, the last time I posted about this quilt was last July. It was time to pull it out and make some progress. There were four finished blocks in the bin. The blocks go together quickly once the layout is set. I remember worrying a lot when I was working on this before about not putting too many like squares together.

If a big block is made from squares that all came from the same strip set, the block can start to lose some of its scrappy look. I decided to relax and just go with it this time. They all look scrappy enough and I may have mixed them up some the last time I worked on this quilt.


I should take better notes when I'm working on a project like this. Of course, I was sure that it would be finished quickly. The six month break was not part of the plan, but other projects lured me away for a while. I noticed my scrap bins getting full (again!) and knew the scrap quilts in progress needed some attention.


This is the stack of squares remaining. My best guess is that there are enough for 11 more blocks, which is just right. 20 total blocks will make a nice quilt top. Each block will be 15 inches finished. The individual squares were trimmed to 4 1/4 inches.


There are many projects going on at one time in my sewing room these days. I'm hoping this one will stay close to the top of the pile. A scrappy finish would feel great in the first few months of the new year.

Linking up to Whoop Whoop at Confessions of a Fabric Addict and Finish It Up Friday at Crazy Mom Quilts.

Friday, December 11, 2015

Star Christmas Tree Topper


Our Christmas tree has been without a real tree topper for several years. We always say we will get one but somehow never have the time or just don't see anything that we like. This year I was determined to have something on the top of the tree.


I decided to go for a simple star since we had an old topper that could serve as the base. I had all these small pieces of gold from an old fabric sample folder. Some are metallic; some are not. They looked like a good possibility for a scrappy, strip pieced star.

Each sample was about 6 inches square. I cut them into 1 1/2 inch strips and made three strip sets, which were then sewn together so the fabrics lined up into one long strip. The paper template was to see if the strip set was wide enough.

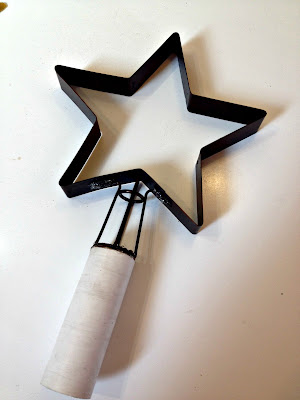
Here is the star that determined the template. It is a tree topper itself and is made of a dark metal. Its holder is too short and wide to actually stay in place on the top of a tree and since the star is hollow, the whole thing gets lost. A piece of PVC pipe was hot glued to the base to make it more sturdy.


It sits on the top nice enough now. It just needs to be dressed up a bit.


There were several forms of fusible interfacing used in this project, mostly because they are all stored in the same bin together. As soon as I found one that I thought would work, I'd give it a try. I know there is Steam A Seam 2 and Decor Bond in this project. They make it so easy to finish a project fast. The only sewing is the strip set that forms the star. Here the star is traced and ready to cut.


Now things are looking better. Once the gold star was cut out it was a little bit too small and needed something to make it stand out. Placing it on a black background made it look a lot better. I even fused the fabric to the PVC pipe. That was some tricky pressing. See those white interfacing edges showing? A touch of black Sharpie around the edges took care of that. It sort of looks like a magic wand laying on the table.


Each star was hot glued to the original metal star. I can't say this will be a forever tree topper but it looks better than no tree topper at all.


While I was making the star, this tree topper appeared. It would have been fine with me if this one stayed, even though it might have startled me in the middle of the night.

Here it is when it first went on the tree. I decided the star was just a little far from the rest of the tree so we gave it a little trim.

I like this proportion much better. This year, our little tree has lights, ornaments, AND a star on top. I love sitting by the tree in the quiet of the morning. There are lots of stories in those ornaments.

Wednesday, November 11, 2015

November Bee Blocks


Robin is our quilter in charge of the Believe Circle quilt this month. Robin was very considerate and gave us an easy assignment. Thanksgiving is coming up later this month in the United States and many of us have feasts and family and all sorts of fun things to prepare for. She provided a tutorial for these blocks along with a color scheme.


I am really enjoying my work area these days. The color scheme is up on the laptop. I've pulled out my red stash drawers. I can pull fabric from the drawers, audition it, and put it right back if it isn't a winner. This really helps keep the mess down and the drawers are shallow enough so that it is easy to see everything.


Love the warm colors for this month.


This quilt is going to be on fire! Thanks for the easy blocks this month Robin.

Other posts about the Believe Circle:
Believe Circle Quilts 2015
Believe Circle Half Way Through the Year
Believe Circle Quilt Finish

Linking up with Work in Progress Wednesday over at Freshly Pieced. Also linking up with Finish It Up Friday at Crazy Mom Quilts.

Monday, July 6, 2015

Scrappy Strip Quilt Progress - Choosing a Layout


After a nice long weekend with all of my children in one place (which is becoming a rare thing), I returned to my sewing room to see just how much work the quilting fairies did while I was away. What!? Nothing? That just means there is more fun for me.


There are still plenty of strips to sew together. I'm finding this to be quite therapeutic. It makes me almost giddy to put two of the most unlikely candidates side by side and sew them together. Take that you fabric strip. Bet you never thought you would be sewn next to this guy. Hahahaha (that is my evil laugh...just go with it, okay?).


I have sorted the strips by length to reduce the waste of dangly longer pieces. Once a set is sewn together, I cut them into 3 1/2" strip sets. For the blocks, I'm using the instructions from Bonnie Hunter's Diamond Strings quilt.

I set aside a bin to hold all of the blocks and now I have enough to figure out a layout. I found a great link over on Pinterest for half square triangle quilt layouts. I took four favorites and gave them a test run.

First up is a layout that has a jewel box feel to it.


Second is this layout that has a repeating ohio star throughout.


Third is a layout that gives the strips a chevron look.


And last is this vertical layout of slanted parallelograms.

The winner is... the first layout. The strippy scrappy triangle add a level of busyness that calls for a larger design and the jewel box gives it just that. Your eye has a place to rest while still yielding a bright and colorful quilt.

For the next little bit I'll keep sewing strips together to see just how big this quilt is going to be. And you know what...taking all of my scraps and sewing them into beautiful quilts is doing something I didn't expect. It's making more scraps! There is something really wrong with that. At some point, there are going to be pieces small enough to throw away. Not yet, though! I already have ideas for these new scraps.

Saturday, June 27, 2015

About That Day I Was Taking A Break From Sewing


One day last week, I found myself caught up on all my sewing commitments. I put away all my rulers and cutters. My sewing table was completely clear for the first time in forever. I even put the cover on my sewing machine, something that rarely happens. I left the room confidently, saying to myself...I'm going to take a break from sewing.

All was good that day. I had plenty to do and did not give sewing any thought at all, except maybe I thought about my scraps a little. Just a little. Maybe my next quilt should be one of Bonnie Hunter's scrap quilts. I've always wanted to make one of her patterns. It was a passing thought.

The dog crate is in the sewing room. I was only going into the sewing room to zip up the dog for the night. And then I thought, well, while I'm up here I should take a look in my scrap bin, you know, just to see what's in there. Wait, where did that come from? I didn't know I had started a second bin for scraps. When did that happen?


As you can see, my sewing table did not stay clear for very long. And I became hugely inspired by all these ridiculous, I mean, beautiful scraps. I sorted and ironed and planned. And now I have, ahem, four quilts underway from all these scraps. My sewing table looks a bit like a boxing ring.


In the first corner, coming in with 2 1/2" squares and 2 1/2" x 4 1/2" rectangles, we have Oklahoma Backroads.

In the second corner, we have strips being sorted by length.

The strips seem to be winning at the moment, on their way to becoming a strippy diamond quilt.

In the third corner, the 2 1/2" strips are becoming a scrappy trip around the world quilt.

And in the final corner, we have the crumb and triangle bin, bound to become a beautiful crumb quilt someday. These poor scraps keep getting pushed to the floor to make room for other action on the table.

So much for a sewing break. It's okay. I really like the plot twist in this story. We'll have to wait and see what happens next as this sewing saga continues.
Related Posts Plugin for WordPress, Blogger...