Wednesday, October 7, 2015

Seven Methods for Making Half Square Trianges


A while back, I accumulated as many methods for creating half square triangles as I could find. They were used in a class that required LOTS of half square triangles. Each student received a nice hand out with the instructions and math for all the methods, but I had never fully tested each one. So, it was time to officially test and confirm each one to validate the instructions and accuracy. The goal for each method is to yield 3" finished half square triangles, both for consistency from method to method, and so all of the half square triangles created could be used together in a project.

 The seven methods are:
  • One at a time
  • Two at a time
  • Four at a time
  • Eight at a time
  • Eighteen at a time
  • A strip method
  • Another strip method

As a disclaimer, I am fairly conservative when I sew, which means I am more likely to size things up a little more than necessary just to give myself enough margin of error, and also so I can accurately square up each unit once it is created.

Method 1 - One at a time

Use this method when you need only one half square triangle, or your desire is for every half square triangle to be unique.

Cut triangles from two fabrics. I cut a square from each fabric and then cut it on the diagonal to create my triangles. If you cut squares first, they should be one inch bigger than the finished size of the half square triangle. So, for three inch finished units, cut 4" squares.


Place the triangles right sides together and stitch a quarter inch seam on the long diagonal side. Be careful not to distort your pieces. The diagonal cut leaves a bias edge that is more fragile than cuts made square with the grain of the fabric. Press toward the dark fabric.


Once the unit is stitched and pressed, square it up. Use a ruler with a 45 degree diagonal line. Make sure this line is on the seam line. Then check to make sure that the unit is bigger than 3 1/2 inches. If it is not, your seam allowance needs to be smaller, so you will need to start again. Keep going if your unit is 3 1/2 inches or bigger. Hold the ruler in place, then trim two of the sides. Rotate your cutting mat and line up the ruler on the 3 1/2 inch line around the square and the diagonal line on the seam. Trim the other two sides and your half square triangle will be ready to use.


Calculation review: Finished half square triangle size + 1 = Cut square size.
3 + 1 = 4 inches

Method 2 - Two at a time

This is the most common method for making half square triangles.

Cut two squares. The official calculation for determining your square size is to add 7/8 inch to the finished size of your half square triangle to determine the square size to cut. I always add 1 inch just to be safe. For our 3 inch finished units, cut two 4 inch squares.


Lay the light square on top of the dark square with right sides together. Use a ruler to draw a diagonal line on the wrong side of the light fabric. Two products I love when making half square triangles: Creative Grids rulers and PaperMate Sharpwriter #2 lead pencils. Both the lead and erasers are great on these pencils. Neither company paid me to endorse their products. I am just sharing some of my favorite things with you.


Here is how the line should look.


After drawing a diagonal line, stitch a quarter inch seam along each side of the line. They are hard to see, but there are stitching lines there.


Cut on the drawn line.


Press each unit open, pressing toward the dark fabric, square up your units, and you will have two half square triangles ready to use.


Calculation review:
Finished half square triangle size + 1 = Cut square size.
3 + 1 = 4 inches


Method 3 - Four at a time

This is the only method that required more than one try. The first test yielded units that were too small. The instructions said to use the finished size for calculating. For the second try, I used unfinished size and the results were much better. The calculations for this one are trickier, using both decimals AND division. Just use a calculator and go with it. This time use the unfinished half square triangle size and divide it by 0.64. Round that up to the next whole number. For finished 3 inch half square triangles, cut 6 inch squares.


Place the squares right sides together and stitch a quarter inch seam around all of the outer edges. It is really hard to see the stitching lines but I promise they are there.


Cut across the diagonal in both directions.


Press each seam to the dark fabric, square them up, and four half square triangles are ready to use.


Calculation review:
Unfinished half square triangle size / 0.64, then round up to the next whole number.
3.5 / 0.64 = 5.46875, round up to 6 inches.

Method 4 - Eight at a time

Again, start with two squares. To determine the square size, add 7/8 inch to the finished half square triangle size and multiply the answer by 2. Round up to the next whole number. For finished 3 inch half square triangles, cut 8 inch squares.


Place the squares right sides together. Draw diagonal lines in both direction on the wrong side of the light square.


Stitch on either side of the diagonal lines. This is much easier to see from the dark side.


Cut the square in half horizontally and vertically as well as on each of the drawn lines. Since these are eight inch squares, use your ruler to measure four inches to determine your cutting lines.


This is the result once all the lines have been cut.


Press each seam toward the dark fabric, square it up, and eight half square triangle units will be ready to use.


Calculation review:
(Finished half square triangle size + 7/8 inch) x 2, then round up.
(3 + 7/8) x 2 = 7.75. Round up to 8 inches for your cut square size.

Method 5 - Eighteen at a time.

This is my favorite method. Many blocks that are made completely of half square triangles use a four by four setting, which means you need 16 half square triangles to make the block. I can see using this method with a Layer Cake (collection of fabric sold in packs of 10 inch squares) and making a cool sampler of half square triangle blocks.

This is the last method that will start with two squares. To determine the size to cut your squares, multiply the finished half square triangle size by 3.6, then round up to the nearest number divisible by 3. We will use 12 inch squares.


Place the squares right sides together. Draw two horizontal and two vertical lines on the wrong side of the light square. Since this is a 12 inch square, the lines will be at the 4 inch and 8 inch marks. This is why the block size needed to be divisible by three. Once these lines are drawn, it will look like a tic tac toe board. Now, draw diagonal lines in one direction only. There will be four diagonal lines.
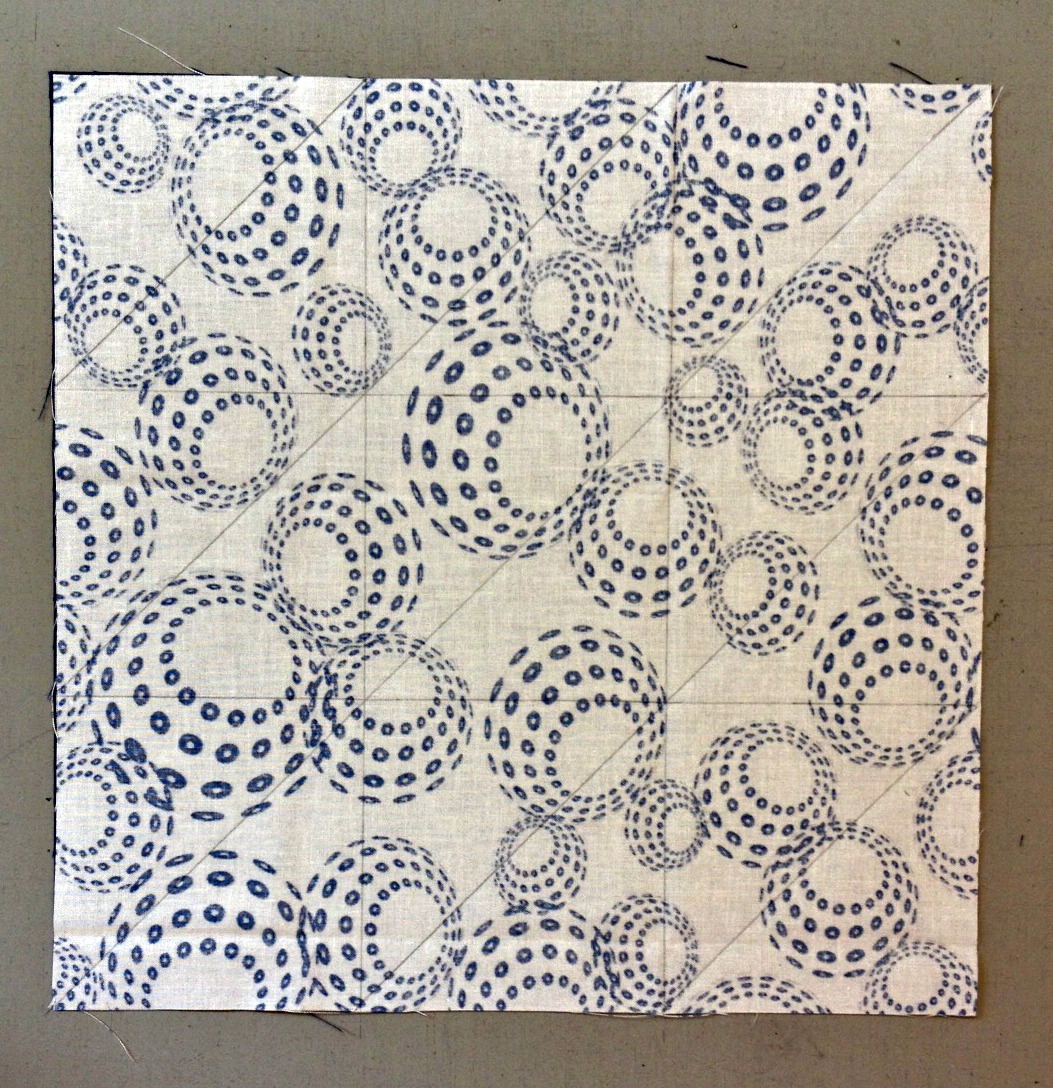

Stitch a quarter inch on either side of the diagonal lines only. Here is how the stitching will look.


Cut on all of the drawn lines...horizontal, vertical, and diagonal.


Press each seam toward the dark fabric, square up each block, and 18 half square triangles will be ready to use.


That is a lot of half square triangles. I find this method very fast when you need lots of half square triangles.

Calculation review:
Finished half square triangle size x 3.6, then round up to the nearest whole number divisible by three.
3 x 3.6 = 10.8, round up to 12 inches for the beginning square size

Method 6 - A strip method

This is my least favorite method. It wastes too much fabric. There is no specific calculation for this one, so I used the finished half square triangle size for the width of each strip. Cut two strips, one from the light and one from the dark fabric.


Sew them right sides together along one of the long sides using a quarter inch seam. Press open, with the seam toward the dark fabric. Use a ruler to cut the squares, with the point of the squares on the seam line.


Each square needs to be 3 1/2 inches.


The good news about this method is that the blocks are perfectly cut. No extra squaring up to do.


Calculation review:
No special calculation required. Use strips the same width as the finished half square triangles.

Method 7 - Another strip method

Again, for this method, the strips are cut the width of the finished half square triangles, in this case, 3 inch strips.


Place the strips right sides together and stitch a quarter inch seam on BOTH long sides.


This method also requires a special ruler, the Quilt in a Day 6 1/2 inch triangle square up ruler. I like this method, and I really like this ruler. Place the line with the measurement of your unfinished half square triangle on the stitching line. Trim around both sides of the ruler.


Rotate the ruler to line up with the seam line and cut edge and cut again. Press each unit open with the seam allowance going toward the dark fabric. This is another method that comes out perfect. No need for any additional squaring up. This method could come in handing when working with a jelly roll (fabric collection cut into 2 1/2 inch strips).


There are other methods available, such as triangles on a roll, that are not included here. Which one is your favorite? Are there other methods you would like to share?

This adventure yielded 38 half square triangles. I picked a couple of my favorite layouts to see how they would look.

While I was arranging these I thought about a quilt that featured each and every layout on the sample page in just two colors. Then I did a little bit of math. There are 72 blocks on the page. Each block has 16 half square triangles. That is 1,152 half square triangles. That is a lot of triangles.

Other posts about triangles:
Just Sewing - Potholders
Hot Pink Holiday Quilt
Scrappy Holiday Tree Quilt

Monday, October 5, 2015

October Bee Blocks - Quilt as you go

I could not wait to get started on our Believe Circle bee blocks for this month. Jennifer is our quilter this month and she asked for a quilt as you go design based on a tutorial over at Hey, Let's Make Stuff. The reason I was so excited is because of the color scheme. I have a hand dyed panel that was made by Anita Heady that I have been wanting to use forever, and this is the project that will make that happen.


The only thing I could ever think of to do with this gorgeous piece was to frame it as it was. But today, I got brave and cut right into it. The tutorial required lots of strips of varying sizes. I was a little nervous about being completely random so I laid them out on my block for a trial run.


The more strips I put on the piece, the more excited I got. However, this is a sew, flip, and quilt technique. One strip at a time.


After each strip was applied, I would test out the next two or three, and then have to back up and sew them to the project. The finished block is supposed to be 12 1/2 inches, but I cut my batting and backing 14 inches just to give myself some wiggle room.


Originally, the plan was to end with the blue on the outside, but I ran out of blue, and had to go back to the deep oranges and golds. I think it turned out just fine.


This block was fun and easy to do, mostly because all of the colors were on one piece of fabric. It almost feels a little like cheating.

When I look at this block, I see a flower. When my twelve year old son looked at it, he said, "Wow mom, you made a staircase into a pit of fire!" That is why it is called art, right?!


One thing I did not do is prewash my fabric. Being hand dyed, it absolutely needs to be washed. I zigzagged around the outside edge and will put it through the gentle cycle later today. Then it will be ready to square up to the 12 1/2 inch size.

Each month, bee members are supposed to make two blocks. I don't have another hand dyed piece to use, so the second block is going to require a little more stash busting before stitching can begin. There are so many gorgeous colors to choose from this month. That second block is going to wait for a couple of weeks. Inspiration will come along soon enough for the second block.

If you are interested in learning more about do. Good Stitches, check out their Flickr page.

Linking up with WIP Wednesday over at Freshly Pieced and Fabric Tuesday at Quilt Story.

Other bee posts that might interest you:
September Bee Blocks Finished
Believe Circle Quilts 2015
Raindrops - A Finished Quilt

Friday, October 2, 2015

Funky Quarter Cabins - A Finished Quilt and Tutorial


I wasn't quite sure if this quilt was "funky" enough to earn such a title, but that bold circle print pushed it over the funky edge for me. This was a fun quilt to make and would be so perfect for a baby or young child. The three bold prints in this quilt top were the starting point and the rest grew from there.

Because the quilt top is so busy, the quilting itself is a simple straight line grid, with stitches a half inch away from each seam going vertically and horizontally. The thread on top is a green King Tut 40 weight Betty Cotton (color #987). The bobbin thread is a 30 weight Sulky Blendable (color 4008).


Sometimes using different weight threads on top and bottom can cause tension issues with your machine, but this time everything worked out just fine. The backing fabric is a salmon Kona solid.


The choice of binding fabric was supposed to be a no brainer until I auditioned it. I was certain the dark blue was perfect but it looked sort of boring to me. Instead, the funky level is jacked up a bit by the bold striped binding. I am very glad I took a closer look at my choice before cutting and sewing.


The blue option shows up a little better in this picture.


I knew going in that there was not enough of the stripe to make it all the way around the quilt but it's okay. This quilt is supposed to be funky, right? I finished it off with a little strip of blue that is the same fabric as in the quilt top.


Once the quilt was completely finished, I noticed a discolored section on the back. Wow, I was mad. Mad that it was there. Mad that I did not see it before using it, and extra mad because I had already discarded a scrappy backing I made because there was a stain on one of the pieces. The plan was to put this quilt up for sale but there was no way I could do it as it was.


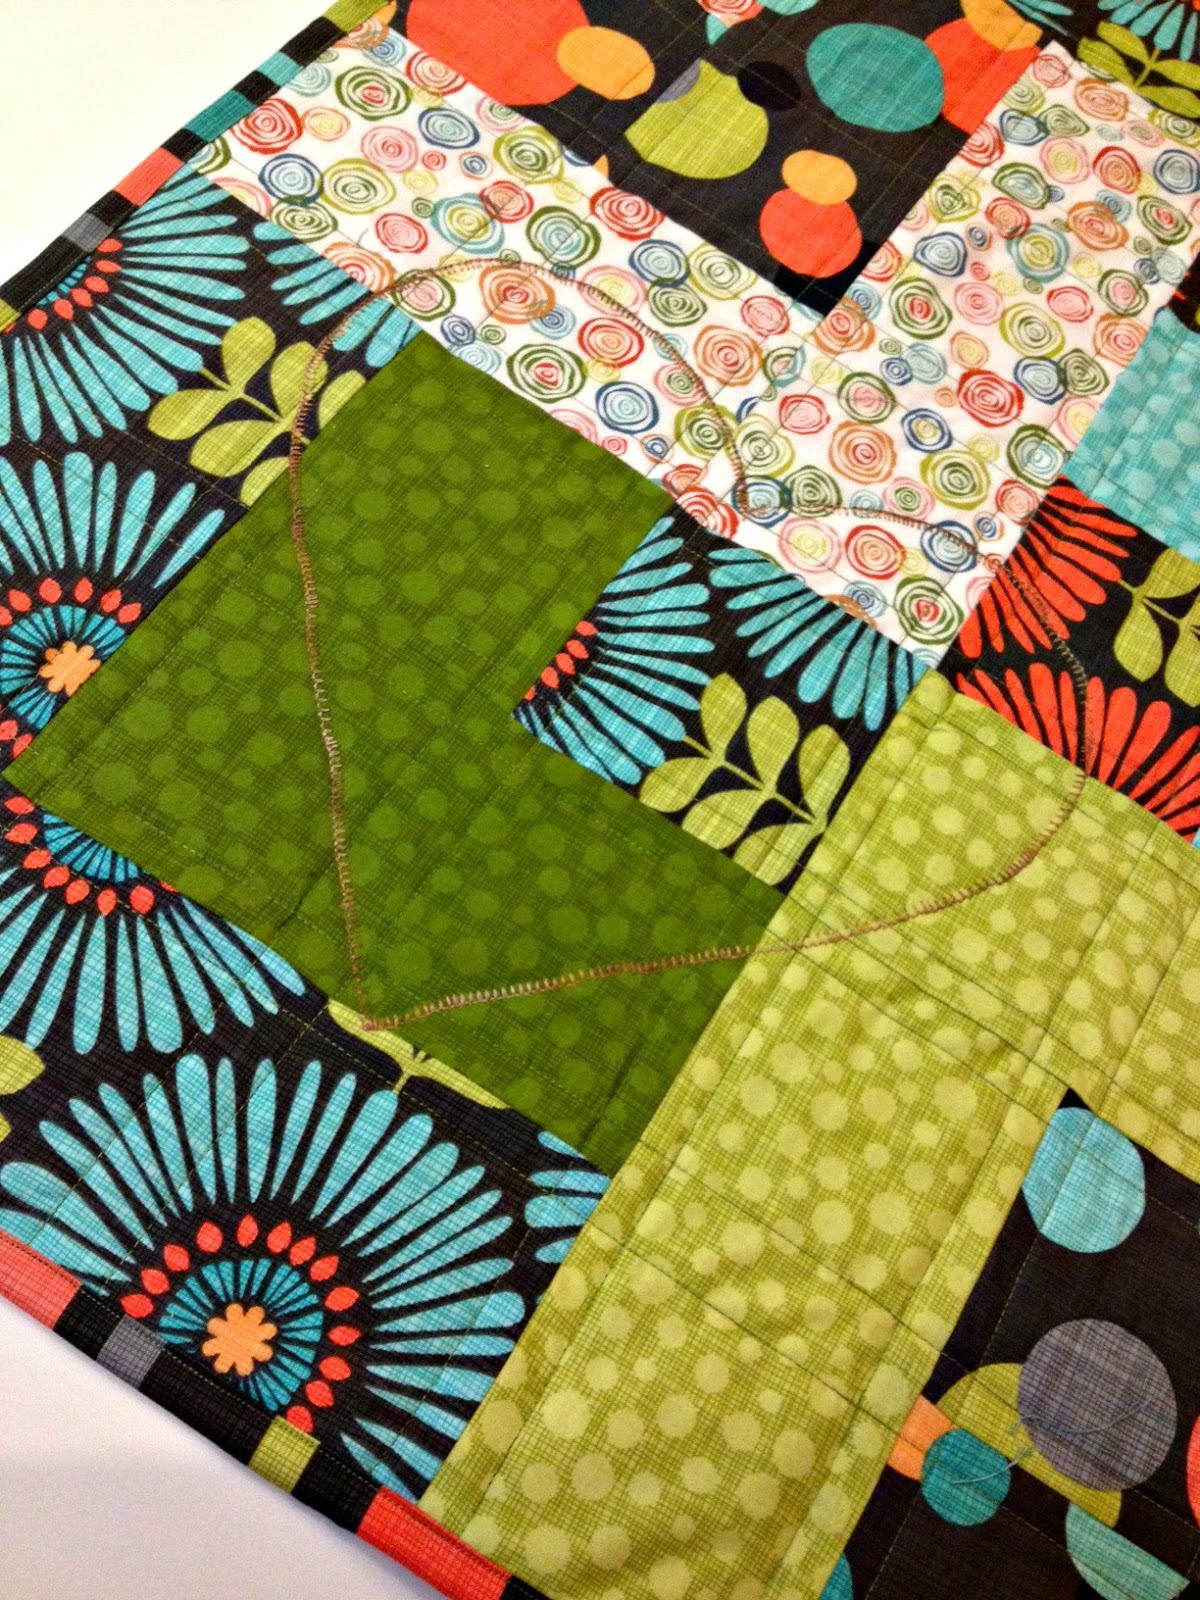
It's all okay now. I fixed it. I appliqued a heart from a cute little owl print right over the top of the problem area. It was just meant to be, that sweet little heart. It adds just the right amount of love to the quilt.


I love those owls.


I also love how the blanket stitching around the heart is echoed on the quilt front.


The finished quilt measures 36" x 48".

Would you like to make your own funky quarter cabins quilt? You have to find your own funky fabric but I can certainly share with you how to make the blocks and assemble the quilt top. If you aren't going for a scrappy version, you will need six fat quarters. The cutting for each fat quarter is very tight, meaning there is very little room for error and if you happen to get shorted even a tiny bit on the fat quarter (it should measure 18" x 21" or more), there will not be enough fabric to cut all the pieces. If you want to be safe, it would be a good idea to purchase a half yard of six fabrics and plan to incorporate the leftovers on the quilt back just to be safe. Each fat quarter should be cut as follows:
First, cut four strips that are 4 1/2" wide each. For two of the strips, cut one  4 1/2" x 8 1/2" rectangle and one 4 1/2" x 12 1/2" rectangle from each. For the other two strips, cut one 4 1/2" x 8 1/2" rectangle and two 4 1/2" squares from each strip. With each fat quarter, there are enough pieces for two blocks with corner and outside and two blocks with middles. So each fabric will appear in four different blocks.

For those of you going for a more scrappy look, each block needs two fabrics. From the first fabric, cut a 4 1/2" square, a 4 1/2" x 8 1/2" rectangle, and a 4 1/2" x 12 1/2" rectangle. These will form the corner square and the outer round of fabric for your block. From the second fabric, cut a 4 1/2" square and a 4 1/2" x 8 1/2" rectangle. These pieces will become the middle round of fabric for the block.

The blocks are very simple with only five pieces in each one.


Before you start sewing, you might want to check out the process I used to figure out the fabric placement for the blocks. Once you are satisfied with your design, the sewing can begin.

The first step is to lay out the pieces for your block.


Stitch the corner square to the square that begins the second round of fabric. Press the seam to the darker fabric.

Stitch the remaining rectangle of the second color to the long side of your stitched squares. From this point, you will always press your seam toward the piece that was just attached.


Stitch the smaller piece of the outside round of fabric next.


Stitch the last piece to your block as pictured, and your block is complete. Repeat this 11 more times to finish all of the blocks.

As I was working on the layout for this quilt, I would get confused about which way the block should be turned. Finally, I made myself a diagram to make it easier as I moved blocks around on my design wall. Each "X" shows where the corner square for the block belongs.


Stitch the blocks together for each row, alternating the pressing direction of the seams. Rows one and three, press to the right. Rows two and four, press to the left. This will help the rows go together easier. Once all the rows are made, stitch them together for your own funky quarter cabins quilt top.


This quilt (cute heart on the back and all) is available for purchase.

There are lots of scraps on my cutting table from this project. A smaller, scrappy project might be underway next week.

Linking up with Finish It Up Friday over at Crazy Mom Quilts.

Other posts that might be of interest:
Quarter Log Cabin Quilt Finish
Giraffe Baby Quilt and Tutorial

Wednesday, September 30, 2015

Five Tips: Choosing Fabric for a New Quilt


Today, I'd like to share more about my process of selecting fabric for a new project. There is no one size fits all formula for this so it is simply how I chose fabric for this quilt. Just like all things in life, being comfortable with fabric selection takes practice. For some, it is a very intuitive process while for others, it is much more defined, meaning there is much more thought put into value, scale of design, complementing colors, contrasting colors, and other "formulas" for getting just the right mix of fabrics for a project. I like to think of my process as a little bit of both.

------------------------------------------------------------------------------
Tip 1: Almost everything in life gets better and easier with practice, including choosing fabric for a quilt.
------------------------------------------------------------------------------

Here is the block design planned for this quilt. It finishes at 12" so the smallest square is 4". Always consider the size of the pieces to be used in a quilt when selecting fabric. Large scale prints will be lost if cut small (and sometimes that is the desired effect) while small scale prints might be lost in a large cut.


So much of fabric selection is personal taste. In the end, it is what you like that matters so try not to feel confined or restricted by what you believe you are supposed to do. Have fun. Experiment. I usually encounter a surprise or two with all of the quilts I make.

------------------------------------------------------------------------------
Tip 2: Consider the size of the block and the size of the pieces within the block when selecting fabric.
------------------------------------------------------------------------------

For this project, I knew I wanted to make a bold baby quilt. The starting point for this project is three large scale print fat quarters.


They were part of a larger bundle but I wanted to stretch my fabric selection muscle a little and try to add some pieces that were outside of the fabric collection. This is the first attempt.


These were pulled late at night so I took a quick picture and emailed it to myself. While at work the next day, I pulled this picture up on my computer monitor so I could study it throughout the day. At the end of the day, I marked my decisions and emailed it back to myself so I could play some more at home.


Why did some of these get kicked to the curb? For the tone on tone blue/teal fabrics, I decided that one was enough. There was no benefit of keeping the others and the one on the upper left was leaning a bit too much to the green side of teal anyway. The top center print, while great for color, was a large scale print that seemed to compete with the three main prints for the project, so out it went. The creamy print on the right...a bit too creamy. The bottom right print had a sketched feel to it while all the other fabrics had clear, clean designs so it just wasn't a good fit. The bottom comma print was too dark. The orange on the left was a bit too neon. It is actually a print that was part of the original fabric bundle but the boldness of the three main prints was enough for this project.

At this point, one of the things I thought this project needed was more light fabrics.

------------------------------------------------------------------------------
Tip 3: Rather than choose all of the fabrics in one sitting, walk away for a while. You will often be freshly inspired when you revisit your selections.
------------------------------------------------------------------------------

After another evening of adding and taking away, this is the final pull of fabric.


One thing to remember...what looks good as a collection of fabric may look far different once the quilt making begins.

------------------------------------------------------------------------------
Tip 4: Be willing to add or take away fabric as a project progresses.
------------------------------------------------------------------------------

Here is the beginning of the quilt layout. I had already spent time moving the focus prints around and was happy with their locations. The next step was to choose the fabric to go with the focus print in each block. None of the pieces are sewn together. It is on my design wall, which is an insulation board covered in flannel. The pieces stick to the flannel fairly well so it is easy to move things around.


The last block on the second row doesn't even have anything with it yet. After spending a couple of hours working on it, I decided to leave it overnight (it was getting late) and look at it with fresh eyes in the morning.

After another hour or so of playing the next morning, the layout was complete.


Let's look at them side by side to better show the differences.


What changed? There are two big changes that happened while laying out the blocks. First, the dark green tone on tone print was added. This was a surprise. I was so determined to keep this quilt light and whimsical that I would not even consider any dark colors. At first, before even cutting into this fabric, I pinned the dark green fat quarter randomly to the design wall and stepped back. It instantly added just a touch of warmth to the project. The second surprise was that I cut back the number of light prints in the project. All the variety seemed to make it too busy. In the end, there is only one light fabric in the quilt and I love the way it looks.

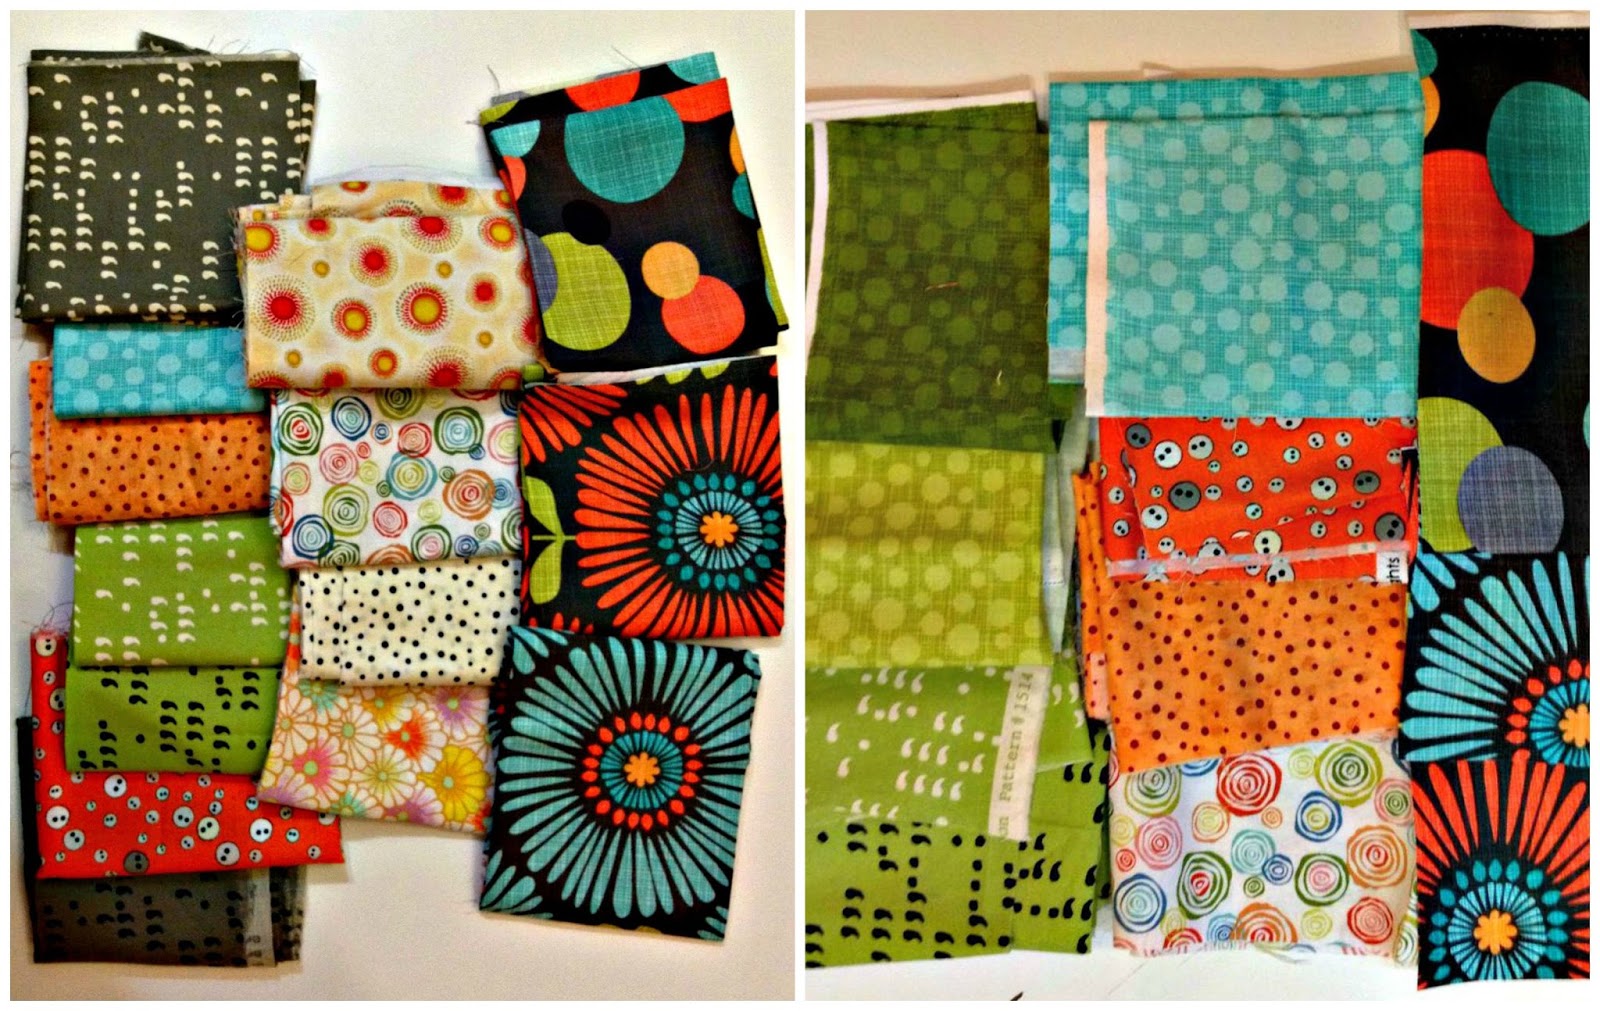
Here are the fabric pulls side by side. The first shows what I thought would be used in the quilt and the second shows what actually was used in the quilt.


In the final version, six of the fabrics are from the same collection. Five are from my stash. I am happy with the mix.

When making simple, large scale blocks, it is a good idea not to piece each block until the final layout is determined if possible. It was tempting to pair up the fabrics in advance and then figure out the block layout. Sometimes that works out and sometimes it doesn't. It can be frustrating to keep changing the layout to keep too many things from being too close together only to find you have created another problem. It becomes sort of like trying to solve a Rubik's cube puzzle.

------------------------------------------------------------------------------
Tip 5: For simple, large scale blocks, consider the entire quilt top rather than just one block at a time.
------------------------------------------------------------------------------

Once the design was completed, the quilt top went together quickly. I hope to share a finished quilt and a tutorial for making it on Friday.

Other posts of interest regarding fabric selection:
Patchwork Prism - A Finished Quilt
Scrappy Strip Quilt Progress - Choosing a Layout

Linking up with WIP Wednesday over at Freshly Pieced.


Related Posts Plugin for WordPress, Blogger...