Showing posts with label memory quilt. Show all posts

Sunday, May 5, 2019

Two tutorials - Quilts from Shirts


The original post for these quilts was just over two years ago. This set of mini-quilts was made for a family of five siblings to remember their father. I've received several questions about reproducing the design for the first and third quilts so thought I'd share that information here so that you can make one, too.

One frequent question is about how to size the finished quilt to be bigger or smaller. Both of these designs are based on an eight block by eight block grid. In other words, there are eight rows of eight blocks. To determine your finished quilt size, decide how big the finished block size will be and multiply by eight. Here are some examples:

  • 2-inch finished block = 16-inch square finished quilt top
  • 3-inch finished block = 24-inch square finished quilt top
  • 4-inch finished block = 32-inch square finished quilt top
  • 5-inch finished block = 40-inch square finished quilt top
  • 6-inch finished block = 48-inch square finished quilt top
  • 7-inch finished block = 56-inch square finished quilt top
  • 8-inch finished block = 64-inch square finished quilt top
  • 9-inch finished block = 72-inch square finished quilt top
  • 10-inch finished block = 80-inch square finished quilt top
  • 11-inch finished block = 88-inch square finished quilt top
  • 12-inch finished block = 96-inch square finished quilt top
  • 13-inch finished block = 108-inch square finished quilt top
  • 14-inch finished block = 116-inch square finished quilt top
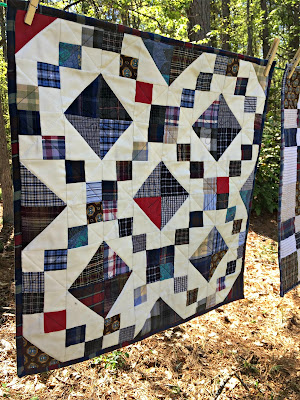
That should cover every size from a mini-quilt up to a king sized quilt. The quilts hanging on the line are 24-inch quilts which means they have 3-inch blocks.

Here is the simple grid for both quilts. Forgive the low tech drawings. You would think that since my day job is all about technology, I would up my game but I really love the simple process of graph paper, ruler, and pencil.


Let's figure out the design breakdown for the first quilt. It is based on the traditional jewel box pattern which is made up of four-patch blocks and half square triangles.


It is a two value quilt, using dark and light fabrics. In my version, the dark is scrappy from the shirts and the light is a Bella solid (ivory maybe). If you look closer, the dark value is really both dark and medium values. I could get away with a wider range of values since my light was very light and also consistent within the quilt.


Each quadrant of this quilt is exactly the same so make one and repeat three more times. The upper left quadrant is drawn out for you. Each quadrant consists of eight half-square triangles and eight four-patch blocks. For three-inch finished blocks, each square in the four-patch blocks should be cut to two-inch squares. Here's the math for that:

    Finished block size divided by 2, then add half an inch = cut size of squares for the four-patch unit.

And a couple of examples:

    Finished block size = 4 inches
    Divided by 2 (or take half if that's easier for you to think about) = 2 inches
    Add half an inch = 2 1/2" cut squares for the four-patch block

    Finished block size = 7 inches
    Divided by 2 = 3 1/2 inches
    Add half an inch = 4 inch cut squares for the four-patch block

There are many great tutorials out there for half-square triangles, so go to your favorite or check out this one for help making those.

That's all there is to it. 


Now let's take a look at the third quilt hanging on the line. In one way this quilt is easier and in another it is more complicated.


It's easier because it has simpler units. It is solid squares and half square triangles. It's more complicated because it uses three values: light, medium, and dark. The layout is a little trickier too only because it's easy to turn one of those triangle units the wrong way while sewing the blocks together. 

Here's the grid for this one:


For the grid, L means light value, M means medium value, and D means dark value. Because I was working with shirts and had a limited colors/values available, this design was a bit tricky, but it worked out just fine. I had to be careful of placement for those fabrics that could pass for more than one value. The stronger the value, the stronger the design stands out for this quilt.

It's a busy drawing so here is the break down of the blocks you need:

    Light squares = 20
    Medium squares = 12
    Half square triangle blocks with half light, half dark = 20
    Half square triangle blocks with half medium, half dark = 12

We covered how the block size determines the quilt size way up at the beginning of this post and I've also shared a link to my tutorial for making half square triangles. Here it is again just in case you skipped over the instructions for the first design and came straight to this one.

With these details, you should be ready to jump in and make your own version of this quilt, too.

I love how simple squares and triangles can be put together to make thousands of designs. Have fun creating your own quilts and please let me know if you have any additional questions or need more details for either of these quilts.


Sunday, March 31, 2019

Eight Shirts, Three Quilts

Last fall, I made two memory quilts for a coworker who lost her brother. She gifted those quilts to her mother and her sister-in-law. You can read about those quilts here. As soon as she shipped them off she started wishing she had one of her very own. Luckily, there was just enough shirt fabric to make one so that she would have her very own quilt to keep close.


If you look closely at this quilt, you will know which of the shirts were long sleeve and which were short sleeve. It was a challenge to even get one block out of a couple of these. I am very thankful for long sleeves for this project.


I had to use the pocket front for all but one of these shirts. The pockets could have been left unquilted but she requested them stitched down so a hand or foot would not get caught and tear the quilt. It would be fun to leave them unquilted if this were going to be hung on a wall, You could keep special notes or other memories in the pockets.


The backing is navy flannel just like the other two quilts. The first two quilts each had one of these photos on the back. This one has both! It will be easy to flip up a corner to see the picture. This photograph also shows the scrappy binding. I was not sure there was going to be enough shirt left for a binding, but there was. The binding scraps frame each of the pictures on the back.


All of the pictures are after the quilt was washed. The quilting is a simple meander in an off white thread to match the background fabric. This quilt was delivered earlier today and I could tell she was very happy to receive it.


I couldn't help but take a picture of our back yard bird set up. It's been so active lately, except when I scare them all off taking quilt photos.


Eight shirts, three quilts. So happy to have been a small part of saving these memories.

Friday, November 30, 2018

Two Memory Quilts - Simple and Special


I've been on a bit of a sewing break, focusing more on time with my family and taking care of my health. But when this project came my way, I was ready to get back to it. Many months ago, a coworker had asked if I would be willing to make a quilt from her brother's shirts. I told her I would be happy to, but had pretty much forgotten until she showed up with shirts in October.

Eight shirts, four cool color, four warm color, all in excellent condition. We looked at quilts on Pinterest and she determined quickly what she did and did not want. She wanted simple throw quilts. Two, similar but different. She really liked meandering for the quilting. I like all those squiggly lines is how she put it.


I made this one first. Thirty simple blocks that are 6 1/2" x 10 1/2" shirt squares with a 2 1/2" x 10 1/2" strip of background fabric stitched on each long side. The resulting 10 1/2" block is rotated in the layout of 30 blocks. It took a little bit of finagling to get a layout where the color and pattern was nicely distributed, and I love the result. There is a 2 1/2" border of background to frame out the quilt.


For the second quilt, the blocks are the same style but smaller. Three borders, all cut 2", finish this version. I love the checkerboard border.


This picture makes it easier to see the difference in block size between the two quilts.


Here's a closer look at the meander quilting before the quilts were washed. This free motion quilting design goes super fast.


Sometimes a little too fast. Can you see the light colored thread poking through the back? That is what happens when I go too fast. I had to really pay attention to my speed to limit this result. Slow and steady wins the race, right? The good news is that this picture is before washing. After washing there is just enough crinkle going on to hide the light thread on the back.


The backing fabric is the same for both quilts, a navy flannel. I prewashed the flannel since I knew it was likely to shrink more than the other fabrics. The labels are two pictures. She did not want any words. I used binding scraps to frame out each one. They are hand stitched in place, although in this picture they are just pinned in place.


The binding is scrappy, and includes all of the shirts.


These quilts are being delivered today. One of my favorite parts is seeing the reaction of the quilt owners when they get a first look at the quilts. Some want to see progress photos all along but others, like this customer, want to see the quilts for the first time in person when they were completely finished.

One of the quilts will be gifted to the mother and the other will go to the wife of the man who wore these shirts. There are so many reasons to love quilting, but bringing joy and comfort to others is right up there at the top.

Sunday, April 9, 2017

Five Small Memory Quilts


More than two years ago, I made my very first memory quilt from the clothing of a loving father. The daughter gifted it to her mother and I understand it has been displayed on her mother's bed every day since then.

Late last year she asked me if I would take the scraps from that project and make five small quilts so that each of her siblings could also have a memory quilt to remember their father by. That is the primary project I have been working on in 2017. She wanted to gift them for Father's Day this year and I will be delivering them to her this week.


I wanted to make these versatile so that they could be used as a pillow, a table topper, or a wall quilt. Each one has an envelope backing so that a pillow form can be easily inserted.


Here it is as a table topper. Each small quilt is 23" to 24" square. The backings are made from clothing as well. They are just as unique as the quilt fronts.


It was a sunny and breezy day when I was taking photos. There were very few big pieces left by the time these backs were made. The center one uses a shirt that was a bit too thick for patchwork but made a great pillow back. The pillow form fits in that one by unbuttoning the shirt front.


Here is a closer look at each of the quilt fronts.


I was constantly reminding myself that the focus of these quilts is the clothing. Not the patchwork. Not the quilting. There were a couple of tops I made and set aside because the clothing was not the focus. While I love them all, this simple square in a square is one of my favorites, mostly because in the beginning, I thought it would be boring. It is anything but boring.


You can't see it in the picture, but this is the most heavily quilted of the set. I was so nervous with this one because about half way through, I thought it was going to be overdone, but once it was finished, it turned out to be the one with the most old fashioned feel to it. Most of the clothing fabric is shirts. Some is pajamas, and some, like this solid red, is from boxer shorts. In this case, red Santa boxer shorts. It's the perfect accent fabric and I just love the fun behind the history of it.


I wanted each one of these quilts to be special. There was one point when I was struggling to come up with patchwork designs for them. This was a last minute addition to replace one that I was feeling ho hum about. When these were in the completed top stage with no quilting on them, this was my favorite.


What I like most about this quilt, is that every piece of fabric is from clothing. All of the others have a Moda Bella solid for the background. There weren't enough really light clothing items to do that throughout, but I'm happy that this one is all clothing.


This is the only one where part of the quilting is in a darker thread. There is a flower quilted in the center of the larger squares in a dark blue thread, and that same thread is used to stitch lines diagonally through the darker fabrics. There is also a layout mistake with the patchwork on this one. I did not see it until it was far too late to correct, and I think it adds an element of quirkiness. Can you find it?

I am really excited to finish and deliver these small quilts. Making memories is a very special part of quilt making for which I am thankful to be a part.


Monday, August 15, 2016

Memory Quilt Fit for a Queen


A Queen size bed, that is. This quilt is a commission memory quilt made from the night gowns of a special mom. Up until now, the memory quilts I have made were mostly from men's shirts. This is the first one I have done with pastels and florals. It was a sweet change of pace.


This is also the largest quilt I have ever made. It measures 91" x 114" and fits very nicely on a queen bed.


We covered all seasons with the gowns. There is seersucker and cotton knit, satin, and soft flannel. It is quite heavy since many of the fabrics required interfacing to stabilize them for a quilt.


The quilting was kept very simple. I used a cream 50 weight Aurifil thread to stitch through each block horizontally and vertically. Then I switched to a matching blue thread, also 50 weight Aurifil, to stitch down the center of all the sashing. All the crinkles are because the quilt has already been washed and dried, ready to be displayed on a bed or wrapped around a loved one.


The binding is the same blue fabric as the sashing and setting triangles. It is a Kona cotton in the color Evening. Such an appropriate color name for a quilt made out of night gowns.


I delivered this quilt to its owner this week. It was fun to watch her taking it all in. She knew stories behind each of these precious gowns and it was very special for me to share in just a tiny part of that.

Friday, July 22, 2016

Memory Quilt to Remember a Special Mom


I am making another set of memory quilts, this time in memory of a special mom. This is the first one I have made using female clothing, and this one specifically uses pajamas.


While it takes extra effort to work with the different weights and textures, I love the result in the quilt. There is so much more to enjoy from a tactile point of view. Satin and flannel, cotton knit and lightweight seersucker. To sit and hold this quilt is a real treat to the fingertips.


The pattern is a familiar one from my memory quilt making experience. I like that it showcases bigger pieces of fabric from each garment. The solid blue is Kona Evening. It is not quite this bright in real life but it certainly does make all the feminine pastel fabrics shine.


All of these pictures were taken after the quilt had been washed so it is nice and crinkly. The quilting is very simple with a line of stitching surrounding all of the pieced squares and then diagonal lines through each square to finish it off.


The thread is a Sulky Blendable. It is a pastel color way with pink and blue and yellow.


The binding is made from one of the summer gowns. It is a large floral that includes all the colors. The finishing touch is a special label honoring a special mom and wife. This quilt was commissioned by her daughter and was given to her husband. There is a second quilt in the works. It is much bigger and a pattern that I have not used for a memory quilt before. I hope to be sharing that one soon.

Friday, December 4, 2015

Memory Quilt Finish: Two Beautiful Quilts

Two more finished memory quilts to go with one I finished a few weeks ago. They are very similar. Only the blocks are different. The quilting and binding are the same.
Each quilt contains eighteen shirts. The background fabric is Moda's Bella solid in Porcelain.
The large squares are cut 9 1/2 inches. The blocks with the smaller squares have a 3 1/2 inch center square of shirt fabric. A 3 1/2 inch square of background fabric is sewn to each side, then a 3 1/2 inch x 9 1/2 inch rectangle of background fabric is sewn to the top and bottom. It is a super fast and super easy block to make and I love the contrast of small and large squares.
Each one has a label sewn on the back.
The backing of this quilt is a solid green. For quilting, I stitched a quarter inch away from each side of the seams connecting the blocks and then I stitched a cross hatch of diagonal lines through all the blocks.
The binding for each quilt is scrappy shirt fabric.
This quilt finishes at 58 inches square. It has already been washed, giving it that old fashioned crinkly cozy quilt feeling.
Here is the other quilt. It is made by cutting four 5-inch squares from each shirt. The squares are combined into a four patch block. The sashing between each block is cut 1 1/2 inches wide. The outside border is cut at 2 1/2 inches wide. This quilt finishes at 63 inches square.
There are two lines of quilting one each row of sashing and the four patch blocks are cross hatched on the diagonal. All of the stitching lines run into the border so no additional quilting was needed in the border.
Here is the label on this quilt.
The backing on this quilt is made from two colors, a green and a brown. That brown is tricky. Sometimes it looks blue and other times, like in this picture, it looks purpleish. I'm sticking with brown.
Here is a closer look at the quilting.
The plaids make both of these quilts look warm and cozy... and they are just that.
I'll be delivering these quilts to their owner in the next week or so. They were a pleasure to make and I hope they bring many warm memories to all that snuggle under them.

Linking up with Whoop Whoop Friday at Confessions of a Fabric Addict and Finish It Up Friday at Crazy Mom Quilts.
Related Posts Plugin for WordPress, Blogger...