Friday, September 11, 2015

How To Make Fabric Laces For Skates


One of my mantras is that everything is better with fabric so anytime there is an opportunity to incorporate fabric, it is going to happen. Also, being a girl with many and varied hobbies, I love to roller skate. It's fun, great exercise, and a great way to spend time with my youngest son. Recently, I decided it was time to buy my own skates rather than rent them.


Is that skate with it's plain black lace not the most boring thing you've ever seen? My son and I have the exact same kind of skates, too, so there needed to be a way to tell them apart. Maureen Cracknell has a tutorial up on her blog that shows how to make fabric laces for your sneakers. It was the perfect starting point for my project.


First, remove the laces from the skates and measure them. These are 67" long. Then, choose a fabric and cut some 2" strips to total the length of two laces. This fabric is a stripe from Lakehouse. The strips are sewn end to end in the same manner as quilt binding (Maureen's tutorial shows this).


Because these laces are going on skates and need to be extra strong, fusible interfacing was added to the wrong side to make them super durable.


Press the long strip in half lengthwise.


Open it up and press each long side to the center crease.


Then fold it back in half and press one more time. Stitch down each long side to finish it off.


Looking good and so much more personality that boring black.


This step is different from the sneaker tutorial. Instead of lacing up the skates and then turning down the edges to finish the laces, I cut the ends at a sharp angle to make it easy to slip them through the lace holes. If the ends are turned under to finish, the lace becomes too thick and cannot be removed without cutting the end off. This method allows for the laces to be taken out and put back in easier.


To finish, the ends were zigzag stitched to keep them from fraying.


Here is an after and a before. Which one do you like best? I'm all for a good dose of color.


Now I need to think about some matching socks!


All finished. Happy skates. Happy skater.

Wednesday, September 9, 2015

Five Most Important Tools for New Quilters


You have decided that you want to make a quilt. That's great! Now what? Where should you begin? It is so easy to get overwhelmed by all the resources out there for quilt making. Choosing the right tools is one of the most important decisions you will make as a new quilter. This list certainly doesn't encompass all the tools you need to get started but will definitely help you get a positive start to your quilt making adventure.

1. Sewing Machine


The sewing machine can be the thing that makes or breaks your love of quilt making. There is no greater quilt making frustration than bad tension, breaking threads, or locked up machines. There is no greater quilting bliss than a machine that operates smoothly and consistently every time you use it.

What features should you consider?

For piecing a quilt top, a good straight stitch is all that is required. Other features to look for that will allow you to quilt the quilt and expand your quilt making beyond basic piecing include:
- zig zag stitch for machine applique
- ability to keep the needle in either the up or down position
- ability to cover or lower the feed dogs
- additional feet - walking foot and free motion or darning foot
There are many more features available. Be sure and do lots of reading and research to determine which extras are important to you.

How will you know which machine is for you?

I highly recommend you purchase a sewing machine from a dealer rather than straight off the shelf. A dealer can answer questions after purchase, help you maintain your machine properly, and be a resource for repairs should you ever need them. Ask for a demo then ask for a test drive. Sitting down and using a machine, no matter how skilled or not you are, will help you know your comfort level with the machine. It is sort of like test driving a car. It might be a great car but if the blind spot is in just the wrong place, then it is not the car for you. Be sure and test drive more than one machine to help you compare features and comfort.

How much should you spend?

The most important thing to note with a sewing machine is that it is not necessary to spend a bazillion dollars on a super fancy sewing machine made especially for quilting. It is equally important to make sure you have a quality sewing machine, so you probably don't want to purchase the least expensive one either. A quality basic sewing machine generally costs in the $300-$400 range and should last a long, long time, so it really is an investment in your sewing and quilting future. Also, if you purchase your sewing machine from a sewing machine dealer, they often have a program to allow trade ins if you decide quilting is your thing and you want to upgrade to a nicer sewing machine.

2. Scissors


Fabric cutting scissors are critical to any sewer and quilt making falls into that category as well. My personal favorite is classic Gingher scissors (8-inch knife edge dressmakers shears). Mine were given to me as a gift when I graduated from high school. That was more than thirty years ago. If you have issues with hand strength there are several spring action options available. The most important thing with your scissors is that they are sharp and comfortable to use. Save these scissors for fabric cutting only. Using them for other purposes such as cutting paper will dull them in a hurry.

3. Cutting Mat


One of the keys to success for any quilter is accurate cutting. For quilting, these next three items are essential to success. A cutting mat protects your cutting surface and allows you to cut directly on it. There are many sizes of cutting mats, and for a new quilter, I recommend 18" x 24". It is big enough to hold fabric cut straight off the bolt and small enough to maneuver and move as needed as you are cutting fabric for your quilt. My experience has been primarily with Omnigrid mats, although there are several other quality brands available.

Once you have your cutting mat, the most important thing to remember is to store it flat and never leave it in your car. These mats warp fairly easily, especially with a little heat from staying inside your car, and once warped, there is no going back. The mat is ruined.

4. Ruler


Acrylic rulers are a must for accurate measuring. There are literally hundreds of sizes and shapes available and also several great brands. If you can only own one ruler, consider an 8 1/2" x 24 1/2" rectangle ruler. After that, add a few square rulers, then move on to other specialty rulers. There are four ruler sizes that I use 95% of the time in my quilt making. They are the 8 1/2" x 24 1/2" rectangle, the 9 1/2" square, the 15 1/2" square, and the 2 1/2" square. All other rulers are just gravy for me. My go to brand for rulers is Creative Grids. As mentioned earlier, there are several great brands. When shopping for rulers, make sure the numbers and markings are easy for you to read on both dark and light fabric. Many quilters like to stay brand consistent with their rulers so make sure you really like your ruler and seek out the same brand when adding to your ruler collection.

5. Rotary Cutter

This is another fantastic tool and a must for accurate cutting. A rotary cutter allows you to cut fabric in the same manner you slice your pizza. There are three primary sizes for rotary cutters, 60mm, 45mm, and 28mm. Your first, and primary rotary cutter should be 45mm. There are many good brands available. I have used both Olfa and Fiskars with success. The basic model of each of these works great but they offer a number of ergonomic, decorative, safety, and luxury models. This is something you want to hold to see how it fits in your hand. If you like piecing quilts, you will be spending a lot of time using your rotary cutter. It is also a good idea to buy extra blades for your cutter, too. It is a good practice to change out the blade every few projects. Working with a dull blade can be quite frustrating.

Note that all of the information in this post is purely my opinion from years of quilt making experience. There are no sponsored products or affiliate links included.

Experienced quilters, what else would you add to or change about this list?

Do you have additional questions or comments? I'd love to hear from you!

 

Monday, September 7, 2015

Quilt Blocks From My Great Grandmother


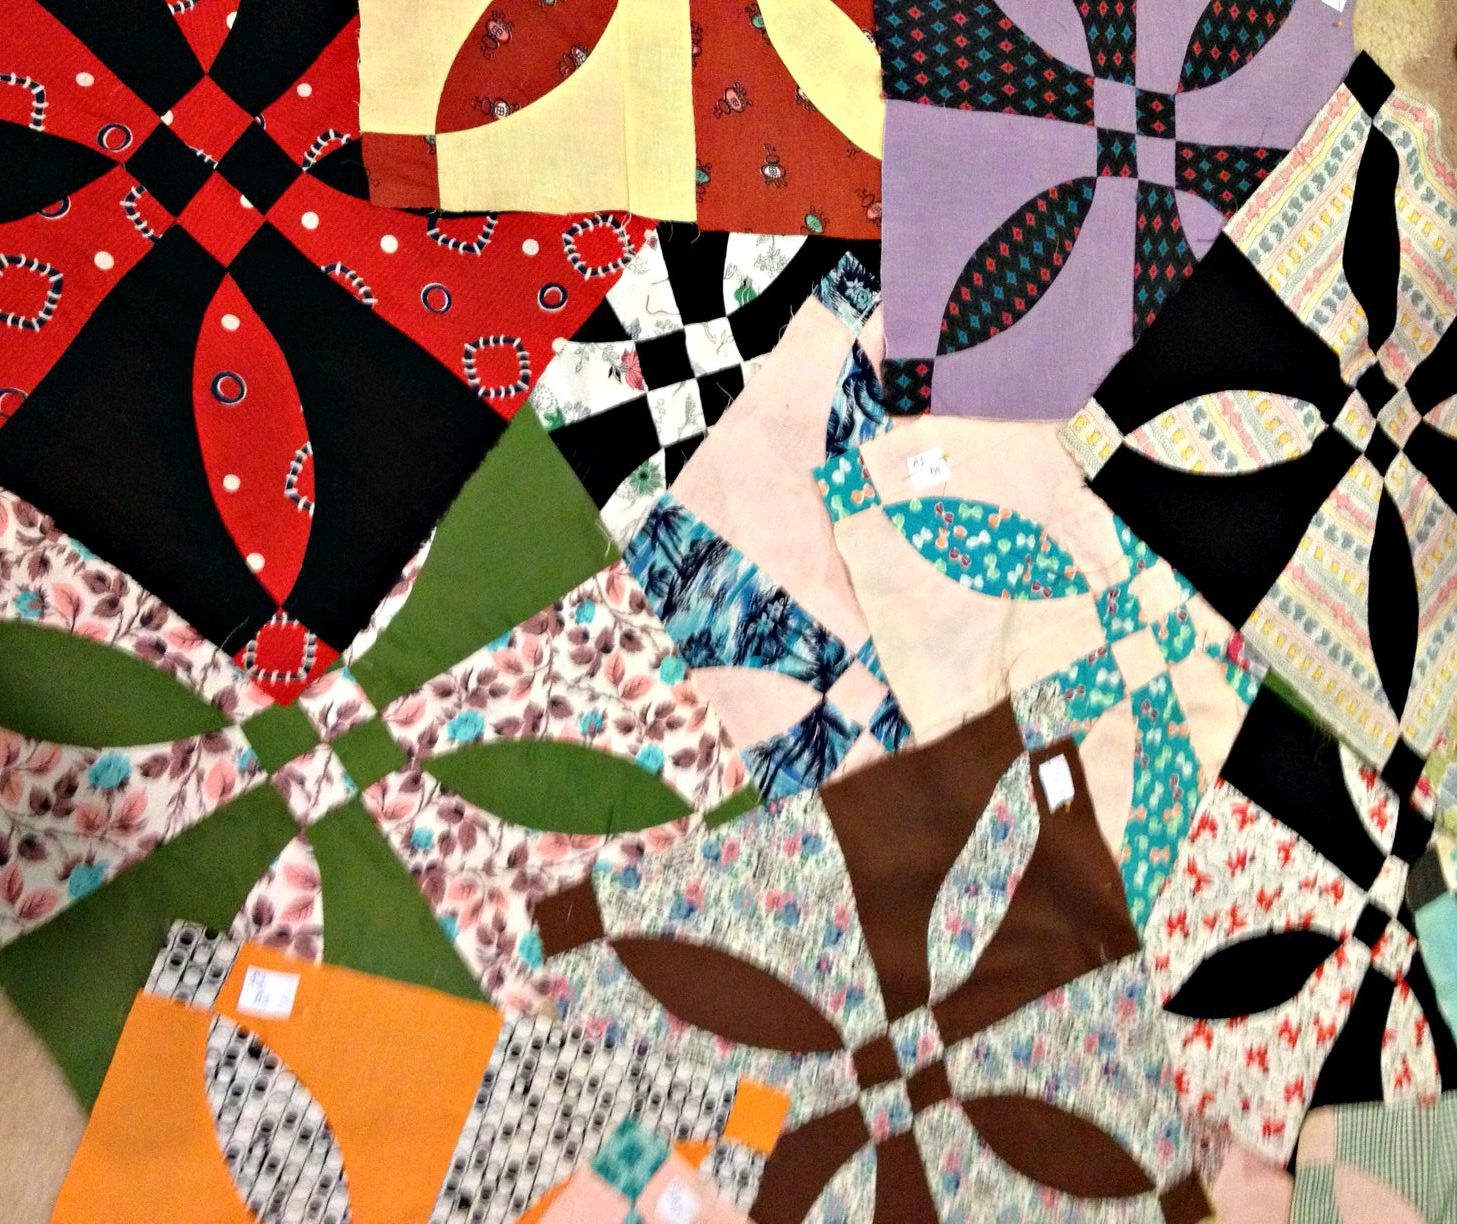
My mom recently spent a few days with her sister. One of their projects was to sort through some quilt blocks left to them by my great grandmother, Eunice Fincher. We called her Mama Fincher. My mom has two sisters and Mama Fincher wanted each of them to have a quilt made by her.


We are not sure when these blocks were made but suspect they were much later in her life, because of both the quality of work and the origin of some of the fabrics. My mom recognized two of them as fabric she had purchased with her own money as a teenager to make skirts.

Each block is huge, measuring 18". They are all hand sewn, at least for the piecing. There is some machine sewing, where scraps were lovingly sewn together so there would be a big enough piece of fabric to make the block. They did not have much money and made the most of everything they had.

Do you know the name of this block? I did a little bit of research but have had no luck in finding a good source for identifying it. I know the curved part alone is called "orange peel" but I wasn't sure if the combination with the corner squares had its own unique name as well.

Mama Fincher made enough blocks so that each sister received 19 or 20 blocks. My mom and her sister completed the job of sorting through all the blocks and dividing them into three piles. Mom then enlisted me to help her decide what to do with her set of blocks.


After thinking about it for a while, I thought the best plan of action was to stay as true to the original intention with these blocks as possible. My great grandmother made the blocks and now my grandmother's treadle sewing machine will sew them together. I considered adding some sashing (a strip of fabric between the blocks) to help them go together better since they are not perfectly square, nor are they all exactly the same size. We're going to try it without that first since I am fairly certain that is how the original project would have been finished.


The machine was in good working order not too long ago, and just needs her belt put back in place and she can go some more. My hope is that my mom will sew the blocks together with this machine. I am very fortunate to have the machine living at my house while my mom lives just a few miles away. When the quilt top is together, we will layer it and big stitch hand quilt it. At least that is the plan for now. There is no deadline so we will take our time, enjoying the special job of finishing a quilt that was begun many, many years ago.


Linking up to WIP Wednesday with Lee over at Freshly Pieced.

Saturday, September 5, 2015

Oklahoma Backroads - A Finished Quilt


Back in June, I had a bit of a scrap attack which resulted in four quilts in progress. This is not the one that I would have guessed would be finished first, but once I got rolling on it, I was hooked. It is the Oklahoma Backroads free pattern from Bonnie Hunter. The exciting part is that all of the fabric in this quilt were small pieces that could just as easily been tossed in the trash. It is bright and colorful and I just love it.

Here is the block. The traditional block is called Oklahoma Crossroads but since Bonnie reversed the placement of the dark and light fabrics, she cleverly named it Oklahoma Backroads. Once the blocks are arranged, there are some great secondary designs.


There was no holding back on the types of fabric used: traditional, modern, batik. All were welcome. The one adjustment that I did make was to be more strict in the dark and light values. After a few blocks, many of the mediums were kicked out and found a new home on the back of the quilt. The design on the front became muddy when too many mediums were in the mix.


Because the blocks are so busy with color and pattern, the quilting is simple and straight line. Each diagonal line formed by the triangles is quilted a quarter inch away from the seam. Once that was completed, one more diagonal line was added through the center of the big squares formed by the double line stitching. Rather than quilt the border with a different design, the quilting lines from the center flow onto the borders.


The border is a Nancy Halvorsen print. It frames the quilt without overwhelming it. The binding is dark with touches of color that is not overly busy. The goal for both the border and binding was to frame the quilt, balance out the busyness of the center while not being too plain and boring.


The back is a red and white calico. This fabric was given to me by a friend along with the inverse print. I am sure I had a dress made out of something very similar when I was a little girl.


The finished quilt is 46" x 61". This quilt is for sale in my etsy shop.

Linked up on Scraptastic Tuesday over at She Can Quilt.


Sunday, August 9, 2015

Quarter Log Cabin Quilt Finish


 In June, I asked our Believe Circle group to send in quarter log cabin blocks. They had my blocks along with an inspiration quilt for the color palette.
The result is this sweet quilt with rows slightly offset.
The layout and piecing of the quilt top was easy. I knew I wanted to sort the blocks by color keeping the darker ones in the center and the lighter ones to the outside. I also wanted a little bit of variation in the placement of the rows. The hard part was deciding how to quilt it. I considered doing something consistent in each block like circles or flower petals but in the end decided I wanted some sort of all over design.

After spending a few days looking at the quilt top,
I started noticing a trend
in the blocks.
There were just a few flowers with petals.
That decided it. I quilted a giant flower on the quilt. At first I thought I would do all of it free motion, but after quilting the spiral for the flower center, I backed off and did the rest with my walking foot.
The center was defined with a plate and a blue marking pen. The petals were cut out of paper and pinned to the quilt top. Longer petals stretch to the corners while shorter ones extend to the sides of the quilt.
This picture was taken before the quilt was bound and washed.
This one was taken after the quilt was bound and washed. I think it is easier to see the design after it is washed. The soft crinkles help the design stand out more. It was hard to not continue adding quilting but I was determined to keep it simple. Once the flower was stitched, I added a second line of stitching in the petals and two lines to shadow and fill in between each petal.
The quilting is hard to see on the front, but that's okay because the blocks are the star of the show anyway. The next decision was binding.
I decided on this print by Brandon Mably. I tried different pinks and reds and determined that a large scale design that had both colors worked best. The red blocks are in the center of the quilt and I hoped the binding would draw your eye out from the center.
The finished quilt is 46" x 49", just right for a baby or young girl.
The label has been added. This quilt will ship out tomorrow on its way to a new home.
Thank you to all of the Believe Circle members. Each month is an adventure and I love creating beautiful quilts with you.
Related Posts Plugin for WordPress, Blogger...