Thursday, February 14, 2013

Tutorial - Put A Letter On It

Anytime I share a project that includes words or letters, the first question I am asked is, "Where did you get those letters?"
 

There are lots of great sources for fonts and letters, but often, the answer is even easier than that. For the sewing machine cover I recently made,
I knew I wanted clean, simple letters. Basic word processing software often has the answer. I use Microsoft Word and have a decent number of fonts to choose from within that program. I chose the Arial font for the letters s-e-w. To experiment with the size of the letters, choose different font sizes. This example page shows the Arial font in 12, 36, 72, 150, and 300. The pull down menu in Microsoft Word for the font size only goes up to 72, but you can also enter a number bigger than that to make them even larger. Once there are some good test sizes on the page, print it.
And it's okay to go so big that only one letter fits on a page. They are going to be cut apart anyway. Now, it's time to play. You can cut the letters apart and pin or lay them on your project. Once you're happy with the size of the letters, then it's time to transfer them to your fabric.

What if you want something a little fancier than the fonts available on your word processor? Then it's time to go exploring. My favorite site for fonts is dafont.com. It offers a huge selection of fonts and most of them are free. I also like that it tells you what you are allowed to do with the font once it is downloaded. Most of them are free for personal use, which is perfect for anything you are making for yourself or as a gift. If you are making something that might later be sold or developed into a commercial pattern, make sure that the font is free for commercial use. I am a strong believer in respecting the copyright of all creative things, including fonts.
Not all fonts translate well to fabric so make sure that the letters are thick enough to hold up on fabric, like this
or this
This next one is too fine and would be a huge challenge to cut out of fabric. It would be great to trace in pen or paint, but would not work for fabric on fabric.
With a little interpretation, this one could be really cute...
Can you tell I have Valentine's Day on the brain? Plenty of love for all, even fonts.

Once the font is selected and the size is chosen, it's time to put it on fabric.


To do this, you need two-sided fusible webbing. There are many different brands out there, some good, some not so good. Your local quilt shop can help you make a good choice. In my experience, whatever product you use to learn this technique, it is the one that becomes a favorite. My favorite product is Steam-A-Seam 2. It comes in two weights, and while both work just fine for this application, I prefer the Light version. It comes in packages and by the yard from a roll.


Because the fusible goes on the back of the fabric, the letters must be traced in reverse. To do that, turn the printed page of letters over and use a sharpie to trace the letters. This makes them easier to see when they are traced onto the fusible web. I only traced around one of the letter Os because I can reuse the first one as I'm tracing.


Next, decide which side of the fusible web to write on. To do this, pull apart a corner of your fusible. One paper will pull away clean and one will pull away with sticky stuff on it. Don't pull the paper all the way off yet. This is just a way to figure out which side to write on. Write on the paper that has the sticky stuff.


Now, trace your letters. I use a mechanical pencil for this. The lead is fine and it's easy to correct any mistakes. The letters can be traced close together. They don't have to be spaced as they will be on your project.


Once everything is traced, pull the papers apart. The blank page should pull away clean and can be thrown away. Place the sticky part on the wrong side of your fabric and press it according to the manufacturers instructions for your product.


Since this is a two layered font, I also need to trace, fuse, and cut out hearts.


Before committing to ironing everything down on your project, it's a good idea to do a dry run. In this example I left the paper on the back of each piece, but if I had lots of little pieces, I would pull the paper off and position it on the background. It isn't going to permanently stick until it is ironed.


Once it all looks good, press it down, again following the instructions that come with your fusible product.

At this point, there are several options for finishing. Some of that decision depends on how the finished product will be used. Here are some choices:
  • Stitch around all the edges using a zig-zag, blanket, or other decorative stitch. This choice will keep your raw edges from getting ragged, especially if the project will be washed regularly
  • Straight stitch just inside the raw edge of each fused piece. This option will hold everything in place for projects that will be washed but may result in the edges getting a little ragged over time. Sometimes that is the desired result.
  • Let the quilting serve as the stitches to anchor the pieces. If the pieces are going to be quilted over anyway, this can be enough to secure the letters
  • Do not add any stitching. This works for projects that are decorative and won't be handled or washed.

This project is going to become a decorative pillow in my studio so no additional stitching will be added to the fused pieces. Of course, the two-sided fusible web can be used for anything you want to raw edge applique on a project. Just keep in mind...if your project needs to say something, put a letter on it!

Wednesday, February 13, 2013

Picture Frame Quilt Blocks

Our local cultural arts foundation has a thrift sale every spring. Last spring, I purchased this pretty frame.


I thought it would be fun to make some tiny quilt blocks to display. It was in my basket of things I should do something with, but I had forgotten all about it until I saw an advertisement for this year's thrift sale. Better use last year's purchase before venturing out for new treasures this year.


I pulled out my bin of unsorted scraps to see what inspired me. Originally, I thought I would try to stick with solids for this project, but then I saw the Kaffe floral print that is laying across my notebook in the above photo. It is one of my favorites and only continues to exist as 2" wide scraps in my bin. With such tiny blocks, these flowers would work great as fussy cut pieces for my blocks.


The smallest square in the frame is only 1 3/4" so that certainly limited the number of pieces I could work with in each block. The nine-patch block finishes at three inches square. I ended up with a square in a square,


a fussy cut flower,


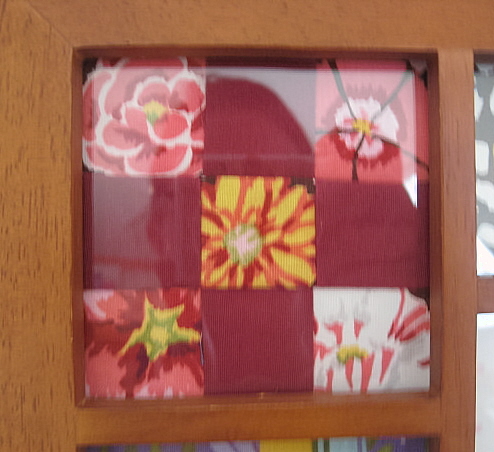
a nine-patch (the photo is blurry but I thought it was fun that you can see my reflection taking the picture),


a rail fence block,


and a quarter dresden.


Here they are all together. I thought I would have to work hard to get them to stay in place in the frame, but they were easy to lay directly on the glass. The frame back holds them perfectly.


I love how projects like this evolve. This looks nothing like I had sketched in my notebook, but I am just as happy with the end result. What a nice way to spend an afternoon sewing.

Sunday, February 10, 2013

Old Family Quilts


There aren't very many quilts in my family. My mom is one of three girls so the quilts were divided among them when my grandmother passed away. I'm very fortunate to have two of them, though I'm not even sure who made them. It was either my grandmother, Ruby Frances, or my great grandmother, Eunice. It could have even been both of them; my grandfather died young and my grandmother and great grandmother shared a home throughout my life. Neither had a love for quilting though. These were made out of need. Anytime I would try to ask my grandmother about quilting she wouldn't have much to say. She was a very shy and quiet woman who would always dismiss any suggestion that something she made was good or beautiful.


The pink quilt appears to have enjoyed a full life with a daily dose of sunshine on the bottom right quadrant. That whole area of the quilt is very faded.


Today, this quilt spends its days in this cradle that was made by my father-in-law. He was a fantastic wood worker and this is one of his best and most treasured pieces. The Raggedy Andy belongs to my husband. 


I am sure the majority of the fabric in this quilt is from clothing worn over the years. My guess is that both of these quilts were made in the 1970s.


The blue quilt now spends its days on my bed. I love the colors and construction. I love the weight of it, too. It's a little on the small side for a queen size bed, though.


One of the projects on my list this year is to make a larger, more contemporary version of this quilt so that my bed will be fully covered and both can live there together, complementing each other.


The solid fabrics that are thrown in here and there really add to the sparkle of this quilt.


I am honored and thankful that these quilts have been entrusted to my care. Their history and beauty inspire me everyday.

Thursday, February 7, 2013

Faith, Family, and Friends


Recently, I started a quilt that had lots of raw edge fusible applique (see that work in progress here). At first, I thought that the scraps from that project would just go in the trash. They couldn't go back in my regular stash since there was sticky fusible on the back side of each piece. But as the scraps piled up, I decided there must be something I could do with the leftovers. And that's how this project started.


I had seen a sign on Pinterest that said, "Faith Family Friends". I liked the sentiment and the reminder of what is important in life. The project was added to my wish list of new projects for 2013. Using these scraps for this project was the perfect combination of making something new out of something that *almost* went in the trash.

The first step was to decide on a font. My daughter, Erica, helped me with that, since she has a "thing" about fonts and collects copyright free fonts. This font is called "return to sender". Do fonts get named by the same folks that name paint colors? We blew it up to a good size, printed it, and then traced the letters onto two-sided fusible, which, as a reminder, should always be traced in reverse. Not that I forgot that...again...ahem.

Using a water soluble marker, a rectangle was drawn on the background to frame the letters. A second rectangle was drawn two-inches outside the first one. This formed a boundary, or frame, for the scraps.


I used a method often called "snippets". The paper from the fusible is peeled off the back of the fabric scraps and small pieces are cut at random and scattered within the borders of the frame.


I tried to relax and let the pieces fall where they may, but there was some manipulation needed to make them line up around the borders correctly. I did not iron the letters down until after the frame was complete.


Once the frame was filled with fabric, the whole piece went to the ironing board to get it all fused down.

Here's a close up of all those little scraps. It makes it look like a whole new fabric.


To quilt this, I sewed around the letters using a straight stitch with matching thread. Then, with cream thread, I outlined the frame with a quarter-inch inside and outside the frame. For the last quilting step, with a variegated thread, I used a free motion back and forth stitch, covering all of the frame, just to make sure none of those scraps decide to loosen up and escape over time.

When I first showed these to my family, the first comment was, "Don't let anyone see the back!".


Which means that I absolutely have to show you. These are some Martha Negley prints that were in my stash. I knew I wasn't likely to use them in a project, and they do make cute backs...even if they are sideways. Who's gonna know? The back will be up against the wall, so I'm okay with crazy backs...and crazy family members who worry about such things.


The wall these will go on has always been kind of bare, with just a small project or clock hanging in its center. It was screaming for something more.


And now, this wall makes a great statement. This was such a fun project to make, and I'm happy for another finish for the year.

Monday, February 4, 2013

A Lovely Year of Finishes: February

After posting recently about all of my unfinished projects, I found a great way to make some progress. A couple of blogging gals put together "2013: A Lovely Year of Finishes". It's fun to be part of an encouraging group of folks all focused on the same goal...finishing one project each month. And even better, for each successful finish, there is a chance to win some fabulous prizes. It's a win-win, right?

Here's my project for February. Doesn't it look finished? I made this sample in a hurry when Marti Michell came to the shop to teach this class, way back in 2008 I think. It is pieced; it is layered; the edges are finished, but there's NO quilting. Not a stitch. It never bothered me until I started focusing on improving my quilting. Now it looks so empty, so blank. This is the month it will be finished. And it isn't just going to get a little quilting; it's going to get a lot of quilting.


A big flower in the center of each block, some pebbles all over the header, and something yet to be determined in the bands around each block. I used fusible batting when I put it together, so I'm hoping the layers are smooth and stable enough so that I don't get much shifting and puckering. They even have a cool button that I've added over on the left side of my blog.


Even though I already had a loose plan to make some progress on all those unfinished projects, this is going to be just the thing to make 2013 "A Lovely Year of Finishes".


Friday, February 1, 2013

Quilting Practice - Leaves


Quilting practice continues with an attempt to quilt leaves. The quilting designs are getting more challenging as I go. This one was mostly a challenge of memory motor skills. Some of the leaves would develop with ease while others evolved with many awkward starts and stops as I figured out where I wanted to go.


I enjoyed practicing on this block since there was lots of quilting real estate. I was able to both intentionally and unintentionally play around with the size of my leaves. There isn't a "real" project lined up for this quilting design yet. This one will require a little more practice before fully diving in.
 

Three of the twenty blocks I made last year as part of Craftsy's block of the month class are now quilted. My plan is to bind them separately and hang them as a group. I have a vision of all twenty blocks hanging together to make the appearance of a "quilt" while they remain as twenty separate pieces. The vision and the reality don't always come together, and we'll just have to see how this one evolves.


Paisleys are next on the practice list. They are similar to the leaves except they don't have points. They just *might* be a little easier.
Related Posts Plugin for WordPress, Blogger...