Wednesday, January 16, 2013

Quilting Practice - Swirls

The next quilting design on the practice list as part of the Craftsy Quilting Negative Spaces class is the swirl. This design is much more difficult than the pebbles that I started out with, and will require lots of practice to conquer. It will be worth it though. It's a really pretty design.


I added to the challenge unintentionally by choosing to practice on a block with narrow quilting spaces. The swirls are supposed to be circles, but many of mine had a bit of a tail, which made them look more like sea shells than tight swirls. That's not necessarily a bad thing, just not the result I was expecting.


There's work to be done here to get a more consistent size throughout the design, and there's also more practice needed figuring out how to end one swirl and start the next. Angela Walters calls it "traveling" in class.


All that said, swirls make a really cool design and overall, I'm very happy with my first attempt.


I've already incorporated the swirls into a "real" project, which I'll be ready to share later this week. Next up on the quilting practice schedule: leaves.

Sunday, January 13, 2013

Blocks for the Quilt Guild


The quilt guild I belong to, Big Springs, has decided to make a group quilt. We aren't quite sure what we'll do with it once it is finished, but we're going to have a great time making it. At our January meeting, each person received instructions to make a block. Every block was different, but all were traditional. Along with the instructions was a fat quarter of Kona Snow fabric. The only rule was to use the Kona Snow as a background fabric and to not use batik fabric in the block. 


The block that was assigned to me is the Ohio Star. I had fun going through my stash looking for just the right fabric to use. Of course I selected a dragonfly print for the center. The world would probably stop spinning if I didn't have a dragonfly something within an arm's reach of wherever I am.


There were a few blocks left over after everyone had chosen so I asked if I could choose a second one. This one is called Square and Star. Again, it was fun deciding on fabrics and I scrapped this one up a bit more than the instructions called for.


Making these blocks was a great way to spend a Sunday afternoon. Just the right amount of time and challenge to be creative and complete tth blocks.


I'm looking forward to seeing what everyone did with their blocks at the February meeting.

Thursday, January 10, 2013

A Thank You Quilt


An acquaintance and co-worker of Duane's has sons that are a bit older than our younger two. Every six months or so, a couple of bags of clothes they have outgrown come our way. These are not rag tag clothes either. They are always in great shape and sometimes there will be something new that was never worn. The sizes and timing have been perfect for us. She has provided more than half our boy's wardrobes. Duane said recently, "We should really do something to say thank you."

My reply was, "The best way I know to say thank you is with a quilt."


And that is how this project began. I asked if she had any favorite colors. The response: black and white. Any special color I should think about for an accent? Red. I struggled to come up with a design to use, until I saw a recent post on Frances Arnold's blog. Her design is exactly what I wanted to do.

I drew the block out on graph paper to figure out the measurements to use. Here's the basic block construction.

From the black&white, cut two 3 1/2" x 5 1/2" rectangles and two 1 1/2" x 3 1/2" rectangles. From the accent color, cut one 3 1/2" square.

Sew the smaller rectangles to either side of the accent square using a 1/4" seam. Press to the black&white.

Sew the larger rectangles to the top and bottom using a 1/4" seam. Press to the black&white. It's a very simple, yet striking block.

This quilt is made entirely from my stash. The most time consuming part was cutting the fabric. Duane and Erica helped match up each black and white print with just the right red print. I leaned toward true reds and red-pinks and stayed away from red-oranges for the accent fabric.


The assembly line sewing went quickly for the blocks.


There are black on black prints between each block vertically to break up the design. Those are cut at 3 1/2" x 5 1/2" each. Since my design wall is portable, once all the blocks were finished, I moved it right next to the sewing machine while assembling the top to help me keep everything in order.


I kept the quilting simple and quilted straight lines a 1/4" inside each of the accent squares. There are some really fun prints in this quilt. You can see the high heeled shoes and measuring tapes here. There are skulls, martini glasses, cats, and many flavors of dots and flowers.

The borders are each cut 2 1/2" wide. The first border is a red print and the second border is solid black. It is bound in the same black.


The back is a red print from my stash. You can tell by looking at the back that I "eyeballed" my quilting lines rather than marking them in any way. Not exactly straight, but I just say it adds a little whimsy to the project.

At the end of last year, I made a list of the new projects I wanted to complete this year. This "thank you" quilt was one of them. It feels good to check one off so early in the new year. The recipient has no idea that she is going to be thanked in any special way so I'm looking forward to hearing her response when Duane presents her with this quilt in a couple of weeks.

Monday, January 7, 2013

How I Organize My Fabric

Fabric organization is one of the great dilemmas faced by quilters, especially when that stash first starts building. There really isn't any one best way to do it. It depends on the kinds of quilts you like to make, what other things you use fabric for, how large your stash is, and what size cuts of fabric you typically keep on hand.

One of the things I like to do in that lull between Christmas and New Year's Day is revisit my stash. It reminds me of how much I already have and inspires me for some new projects in the new year. It's an opportunity to neaten up and reorganize. I believe a stash is something that ebbs and flows with the wants and needs of its owner. Here's how mine is looking for this year.


I'm a girl that doesn't like to waste, so I tend to keep even the smallest of scraps. Sometimes I'll go through my scraps and cut them into more standard sizes. Those live in these glass jars. The idea was that once the jar was full, I'd find a scrappy project to use them for. So far, I just keep adding more jars. At some point, I'll hit my scrap limit, then a new project will be born.

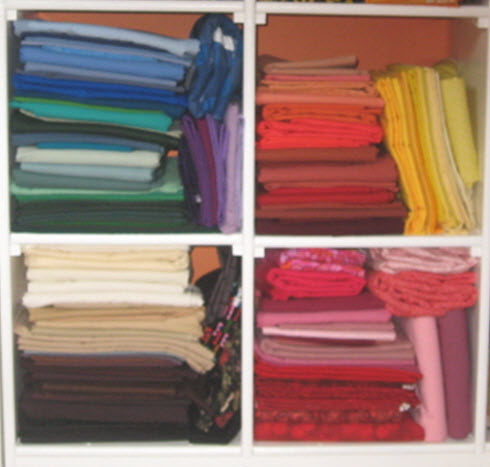
For the rest, I store them in open cubes. This picture shows half of the cubes. I really like to see all of my fabric when I'm working on a project. Each cube is 15" x 15" x 15". Most of it is sorted by color, but there are a few special cubes. It is in stacks within each cube. There is usually one stack for bigger cuts (half yard or larger) with the rest folded into smaller stacks. The stacks are generally two across and up to three deep. It's easy enough to pull a stack out to see what is behind it. I don't have any special folding method since most of my fabric is odd shapes and sizes.


Black and White. This includes Black on Black, White on White, Black with Bright Colors, Grey, and of course, actual Black and White prints.


Kaffe Fassett. I'm a big Kaffe Fassett fan and have collected a lot of his fabric. It gets its own cube for two reasons. One is that I sometimes want to make a project that uses only his fabric and the other is that I struggle to put many of his fabrics into a single color. They are so bright and full of so many colors. It's just easier to keep them all together.


Brown and Cream. This includes muslin, which I try to keep on hand for foundation piecing.


This is a shared cube. The left side is purple fabric and the right side is all Christmas fabric.


This is the multi-color cube. It holds all those multi-color focus fabrics that I just couldn't decide belonged with any single color. This cube sometimes serves as overflow, too, when some of the other cubes are getting near their limit.


Yellow, gold, and orange all live together. Sometimes it's a tough call to know when it is gold and when it is tan/brown.


Green. My favorite color. Can you tell? The green cube is a bit full.


Red and pink. This cube is pretty full, too. Might be time to think about separating the pink and red. One of my first projects in the new year will use some red so we'll see how it looks after that.


Blue of all kinds. Teal is my favorite color of blue and I can see that there isn't a lot here. Need to add that to my stash shopping list.

The other wall of cubes look like this:


These four cubes hold all of the bigger cuts of fabric, most of which are Kona solids. It's a great assortment for both quilt fronts and quilt backs.


These are all of my batiks. I made one exclusively batik quilt last year so that cut into this group. I'm not as into batiks as I once was so this group may continue to dwindle.


These are my Nancy Halvorsen fabrics. In the years that I had a shop, Nancy Halvorsen was one of the best selling fabric collections and I was constantly making samples from her fabric. Over the years I have accumulated many scraps and they all work very well together. They recently grew to the point of needing their own cube. When I cleaned up this year, I realized that it was hit or miss if a Nancy Halvorsen fabric was with its color or with all the other Nancy Halvorsen fabrics. After putting them all together, they needed a cube to themselves.


This cube is where all the pre-cuts live. I tend to purchase fabric by the fat quarter so when they first come home, they go in this cube. I usually have some purpose in mind with the purchase so it's easy to find them here. If they linger too long and the cube gets full, I'll clean out and move them to their appropriate color bin. Charm packs, jelly rolls, and any other interesting pre-cut go here, too.


Last of all is this cube where all sorts of tiny scraps, orphan blocks, and other odd items are stored. When I'm feeling uninspired or I'm between projects, I'll pull these bins out and cut them down into standard sizes, which then graduate to the jars on the top of the cabinet.

I tend to lean toward more organization rather than less. I like some creative chaos in my life, but always need a point of organization to return to. This is just one of many, many ways to store your stash. I really enjoy learning how other quilters organize their stash so I can continue to refine the way I keep mine.

I'm looking forward to a year of stash sewing, now that I've been reminded (again) of all the great fabric I already have on hand. Happy sewing to you, too, be it stash sewing, or a project made with all yummy new fabric! 

Friday, January 4, 2013

Quilting in Negative Space Practice - Circles

A dear friend recently gifted me with the Craftsy class of my choice. One of my goals for the new year is to improve both my confidence and my skill with machine quilting, so I signed up for Quilting in Negative Spaces with Angela Walters. There are ten lessons, and I've watched five of them so far. The first thing she teaches is how to use a circle, or pebble pattern, in quilting.

The first Craftsy class I took was the Block of the Month class. I finished all the blocks, but decided that I didn't want to put them all together in a big quilt. Those blocks are going to be finished individually, then hung as a group. They are perfect for practicing quilting. Here's the first one:


I had a great time quilting this, and it wasn't nearly as difficult as I expected. What I like most is that it is not precision quilting. As long as the overall look is achieved, noone is going to notice the little mistakes made throughout.


One thing I will need to work on is the scale of my designs. I have to fight the urge to go teeny tiny with my pebbles.


So, I'm not very patient when it comes to practicing on true practice fabric, so I jumped right in and quilted one of my unfinished tops.


I was amazed at how much the piece changed with the quilting. This is going to totally change the way I look at a project. Before now, the quilting was a burden, and something that just had to be done to finish the project. Serious, planned quilting seems to elevate the project to a whole new level.

The squiggly lines on either side of the circles almost look like ruching. It's very feminine looking.

Here's the piece as a whole. I couldn't even wait until the binding was on to take these photos.

Makes me want to tackle a few more of those unfinished quilt tops.

Here it is from the back.

And here it is finished, hanging just inside my front door.


This is just the first quilting design. Next, I'm taking up swirls.

Tuesday, January 1, 2013

Happy New Year!

Happy New Year to you! I'm not big into resolutions, but I certainly enjoy spending time reflecting on the year that has passed, and thinking about what I want in the new year.

To start the year out, I've spent a bit of time spiffing up the blog this week. I asked my daughter what I could do to make my blog better and she told me that when she finds a blog that interests her, she wants to know more about its owner.


So I added an "About Me" page.

When I find a blog I like, I always want to know more about where and how he/she works.


So I added a "My Studio" page.

I also love finding tutorials written by all the great bloggers out there.


So I added a "Tutorials" page with direct links to the tutorials I have written.


I also added a "My Quilts" page, which is really more for me, to keep up with the quilts I finish each year.

My new year is off to a great start and I'm looking forward to lots of new quilting, new blogging, and new friends.
Related Posts Plugin for WordPress, Blogger...