Wednesday, November 11, 2015

November Bee Blocks


Robin is our quilter in charge of the Believe Circle quilt this month. Robin was very considerate and gave us an easy assignment. Thanksgiving is coming up later this month in the United States and many of us have feasts and family and all sorts of fun things to prepare for. She provided a tutorial for these blocks along with a color scheme.


I am really enjoying my work area these days. The color scheme is up on the laptop. I've pulled out my red stash drawers. I can pull fabric from the drawers, audition it, and put it right back if it isn't a winner. This really helps keep the mess down and the drawers are shallow enough so that it is easy to see everything.


Love the warm colors for this month.


This quilt is going to be on fire! Thanks for the easy blocks this month Robin.

Other posts about the Believe Circle:
Believe Circle Quilts 2015
Believe Circle Half Way Through the Year
Believe Circle Quilt Finish

Linking up with Work in Progress Wednesday over at Freshly Pieced. Also linking up with Finish It Up Friday at Crazy Mom Quilts.

Monday, November 9, 2015

Six Reasons to Freshen Up Your Sewing Space

Were you one of those kids who was always rearranging your room? I was. It energized me to move things around, discover things lost under the bed, and to have a fresh perspective on a familiar place. As an adult, I do the same thing in my sewing space. Not quite as often as when I was a kid, but still every year or so, I need to shake things up in my creative environment.

I recently updated the pictures on my Where I Sew page for this very reason. There are lots of good reasons for introducing change in any aspect of life, and I spent some time thinking more about the "why" behind this latest change.

Function


I suppose there is a perfect sewing room work zone in the same way there is the perfect kitchen work triangle. I'm all for efficiency but I like it when I have to move around a good bit to get something done in the sewing room. If I am doing lots of chain piecing or paper piecing or some other task that needs constant pressing, I will set up my ironing board right beside me. Other than that, I want to sew a little, get up and iron a little, hang out at the cutting table a little. This girl needs to keep moving. In this new arrangement, the ironing board does not have a permanent home so it gets put in the best spot for whatever is going on at the moment, and funny enough, the most common arrangement forms a triangle between my cutting table, sewing machine, and ironing board. Efficiency in spite of myself I suppose.

Socialization


The cutting table was up against a wall and another side of it had a sofa up against it so only two sides of the table were easily accessible. It's a great table and the less accessible parts were becoming filled with clutter. I thought I needed to put it up against the wall so there would be more open floor space.

With the new arrangement, the cutting table is out in the middle of the room. It is accessible from all four sides, for use of the top, and access to storage underneath. My favorite part of this new arrangement, though, has nothing to do with sewing. Every now and then one of my teenage sons will bring his homework into the sewing room and sit on the opposite side of the table while I sew. Those moments together are becoming fewer. I treasure whatever time I can get.

Organization


The fabric cubbies were moved from one side of the room to the other. This in itself was not very significant, but the change made me take a closer look at what was happening in those bins. No matter how careful I was, those bins stayed messy most of the time.


I decided to further organize within each bin and have added some plastic drawer units to many of the cubbies. It is still a work in progress.


This has really helped keep things neater but also makes it easier when I am choosing fabric for new projects.

Lighting


The sewing machine did not move far but the small shift made a huge difference in the lighting around the machine. Before, it was against the wall near the skylight.


Now, it has been rotated and is directly under the skylight. This means excellent daylight around my sewing machine most of the time. There is about an hour everyday where the sun is directly on the sewing machine. I figure that is a hint that I need a break anyway.

Ease of Access


Do you ever get so engrossed in your project that you randomly put tools and supplies down only to have them buried and lost mid-project? I used to do that all the time. My first solution to that was to keep a tray on the cutting table. Anything that left my hand had to go in that tray. That pretty much solved the problem. Now, I have a set of stacked drawers beside my sewing machine. The top drawer serves that same purpose. I leave it open when I am working on a project and use the same rule of putting it in the drawer when it leaves my hand. No more forever lost seam rippers!

Minimalism


I will never get an award for sewing room minimalism but I have become much more aware of my things this past year. Freshening up the sewing room made me take a hard look at all of the books I had collected over the years. I absolutely love my books, but really, I rarely looked at them. There is so much fresh and new being offered in the quilting world everyday. I did not need all those books. I culled through them a few times and kept the ones I loved the most. The rest, I donated. I know some of them are on the shelves of the local library, some were sold at the annual library used book sale, and some became part of a local guild book collection. I get far more joy knowing the experience of quilting is being shared through those books than I did occasionally thumbing through one or two of them while they lingered on my shelf.

Not everyone has the benefit of a dedicated sewing space, but even if it is just the dining room table, shake it up a bit. Sit in a different spot; use a different chair. Even small changes can suddenly open your eyes to other things happening in your space. And changes like that can often get those creative ideas flowing.

Is there anything you'd like to change in your sewing space?

Other organization posts:
Ribbon Organizer
Keeping the Important Stuff; Letting Go of the Rest

Friday, November 6, 2015

Garden Fence Memory Quilt Finish


This is the third quilt I have made using the Garden Fence quilt block and the second quilt that uses clothing for the blocks. It has been washed and is crinkled up in that old fashioned cozy kind of way. The binding on this quilt is my favorite part. It is scrappy from the same shirts that the blocks were made.


It has been raining and raining here so between the rain and the time change, some of these pictures are a little dark. I did not want to wait. This quilt is a special commission quilt and I want to put it in the hands of its owner as soon as possible.


Here it is from the back. I always have to include a little something extra on the back and there were a few extra blocks that fit just right.


The color is off in this picture but it shows the simple quilting. There are two lines of quilting on all of the sashing and then there are diagonal lines in both directions across the blocks.


There are eighteen different shirts in this quilt. Most of the shirts appears twice as a block center and twice in the outer square of the block.


The quilt owner designed a label for the back. This quilt is in memory of her husband. When I was telling her that she could have a label and it could say anything she wanted it to say and could even include a picture, she got really excited. "This is going to be like getting one last gift from him."

I was asked to make three quilts from this set of shirts. I made this quilt first to make sure there would be enough fabric for more quilts. The second and third quilts will be different designs. He has two daughters and they will each receive a quilt as well.


There is a lot of joy in helping someone preserve the memories of a loved one. I look forward to sharing this first finish with her tomorrow.

Other posts about memory quilts:
A Memory Quilt: Deciding on a Design
Garden Fence Quilt Beginnings
Garden Fence Memory Quilt: Finished

Linking up with Whoop Whoop at Confessions of a Fabric Addict.

Wednesday, November 4, 2015

A Christmas Quilt - What I Learned in Craftsy's Divide and Conquer Class

This post contains affiliate links.


This is what happens when you get into the Craftsy class you are taking. I finished all the lessons for Lori Kennedy's Divide and Conquer free motion quilting class and could not wait to make my first project to practice all that I had learned.

Divide & Conquer: Creative Quilting for Any Space

It's a great class and clicking on the class icon will take you to all the information for it. This class helped me in a lot of ways, but specifically, it helped me with designing the quilting for any given project.


The first step is to plan. I'm not good at this step. I tend to want to just dive right in and hope for the best. But this time I thought it through. One of the things I learned (again) is that for the quilting to really stand out, the fabric needs to be solid. So I started with a Moda Bella solid in Porcelain for the main fabric and framed it with some yummy scraps of Christmas fabric from my stash.


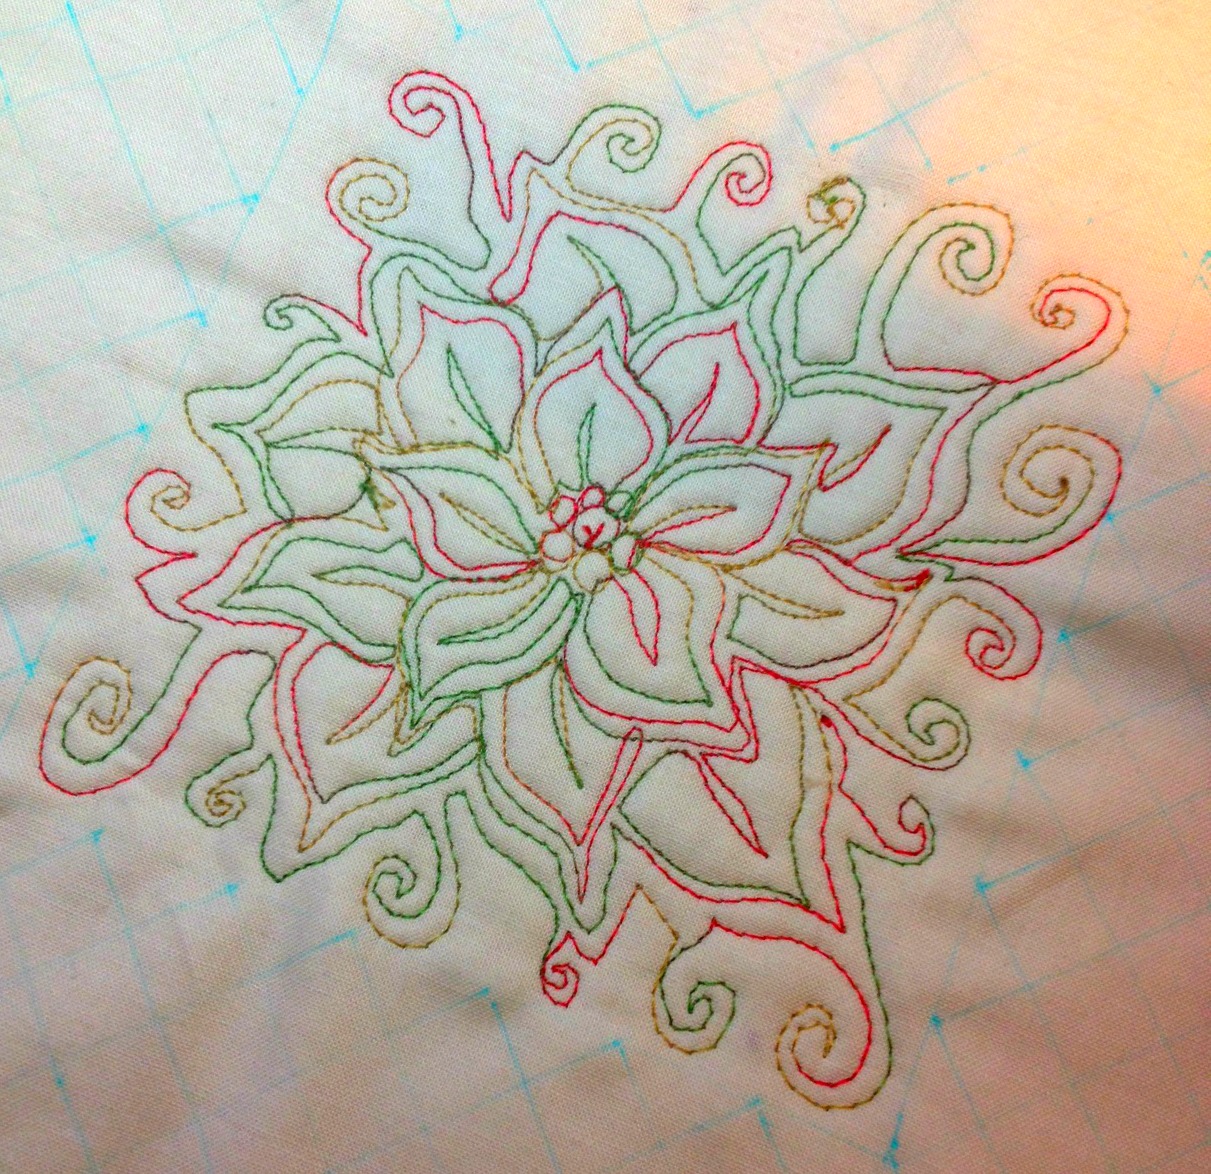
I decided to go for a framed composition and scoured Lori's blog for fitting motifs. The class offers lots and lots of motifs. I chose the grid pop motif from the class and then added Christmas motifs from Lori's blog for my project. The center motif will be a poinsettia, then grid pop, pretty packages, and snowflakes.


The threads were selected to complement the colors in the border fabric. One mistake I tend to make in projects like this is to overdo with too many motifs or too many different thread colors. I'm trying to be a tiny bit more conservative with that, so deciding which colors to use and where to use them took a bit of time. As the project progressed, I only used two of the threads pictured: the cream Aurifil 50 weight cotton thread and the 30 weight Sulky Blendable in red, gold, and green.

The first motif to quilt was the gorgeous poinsettia in the center. Here is a link to Lori's tutorial for the poinsettia motif.


I doodled it first to get a feel for the motions of sewing it. The hardest part of this motif for me is the curly cues around the outside. I had to go really slowly drawing them so that is a good heads up to slow down when stitching them, too. The poinsettia petals became a little challenging on the third round. I tended to want to make them much bigger when doodling them. I had to erase and try again with that part. The only other adjustment I want to make is with the veins in the petals. I like the pointy tip rather than the squared off tip for those. With my new found doodling knowledge, it was time to try stitching it.


There were a few thread breaking issues, probably because I was going extra slow for some parts. It is far from perfect but very pretty for a first try. I love how this motif turned out. It is so fitting for the holidays.


The second round of the composition is the grid pop. This is the grid. Grid pop is not for the faint of heart. There is a lot of stitching in this motif. It was a bit tedious to stitch, especially at a half inch scale. I used matching thread so that the texture would be the focus. The grid is drawn in blue water soluble pen. Rather than stay perfectly inside the frame, the goal was for each line to extend to the poinsettia to fill the space. That mostly worked.


The texture of grid pop is worth the effort. It frames the poinsettias perfectly.


The third round is Pretty Packages. Here is the link to Pretty Packages. This motif was really easy and fast to stitch.


The last round is snowflakes. I had this pretty icy blue thread selected for the snowflakes. I thought it would look nice with the border fabric. However, it was a wool thread, and after a few attempts at threading my machine needle with it, I gave up. The matching thread works just fine for this motif. Here is the link to Snowflakes.


The border fabric is stitched with a simple free motion wavy line.


I finished it with an envelope back so that it could be used as either a small quilt on a table or wall, or as a pillow cover. This project is going to be a gift so I like that there are choices for how to use it.


Lori Kennedy is a wonderful instructor. Now that I am through the class, I have already gone back several times to look through the Ideas and Inspirations section at the end of each lesson. She shows some really pretty quilts and I plan to use many of her ideas as a starting point for my own quilts.

Divide & Conquer: Creative Quilting for Any Space


I can't wait to share more projects from this class with you.


Linking up with Fabric Tuesday at Quilt Story and Work in Progress Wednesday at Freshly Pieced. Also Finish It Up Friday with Crazy Mom Quilts.

Monday, November 2, 2015

Family Quilts - Extra Special Treasures


Last week, I talked about how I found quilting and gave a quick glimpse of the family quilts that have become mine to care for. These quilts were made by my grandmother and great grandmother. They were a farming family and primarily quilted for utility. Each of these quilts is special in its own right. I love that I have such a diverse set of examples from the many quilts they made.


This scrappy trip around the world quilt stays on my bed all year round. My bedroom doesn't really have a color scheme so it is nice to be able to pull from the wide range of colors in this quilt.


This quilt is the only one that has anything other than a solid fabric on the back. 


This is my favorite quilt in the collection. It is wonky and scrappy, and modern looking. This quilt lives on my bed in the winter (on top of the trip around the world quilt). It has a heavier batting than the others. I'm not sure if there are multiple layers or if the content of the batting itself is different, but it does a great job at keeping me toasty warm in the winter.


There are some really great fabrics in this quilt.


This modern looking grid fabric is fun. I have no idea when any of these quilts were made but these prints make me think this one is from the 1970s. I eventually hope to make my own version of this quilt.


This sixteen patch quilt stays folded in a cradle most of the time. It has a wide pink binding which is highly faded in one corner. That corner of the quilt saw a little bit of sunshine every day when it was in regular use.


This quilt is the first one where special fabric was used to give consistency to the pattern. The purple sashing and pink cornerstones add to the girl appeal of this quilt. It is purple on the back, too.


I love the pop that this navy and white striped fabric gives to the quilt.


All of the quilts are machine pieced, most likely on a treadle machine, and hand quilted. The quilting on this one is really beautiful.


This last quilt was completely planned. Every fabric has its place. There is nothing scrappy about this one, which makes me think it was made for an extra special purpose.


The red cornerstones are an interesting choice.


Sometimes I think about the stories that these quilts could tell. Stories of my grandmother working hard every day to take care of her family. Stories of my mom and her sisters growing up. So many stories. I will treasure these quilts forever.

Do you have family quilts? I'd love to see them.

Linking up with Monday Making at Love Laugh Quilt.
Related Posts Plugin for WordPress, Blogger...