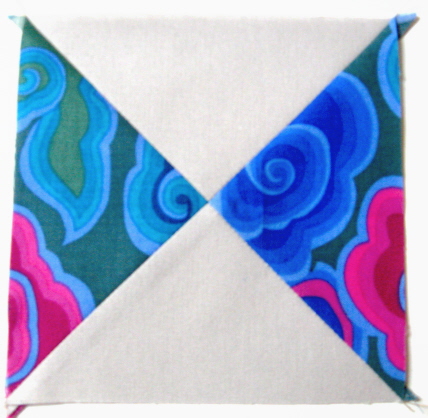
As the lucky winner of a random drawing, I recently received two sets of of 6" squares from Amy Butler's Gypsy Caravan and Free Spirits Essentials. Thanks Sweet Diesel Designs!
I just love all things Amy Butler and couldn't wait to stitch something up with this fabric pack. There were thirty squares and I wanted to do a little more than sew them together. I decided to make half square triangles with them by adding a light background fabric. Getting two blocks out of each square would expand my options for getting to a finished project.
Once they were put together, I was able to square them up to 5 1/4".
Then I started playing on the design wall. It was fun trying different
layouts and there weren't any that I didn't like.
Some looked very traditional while others had a more contemporary edge.
I finally settled on this design...
The top is pieced and waiting to be quilted. Now I have to figure out how to finish it. I thought about adding wide borders to the short sides and turning it into a bed scarf, and I also like it as a wall hanging. I asked my husband what to do with it and he said, "Begin with the end in mind." I'm all for the teachings of Stephen Covey, but that statement very rarely applies to anything I do in the quilting world. I make it because I love it, then I figure out what to do with it. I'll ponder the future of this project while I'm quilting it.
Thursday, August 9, 2012
Sunday, August 5, 2012
Craftsy BOM August - DONE!
This month over at the Craftsy.com Block of the Month class, we're making star blocks. I've said it before and I'll say it again...this is a great class and it is free! I talked to a friend this weekend who has no intention of making the quilt, but enjoys the lessons as skill builders. She hasn't been quilting for long, and this is a good way to pick up new skills and practice old ones. Another good part of the class is that you can watch the videos over and over again, and can make notes throughout the video using time markers. That makes it easy to get to the part of the video you most want to see again.
One of my favorite parts about making these is how the center points nest together so nicely. If you've done a good job pressing, it's hard to mess up the center point.
I'm using my favorite ruler, Creative Grids. Since I know my finished block is 4 1/2", I know I want the center point to be exactly in the center of that, which is 2 1/4". I can also make sure it isn't wonky by placing the 45 degree line right down the diagonal seam.
There are other techniques for making quarter square triangles spot on, and the extra squaring up step does take extra time. I like to sew for fun and I don't want to sweat being perfect with each and every step. The extra squaring up step gives me the ability to have fun and know that I have room for error.
I'm happy with my fabric choices for this block, even though I'm getting bad to mimic what is shown in the pattern illustrations rather than venturing out into my own color choices. The only concern I have with my finished block is that I stand a chance of losing some of those outer points when I put it all together. They are very close to the edge.
The second block this month is called a double star and it's a star in a star block. This block used lots of Flying Geese units. There are several methods for making these, and the method used in class is probably the first one most quilters learn. It is the method of laying a square on a rectangle and sewing a diagonal line. You can see the details in the class video. For this block, keeping your seams a scant 1/4" rather than a full 1/4" will help make sure the end result is the right size.
It's really hard to see here but I tried to sew just outside the pencil line rather than spot on the line. And then I added a trick I learned from Bonnie Hunter over at Quiltville.com. She goes back and sews a second line a generous 1/4" away from the first line. When I trim the extra fabric away, I cut right between the two sewn lines. All those triangle scraps turn into nice 2" half square triangles that I can add to my 2" square scrap pile for use in another project. I love it when there's no waste!
Here's my finished double star.
The transition from the smaller star to the background is a little muddy, but I'm okay with that. It is nice to be caught up with this project so early in the month. It will be an exercise in patience waiting for the September instructions to be available.
While I wait, I plan to spend some more time working on my New York Beauty blocks, along with a few other projects that have caught my eye.
The first block this month is a traditional Ohio Star block. This was a good chance to practice quarter square triangles. I like making quarter square triangles but I'm always nervous that they are going to end up too small. To overcome this, I always use a seam allowance that is much less than the usual quarter-inch. I should of put a ruler on this, but here's the back of my block. Hopefully, you can tell the seam allowance is super skinny.
Each of these units should finish to 4 1/2". You can see how much bigger my block is than the finished size, and that's okay with me. I can trim it down to be a perfect 4 1/2" with the center point exactly in the center.
There are other techniques for making quarter square triangles spot on, and the extra squaring up step does take extra time. I like to sew for fun and I don't want to sweat being perfect with each and every step. The extra squaring up step gives me the ability to have fun and know that I have room for error.
I'm happy with my fabric choices for this block, even though I'm getting bad to mimic what is shown in the pattern illustrations rather than venturing out into my own color choices. The only concern I have with my finished block is that I stand a chance of losing some of those outer points when I put it all together. They are very close to the edge.
The second block this month is called a double star and it's a star in a star block. This block used lots of Flying Geese units. There are several methods for making these, and the method used in class is probably the first one most quilters learn. It is the method of laying a square on a rectangle and sewing a diagonal line. You can see the details in the class video. For this block, keeping your seams a scant 1/4" rather than a full 1/4" will help make sure the end result is the right size.
It's really hard to see here but I tried to sew just outside the pencil line rather than spot on the line. And then I added a trick I learned from Bonnie Hunter over at Quiltville.com. She goes back and sews a second line a generous 1/4" away from the first line. When I trim the extra fabric away, I cut right between the two sewn lines. All those triangle scraps turn into nice 2" half square triangles that I can add to my 2" square scrap pile for use in another project. I love it when there's no waste!
Here's my finished double star.
The transition from the smaller star to the background is a little muddy, but I'm okay with that. It is nice to be caught up with this project so early in the month. It will be an exercise in patience waiting for the September instructions to be available.
While I wait, I plan to spend some more time working on my New York Beauty blocks, along with a few other projects that have caught my eye.
Sunday, July 29, 2012
Quilter's Bingo
The guild that I belong to, Big Springs Quilt Guild, meets the first Saturday morning of each month. In August, we're going to play Quilter's Bingo. As I usually do, I went along with whatever was going on. I didn't even know what it meant to play Quilter's Bingo. And then my instructions arrived. I was going to have to make a game card if I intended to play.
Rather than the caller saying B-7 like traditional Bingo, she'll say something like Red-Holiday or Yellow-Floral. I needed five fabric types of five colors. The black and white center square is a free space. It was fun going through my stash to find all the different parts that I needed to play. Each square is cut 2 1/2". But if I was going to all this trouble, this project had to be more than just a Bingo card.
I decided to turn it into a hot pad. It was going to finish up at around ten inches square and that's just right for sitting under a large casserole dish. I cut two 10 1/2" squares of Therma-Flec for heat resistance, one 10 1/2" square of batting, and one 10 1/2" square of a green Kaffe Fassett print for the back.
Here's the back. I just love the black multi-colored polka dot binding. I went with a simple cross-hatch quilting pattern.
Here's the finished front. The instructions for making the game card emphasize that the more cards you make, the better your chances of winning. I think I'm gonna take my chances and stick with just one card.
Here's a simple tip for cross-hatching a small project. Before starting your quilting, draw a line a quarter inch inside the outer edge. I ALWAYS forget to do this so when my binding goes on, all those nice cross-hatch corners are hidden. Someday, I'll remember.
I'm taking red buttons to mark my place when we play. If I get really lucky, like this board is, I'll hear Red-Floral, Green-Metallic, Blue-Star, and Yellow-Paisley. BINGO!!
And after Bingo is over, my game card can have a long life serving up tasty casseroles.
Rather than the caller saying B-7 like traditional Bingo, she'll say something like Red-Holiday or Yellow-Floral. I needed five fabric types of five colors. The black and white center square is a free space. It was fun going through my stash to find all the different parts that I needed to play. Each square is cut 2 1/2". But if I was going to all this trouble, this project had to be more than just a Bingo card.
I decided to turn it into a hot pad. It was going to finish up at around ten inches square and that's just right for sitting under a large casserole dish. I cut two 10 1/2" squares of Therma-Flec for heat resistance, one 10 1/2" square of batting, and one 10 1/2" square of a green Kaffe Fassett print for the back.
Here's the back. I just love the black multi-colored polka dot binding. I went with a simple cross-hatch quilting pattern.
Here's the finished front. The instructions for making the game card emphasize that the more cards you make, the better your chances of winning. I think I'm gonna take my chances and stick with just one card.
Here's a simple tip for cross-hatching a small project. Before starting your quilting, draw a line a quarter inch inside the outer edge. I ALWAYS forget to do this so when my binding goes on, all those nice cross-hatch corners are hidden. Someday, I'll remember.
I'm taking red buttons to mark my place when we play. If I get really lucky, like this board is, I'll hear Red-Floral, Green-Metallic, Blue-Star, and Yellow-Paisley. BINGO!!
And after Bingo is over, my game card can have a long life serving up tasty casseroles.
Wednesday, July 25, 2012
Craftsy BOM July Blocks
So happy to be back to some quilt making fun. I finished my July blocks for the Craftsy Block of the Month before the end of the month. Shocking! The focus this month is on Dresdens.
The first block is a traditional Dresden Plate block. There are twenty different fabrics in this block (not counting the background). This block represents most of the fabric choices I had pulled for this project. I just love that it showcases all of the choices in one block.
The second block for this month, called Wagon Wheel, is a much more contemporary version of Dresden. This one uses a large scale abstract print by Brandon Mably.
Okay, Craftsy, bring it on. I'm ready to see what August brings.
The first block is a traditional Dresden Plate block. There are twenty different fabrics in this block (not counting the background). This block represents most of the fabric choices I had pulled for this project. I just love that it showcases all of the choices in one block.
The second block for this month, called Wagon Wheel, is a much more contemporary version of Dresden. This one uses a large scale abstract print by Brandon Mably.
Okay, Craftsy, bring it on. I'm ready to see what August brings.
Sunday, July 22, 2012
Tilly Quilt - A Fast Finish
Wow, I didn't expect to finish my Tilly quilt in a day, but here it is.
This trio of Tilly projects is now complete...a recovered cedar chest, a pillow, and a lap quilt. For the quilt, I continued the large flower motif in the quilting. The first flower was quilted before the free motion foot breakage that I wrote about yesterday. The super-glued foot is working nicely so I added two more partial large flowers along the edge of the quilt and two smaller flowers to fill the blank spaces. I decided not to add a darker quilted center and stamens to each flower. I thought it would be too bold and detract from the overall project. It is bound in a dark red Kona solid.
Here is one of the smaller quilted flowers.
I tried to get a good picture of the quilting from the back, but my limited photography skills didn't allow that to happen. All of the pictures just look like a big cream colored piece of fabric. You'll have to imagine that part.
It feels great to add another finish to my quilting year.
This trio of Tilly projects is now complete...a recovered cedar chest, a pillow, and a lap quilt. For the quilt, I continued the large flower motif in the quilting. The first flower was quilted before the free motion foot breakage that I wrote about yesterday. The super-glued foot is working nicely so I added two more partial large flowers along the edge of the quilt and two smaller flowers to fill the blank spaces. I decided not to add a darker quilted center and stamens to each flower. I thought it would be too bold and detract from the overall project. It is bound in a dark red Kona solid.
Here is one of the smaller quilted flowers.
I tried to get a good picture of the quilting from the back, but my limited photography skills didn't allow that to happen. All of the pictures just look like a big cream colored piece of fabric. You'll have to imagine that part.
It feels great to add another finish to my quilting year.
Saturday, July 21, 2012
Quilting on Tilly
I was cleaning out my photo files and noticed that I finished my Tilly quilt top waaayyy back in January, and haven't touched it since.
Part of the reason it isn't finished is because I couldn't decide how I wanted to quilt it. And looking at it again, I still couldn't decide. I *thought* I wanted to focus on each rectangle separately with my quilting so rather than put it away again, I quilted straight lines 1/4" away from each vertical seam while I pondered the possibilities (sorry for the blurry photos).
While I was stitching away on the straight lines, the larger flowers in the prints started calling to me. Wouldn't it be fun to quilt some big flowers?
The idea stuck, but what color thread to use? Stick with the neutral or go for some color?
I really liked the gold, but it didn't look different enough from the neutral color (Aurifil 50 wt color 2325...one of my favorites!). I decided to be a bit bolder and use the rusty orange for the flower and the dark brown for the center stamens. Hooray, I have a plan, or at least the start of one!
The next step was to draw the flower. I recruited my daughter for that. She's great at freehand drawing, especially doodly sorts of things. We used four sheets of copy paper taped together. I originally intended just to quilt right on the paper but decided that it would be a big pain to tear out afterwards. If I do this again, I'll use Golden Threads paper (that I have and totally forgot about until after this was done).
It was easy enough to cut around each row before quilting it and just quilt using the outside edge of the paper as a guide. It's an added bonus that this is not a precise pattern so if I get off a little bit, it's no big deal. There are five or six rounds to the flower. I had finished two rounds when disaster struck...
My free motion foot broke!! It's really a miracle that it has lasted for more than five years. I'm all the time pulling, tugging, and rearranging as I'm quilting. I tried to free motion with no foot at all, but that caused all sorts of tension issues. Since the lines on the flower weren't overly curvy, I opted to use my walking foot to finish up the main flower.
If I had thought of the flower idea sooner, the straight lines would have stopped at the edge of the flower. But it's okay, I am not going to take them out. This is a quilt that is for fun (aren't they all!) that will stay at my house, so I'm exercising my creative license to leave it this way.
Here it is from the back. I rarely use a light and plain backing. This is a Kona...not sure of the official color. Since this is supposed to be more of a light, summer throw quilt, I thought the light color backing would be appropriate, and now that I'm going quilting crazy with it, it will be fun to see all the stitching.
My husband and rescuer repaired my free motion foot with super glue. I haven't tried it out yet, but hopefully it will hold together long enough to finish this quilt. Look for another finish soon!
Part of the reason it isn't finished is because I couldn't decide how I wanted to quilt it. And looking at it again, I still couldn't decide. I *thought* I wanted to focus on each rectangle separately with my quilting so rather than put it away again, I quilted straight lines 1/4" away from each vertical seam while I pondered the possibilities (sorry for the blurry photos).
While I was stitching away on the straight lines, the larger flowers in the prints started calling to me. Wouldn't it be fun to quilt some big flowers?
The idea stuck, but what color thread to use? Stick with the neutral or go for some color?
I really liked the gold, but it didn't look different enough from the neutral color (Aurifil 50 wt color 2325...one of my favorites!). I decided to be a bit bolder and use the rusty orange for the flower and the dark brown for the center stamens. Hooray, I have a plan, or at least the start of one!
The next step was to draw the flower. I recruited my daughter for that. She's great at freehand drawing, especially doodly sorts of things. We used four sheets of copy paper taped together. I originally intended just to quilt right on the paper but decided that it would be a big pain to tear out afterwards. If I do this again, I'll use Golden Threads paper (that I have and totally forgot about until after this was done).
It was easy enough to cut around each row before quilting it and just quilt using the outside edge of the paper as a guide. It's an added bonus that this is not a precise pattern so if I get off a little bit, it's no big deal. There are five or six rounds to the flower. I had finished two rounds when disaster struck...
My free motion foot broke!! It's really a miracle that it has lasted for more than five years. I'm all the time pulling, tugging, and rearranging as I'm quilting. I tried to free motion with no foot at all, but that caused all sorts of tension issues. Since the lines on the flower weren't overly curvy, I opted to use my walking foot to finish up the main flower.
If I had thought of the flower idea sooner, the straight lines would have stopped at the edge of the flower. But it's okay, I am not going to take them out. This is a quilt that is for fun (aren't they all!) that will stay at my house, so I'm exercising my creative license to leave it this way.
Here it is from the back. I rarely use a light and plain backing. This is a Kona...not sure of the official color. Since this is supposed to be more of a light, summer throw quilt, I thought the light color backing would be appropriate, and now that I'm going quilting crazy with it, it will be fun to see all the stitching.
My husband and rescuer repaired my free motion foot with super glue. I haven't tried it out yet, but hopefully it will hold together long enough to finish this quilt. Look for another finish soon!
Sunday, July 15, 2012
Aw, rats! Time to catch up
It's been a few weeks since my last post, and there has been much happening around here. Thought it might be time to catch up. First up is how I did in the Patchwork Prism Quilt Along.
I didn't win for my quilt, but I was selected as a winner in the random drawing part of the quilt along. My kids keep saying it's an honorable mention, which is funny...more like a random mention, but I'll take it any way I can get it. Here's Sweet Diesel's blog post revealing the winners.
As many of you know, my brick and mortar quilt shop closed at the end of last year. After getting everything moved out and packed up, I took a nice, long play break. Well, I decided it was about time to get back to work. Over the past few weeks, I have sorted, organized and posted most of the remaining inventory in my Etsy shop, Dragonfly Quilt Shop. There are fabric, books, patterns, and notions, all at ridiculously discounted prices. The remaining items that haven't been listed there are large or odd shaped things, or things that are really too inexpensive to bother listing in the Etsy shop. My quilt guild will enjoy some nice door prizes for the next few months as I move it all out of here.
There's been one more distraction that has kept me from sewing and that is the addition of some new pets to the household. We already have a dog (he belongs to my husband) and a cat (which belongs to my daughter). The three boys, especially the younger two, decided they needed a pet of their own. My oldest son has wanted a ferret for many years, but I never agreed to that one. I did not want anything that was going to require a lot of expense. So, they went to the pet store and found the least expensive pet there, a rat.
My first response was NO, NO, NO way was a rat going to live at my house. They did their research, rallied the troops, and worked on me until I changed my mind. So, the first weekend in July found me welcoming not one, not two, but three adorable rats to our home. Each son had to have his own of course. They are from Legends of Rock Rattery, which we learned is a much better way to purchase rats than the local pet store. They are named Juno, Hera, and Lady and I must say, I'm becoming rather attached to the cute little things. Here is Hera; she's a shoulder sitter.
They are all girls, 'cuz we don't want any baby rats, that's for sure! This is Juno.
And this is Lady. She's older than the other two (five months) and full grown. The other girls are just six weeks old.
This is their cage and it might be decorated better than my bedroom.The dog hasn't decided if they are little dogs or he is a big rat!
I'm certainly ready to move back into play mode. There are a few quilting projects to be finished and I'm sort of shopping around for a new quilt along. It's been great to see my stash put to good use and quilt alongs are the perfect way for a busy working girl to use stash, try new things, and make new bloggy friends.

I didn't win for my quilt, but I was selected as a winner in the random drawing part of the quilt along. My kids keep saying it's an honorable mention, which is funny...more like a random mention, but I'll take it any way I can get it. Here's Sweet Diesel's blog post revealing the winners.
As many of you know, my brick and mortar quilt shop closed at the end of last year. After getting everything moved out and packed up, I took a nice, long play break. Well, I decided it was about time to get back to work. Over the past few weeks, I have sorted, organized and posted most of the remaining inventory in my Etsy shop, Dragonfly Quilt Shop. There are fabric, books, patterns, and notions, all at ridiculously discounted prices. The remaining items that haven't been listed there are large or odd shaped things, or things that are really too inexpensive to bother listing in the Etsy shop. My quilt guild will enjoy some nice door prizes for the next few months as I move it all out of here.
There's been one more distraction that has kept me from sewing and that is the addition of some new pets to the household. We already have a dog (he belongs to my husband) and a cat (which belongs to my daughter). The three boys, especially the younger two, decided they needed a pet of their own. My oldest son has wanted a ferret for many years, but I never agreed to that one. I did not want anything that was going to require a lot of expense. So, they went to the pet store and found the least expensive pet there, a rat.
My first response was NO, NO, NO way was a rat going to live at my house. They did their research, rallied the troops, and worked on me until I changed my mind. So, the first weekend in July found me welcoming not one, not two, but three adorable rats to our home. Each son had to have his own of course. They are from Legends of Rock Rattery, which we learned is a much better way to purchase rats than the local pet store. They are named Juno, Hera, and Lady and I must say, I'm becoming rather attached to the cute little things. Here is Hera; she's a shoulder sitter.
They are all girls, 'cuz we don't want any baby rats, that's for sure! This is Juno.
And this is Lady. She's older than the other two (five months) and full grown. The other girls are just six weeks old.
This is their cage and it might be decorated better than my bedroom.The dog hasn't decided if they are little dogs or he is a big rat!
I'm certainly ready to move back into play mode. There are a few quilting projects to be finished and I'm sort of shopping around for a new quilt along. It's been great to see my stash put to good use and quilt alongs are the perfect way for a busy working girl to use stash, try new things, and make new bloggy friends.
Subscribe to:
Posts
(
Atom
)