Here's a quick look at my sewing space from afar. It usually isn't this messy. Really, it isn't. I'll get in there and share more details when it's cleaner. I tend to let it get a little messier than this, then the world has to stop spinning until I clean it up. It's the bonus room over the garage; we fondly refer to it as "the orange room". It serves many purposes. In the back right is where Duane services sewing machines. My work table, sewing machine, and ironing space are just in front of that. The sewing machine is right under the sky light and it's perfect for daytime sewing. The back left houses my stash. In front of my stash is a computer area where you can generally find one of my kids playing computer games. In front of that is the dog sofa. It's the only piece of furniture in the house he's allowed on and it's his favorite spot. In front of my sewing area is a small television. It is not unusual for the entire family to be in this room for one form of entertainment or another.
Friday, January 14, 2011
My Sewing Space
Here's a quick look at my sewing space from afar. It usually isn't this messy. Really, it isn't. I'll get in there and share more details when it's cleaner. I tend to let it get a little messier than this, then the world has to stop spinning until I clean it up. It's the bonus room over the garage; we fondly refer to it as "the orange room". It serves many purposes. In the back right is where Duane services sewing machines. My work table, sewing machine, and ironing space are just in front of that. The sewing machine is right under the sky light and it's perfect for daytime sewing. The back left houses my stash. In front of my stash is a computer area where you can generally find one of my kids playing computer games. In front of that is the dog sofa. It's the only piece of furniture in the house he's allowed on and it's his favorite spot. In front of my sewing area is a small television. It is not unusual for the entire family to be in this room for one form of entertainment or another.
Thursday, January 13, 2011
The rest of the shop samples...for now
Here are the last of the new shop samples. Don't fret, we're already conjuring up a few more.
This sample says it all about our part of the world over the past few days. Suzanne Butt made this cute Snow Day wall hanging from Patrick Lose's book Poster Quilts. She used fabrics primarily from Robert Kaufman's Fusions collection.

Jessica Howard made this darling apple quilt. She said the apple blocks were lots of fun to piece. The pattern is Eleanor Burns Apple Cake and was made using a mix of fabrics from our 1930s area.

I wish I had a full picture of this quilt. It is fabulous. Suzanne Butt brought this work in progress to the shop last fall and my first question was, "Can I hang it in the shop?" Our black and white area needed some freshening up and this was just the piece to do it. It is from the pattern Lady Madonna by Abbey Lane Quilts.

Suzanne Butt also made this wall hanging from the pattern Freedom by Cottage Creek Quilts. We have samples from several of the patterns in this series, but this one might be my favorite. It's a simple reminder of something that I so often take for granted.

Last, but not least, is this little cutie that is perfect for Valentine's Day. I whipped this one up and learned that I need some practice making tiny pinwheel blocks. Wouldn't this make a great baby quilt? For those of you with embroidery machines I can picture a name and birthdate in the center hearts. It finishes up at under 30" square.

More soon!
This sample says it all about our part of the world over the past few days. Suzanne Butt made this cute Snow Day wall hanging from Patrick Lose's book Poster Quilts. She used fabrics primarily from Robert Kaufman's Fusions collection.
Jessica Howard made this darling apple quilt. She said the apple blocks were lots of fun to piece. The pattern is Eleanor Burns Apple Cake and was made using a mix of fabrics from our 1930s area.
I wish I had a full picture of this quilt. It is fabulous. Suzanne Butt brought this work in progress to the shop last fall and my first question was, "Can I hang it in the shop?" Our black and white area needed some freshening up and this was just the piece to do it. It is from the pattern Lady Madonna by Abbey Lane Quilts.
Suzanne Butt also made this wall hanging from the pattern Freedom by Cottage Creek Quilts. We have samples from several of the patterns in this series, but this one might be my favorite. It's a simple reminder of something that I so often take for granted.
Last, but not least, is this little cutie that is perfect for Valentine's Day. I whipped this one up and learned that I need some practice making tiny pinwheel blocks. Wouldn't this make a great baby quilt? For those of you with embroidery machines I can picture a name and birthdate in the center hearts. It finishes up at under 30" square.
More soon!
Wednesday, January 12, 2011
Girlie Fashions
With the new year, we added some new girls patterns to our collection. It is only natural that we add some samples to go with them. Here's a cute and sassy skirt made by Suzanne Butt from the pattern Reversible Skirt by Sew Baby. Yes, it is reversible! The other side is a single fabric version using the fabric around the top band of the skirt.

The pattern for these pants is Easy Pieces Pants and it is also by Sew Baby. What a great way to use up scraps. They were fun and easy to make. I just love the ruffle at the bottom of the pants legs.
This adorable top is from the pattern Beverly Belle by Izzy & Ivy. It was a good break from basic straight line sewing. Talk about being able to twirl. The curved pieces make this top quite flouncy and full. It has elastic in the sleeves, around the top and above the waist.
One more blog entry and you will have the full tour of new shop samples. It's been fun sharing them with you.
The pattern for these pants is Easy Pieces Pants and it is also by Sew Baby. What a great way to use up scraps. They were fun and easy to make. I just love the ruffle at the bottom of the pants legs.
Tuesday, January 11, 2011
How to Make a No Sew Fabric Coaster
This is a fast, no sew project that we did at the shop on our Make and Take day. It's a great way to use up scraps; they make great gifts, and they can be an additional accessory for other handmade projects. Here's the final result:

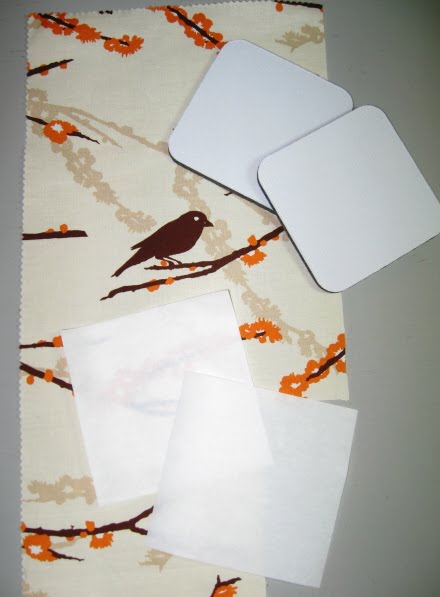
You will need a rubber coaster base, a four-inch square of two-sided fusible web (I prefer either Lite or Regular Steam-a-Seam 2), and fabric that is at least 4" square.

The rubber coaster base is black on one side and white on the other. Fuse the fabric to the white side of the coaster. Another thing to know about the coaster base is that it is heat resistant; great for hot drinks or under a hot bowl of soup.

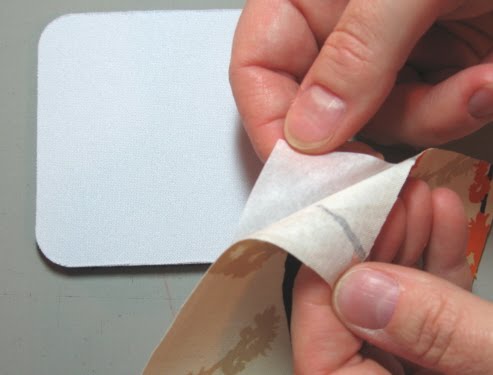
Remove one side of paper from the fusible web. It is paper on two sides and sticky in the middle. Usually, one side of the paper comes off easier than the other. You can fiddle with a corner to see which paper comes loose first.

You should be able to rub your finger over the surfaces between and feel that one side has the rough, sticky fusible while the other side is smooth paper. Peel the paper off and discard. Position the fusible sticky side down on to the WRONG side of your fabric. I emphasize wrong side because that is one of the most common errors for new users of fusible web products. Iron the fusible web to the fabric. Set your iron as you would to iron the fabric. This example uses cotton fabric, so I chose a cotton setting with steam. It takes about five seconds of ironing for the fusible to set. You can check the corner with your finger to make sure it is fully bonded. Iron a few more seconds and try again if it isn't.

Cut out the fabric around the fusible. There's no need to be neat about this step. You will be doing final trimming later. Make sure you cut on or just outside the edge of the fusible area.
Pull the remaining paper backing off the wrong side of the fabric. Again, you may need to fiddle with the corner to get it started. Discard the paper.

Center the fabric on top of the white side of the coaster. The fabric is four inches square and the coaster is 3 1/2 inches square. This gives you some play room in determining the final fabric placement on the coaster.

Once you are happy with the placement, use your fingers to smooth the fabric onto the coaster. It is easy to get a wrinkle in the final result if you do not carefully smooth the fabric to the coaster.
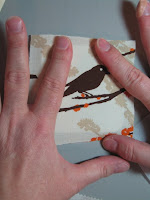
Here's what it should look like from the back.

With the fabric facing up, iron it to the coaster. Trim the edges around the coaster. It is better to leave a tiny bit extra rather than to trim it too close.

Tah-dah! A finished coaster.

If you'd like to make your own, kits are available in the Studio Dragonfly Etsy Shop. The kits come with four coaster bases, four squares of fusible web, and instructions. Enjoy!

You will need a rubber coaster base, a four-inch square of two-sided fusible web (I prefer either Lite or Regular Steam-a-Seam 2), and fabric that is at least 4" square.
The rubber coaster base is black on one side and white on the other. Fuse the fabric to the white side of the coaster. Another thing to know about the coaster base is that it is heat resistant; great for hot drinks or under a hot bowl of soup.
Remove one side of paper from the fusible web. It is paper on two sides and sticky in the middle. Usually, one side of the paper comes off easier than the other. You can fiddle with a corner to see which paper comes loose first.
You should be able to rub your finger over the surfaces between and feel that one side has the rough, sticky fusible while the other side is smooth paper. Peel the paper off and discard. Position the fusible sticky side down on to the WRONG side of your fabric. I emphasize wrong side because that is one of the most common errors for new users of fusible web products. Iron the fusible web to the fabric. Set your iron as you would to iron the fabric. This example uses cotton fabric, so I chose a cotton setting with steam. It takes about five seconds of ironing for the fusible to set. You can check the corner with your finger to make sure it is fully bonded. Iron a few more seconds and try again if it isn't.
Cut out the fabric around the fusible. There's no need to be neat about this step. You will be doing final trimming later. Make sure you cut on or just outside the edge of the fusible area.
Center the fabric on top of the white side of the coaster. The fabric is four inches square and the coaster is 3 1/2 inches square. This gives you some play room in determining the final fabric placement on the coaster.
Once you are happy with the placement, use your fingers to smooth the fabric onto the coaster. It is easy to get a wrinkle in the final result if you do not carefully smooth the fabric to the coaster.
Here's what it should look like from the back.
With the fabric facing up, iron it to the coaster. Trim the edges around the coaster. It is better to leave a tiny bit extra rather than to trim it too close.
Tah-dah! A finished coaster.
If you'd like to make your own, kits are available in the Studio Dragonfly Etsy Shop. The kits come with four coaster bases, four squares of fusible web, and instructions. Enjoy!
Monday, January 10, 2011
A snow day is a sew day
Life has a way of giving you an intermission. In Georgia, it comes in the form of a snow day. The kids were out of school today and will be out tomorrow, too. We measured seven inches. I like the unexpected break, but I'm hoping things will start returning to normal on Wednesday.

I took advantage of the day and finished a UFO. This wasn't my UFO, but one that belonged to my husband, Duane. Last year, he took the First Time Quilt Making class at the shop. He wanted to have a better feel for what all the quilting fuss was about. Robin Cook teaches all of our first time quilters, and does a great job of leading her students to a love of making quilts. In class, he selected fabric, cut, pieced, and quilted his project. At home, we worked together on a label. The only thing left to do was the binding.

Somewhere along the way Duane decided that he didn't like the quilt. He thought there was too much white. Every time I asked, he said he would finish it, but it continued to sit. Nine months later, I decided to help him out. I still like the quilt, and I'm sure his mom will too.
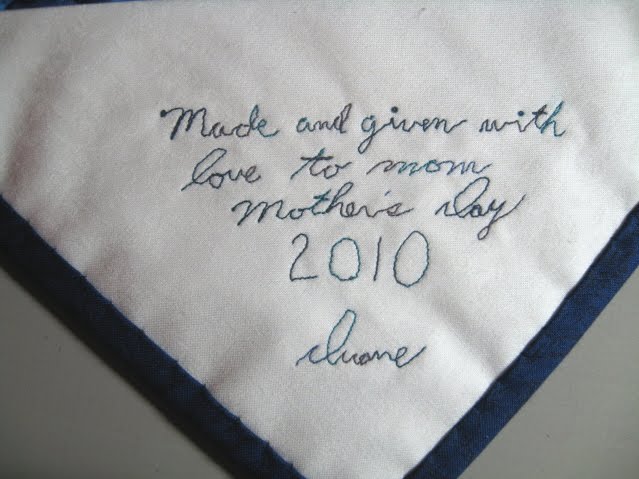
Duane wrote a message to his mom for the label and I stitched it in thread on some white fabric. The fabric was a square that I folded on the diagonal and stitched into the binding. It's easy to do and makes a nice pocket on the back for care instructions or a special letter to the recipient.

I'm looking forward to another snow/sew day tomorrow.
I took advantage of the day and finished a UFO. This wasn't my UFO, but one that belonged to my husband, Duane. Last year, he took the First Time Quilt Making class at the shop. He wanted to have a better feel for what all the quilting fuss was about. Robin Cook teaches all of our first time quilters, and does a great job of leading her students to a love of making quilts. In class, he selected fabric, cut, pieced, and quilted his project. At home, we worked together on a label. The only thing left to do was the binding.
Somewhere along the way Duane decided that he didn't like the quilt. He thought there was too much white. Every time I asked, he said he would finish it, but it continued to sit. Nine months later, I decided to help him out. I still like the quilt, and I'm sure his mom will too.
Duane wrote a message to his mom for the label and I stitched it in thread on some white fabric. The fabric was a square that I folded on the diagonal and stitched into the binding. It's easy to do and makes a nice pocket on the back for care instructions or a special letter to the recipient.
Sunday, January 9, 2011
Fabric Design Insights
We had a fun class on Saturday at the shop with Jennifer Heynen (http://jenniferjangles.blogspot.com) and Genevieve Swinford (http://genevievegail.blogspot.com). Both of these girls are very talented artists who made their way into fabric design over the past couple of years.
It was interesting to get two different perspectives on the design process and the business relationships they each have with the companies that produce their fabric.


Jennifer has a fine arts degree in ceramics so most of her designs for fabric start as a ceramic concept. She is also a button and bead maker so all of her fabric lines have coordinating buttons. Her first collection, Happy, is in its second printing. Her second collection, Polka Dot Garden, will be released to stores in March, and her third collection is in the design process. Jennifer had a table set up with her products and a great Powerpoint presentation.


Genevieve has a fine arts degree in graphic design. Her career path taught her a lot about product design, development, and licensing. She has released two fabric collections, Flower Bucket and Gypsy Garden. She also has her designs coming out on reusable tote bags this year. Her third collection is in the design process. Genevieve had an awesome presentation board as well as specially made candy for each participant.

The one thing I took away from their presentation is to not be afraid to try. Jennifer told us that she is constantly working on new designs and ideas and that for every twenty she tries, maybe there will be one that she's happy with. They both told us that they sketch constantly and take ideas from everyday life.
They shared with us a cool website (www.spoonflower.com) where you can upload your own original design and have it printed on fabric in small quantities.
One of the participants asked if it was possible to earn a living as a fabric designer. Both answered yes, but that your efforts had to go beyond the fabric. Buttons, patterns, and other licensed products based on the fabric add to the initial fabric release.
Thanks to both Genevieve and Jennifer for taking time out of their busy schedules to share their knowledge and experience as fabric designers. I'm looking forward to watching the future unfold for both of these talented ladies.
It was interesting to get two different perspectives on the design process and the business relationships they each have with the companies that produce their fabric.
Jennifer has a fine arts degree in ceramics so most of her designs for fabric start as a ceramic concept. She is also a button and bead maker so all of her fabric lines have coordinating buttons. Her first collection, Happy, is in its second printing. Her second collection, Polka Dot Garden, will be released to stores in March, and her third collection is in the design process. Jennifer had a table set up with her products and a great Powerpoint presentation.

Genevieve has a fine arts degree in graphic design. Her career path taught her a lot about product design, development, and licensing. She has released two fabric collections, Flower Bucket and Gypsy Garden. She also has her designs coming out on reusable tote bags this year. Her third collection is in the design process. Genevieve had an awesome presentation board as well as specially made candy for each participant.
The one thing I took away from their presentation is to not be afraid to try. Jennifer told us that she is constantly working on new designs and ideas and that for every twenty she tries, maybe there will be one that she's happy with. They both told us that they sketch constantly and take ideas from everyday life.
They shared with us a cool website (www.spoonflower.com) where you can upload your own original design and have it printed on fabric in small quantities.
One of the participants asked if it was possible to earn a living as a fabric designer. Both answered yes, but that your efforts had to go beyond the fabric. Buttons, patterns, and other licensed products based on the fabric add to the initial fabric release.
Thanks to both Genevieve and Jennifer for taking time out of their busy schedules to share their knowledge and experience as fabric designers. I'm looking forward to watching the future unfold for both of these talented ladies.
Friday, January 7, 2011
Classes and Clubs at Dragonfly Quilt Shop
I am really excited about some of the clubs and classes we have coming up.

Jennie Weaver is teaching our Sassy Quilters Club. The first project for this club is this fabulous quilt from the pattern All Around Minnesota. The club will meet on the first Saturday of each month in February, March, and April from 10am-1pm. After this quilt is done, Jennie will introduce a new one for the next three months. It should be fun and having three classes should give you lots of time to get it done.

Fay Rawls and Mary Colley are teaching a three session class called Patchwork Garden. They will meet on the first Tuesday of each month at 10am starting in February. These girls are lots of fun and will teach and encourage you through this very pretty project.

Robin Cook will be teaching this bright wall hanging in her class Stars & Crosses. This is an Eleanor Burns pattern and Robin is a certified Eleanor Burns instructor. Look for this class on the last Saturday of February from 10am-4pm.

Holley Downs made this quilt from Nancy Halvorsen's newest book Count On It. Holley is always making something fun for us. We'll be having a club for all the Nancy Halvorsen fans starting in February. There will not be any formal instruction, but there are always new ideas and techniques flying around the room when this group of ladies gets together. We'll meet on the second Thursday or Saturday of each month at 10am.

Jennie Weaver is our Girls Sew In teacher. Every few months, Jennie will offer a class for girls ten and up. On February 5 from 1:30pm-4:30pm she'll be showing the girls how to make a pillowcase.
You can find more information about all our classes and clubs on the shop website, http://www.dragonflyquiltshop.com.
Jennie Weaver is teaching our Sassy Quilters Club. The first project for this club is this fabulous quilt from the pattern All Around Minnesota. The club will meet on the first Saturday of each month in February, March, and April from 10am-1pm. After this quilt is done, Jennie will introduce a new one for the next three months. It should be fun and having three classes should give you lots of time to get it done.
Fay Rawls and Mary Colley are teaching a three session class called Patchwork Garden. They will meet on the first Tuesday of each month at 10am starting in February. These girls are lots of fun and will teach and encourage you through this very pretty project.
Robin Cook will be teaching this bright wall hanging in her class Stars & Crosses. This is an Eleanor Burns pattern and Robin is a certified Eleanor Burns instructor. Look for this class on the last Saturday of February from 10am-4pm.
Holley Downs made this quilt from Nancy Halvorsen's newest book Count On It. Holley is always making something fun for us. We'll be having a club for all the Nancy Halvorsen fans starting in February. There will not be any formal instruction, but there are always new ideas and techniques flying around the room when this group of ladies gets together. We'll meet on the second Thursday or Saturday of each month at 10am.
Jennie Weaver is our Girls Sew In teacher. Every few months, Jennie will offer a class for girls ten and up. On February 5 from 1:30pm-4:30pm she'll be showing the girls how to make a pillowcase.
You can find more information about all our classes and clubs on the shop website, http://www.dragonflyquiltshop.com.
Subscribe to:
Posts
(
Atom
)