Friday, October 30, 2015

Holiday Initial Mug Rug Tutorial


It's time to start thinking about quick holiday gifts. This initial mug rug is fast and very easy to make. It isn't apparent from this picture but it is an "initial" mug rug because there is an initial quilted into the large square.


The parts you need to make the front are one 6 1/2 inch square, one 2 1/2 inch x 6 1/2 inch rectangle, and one 1 1/2 inch x 6 1/2 inch rectangle.


Before sewing them together, you need to draw your initial on the 6 1/2 inch square. To find a letter I wanted to use, I opened up my word processing software and started looking through the available fonts. It is important to use something fairly simple so that the letter does not get lost in the quilting.


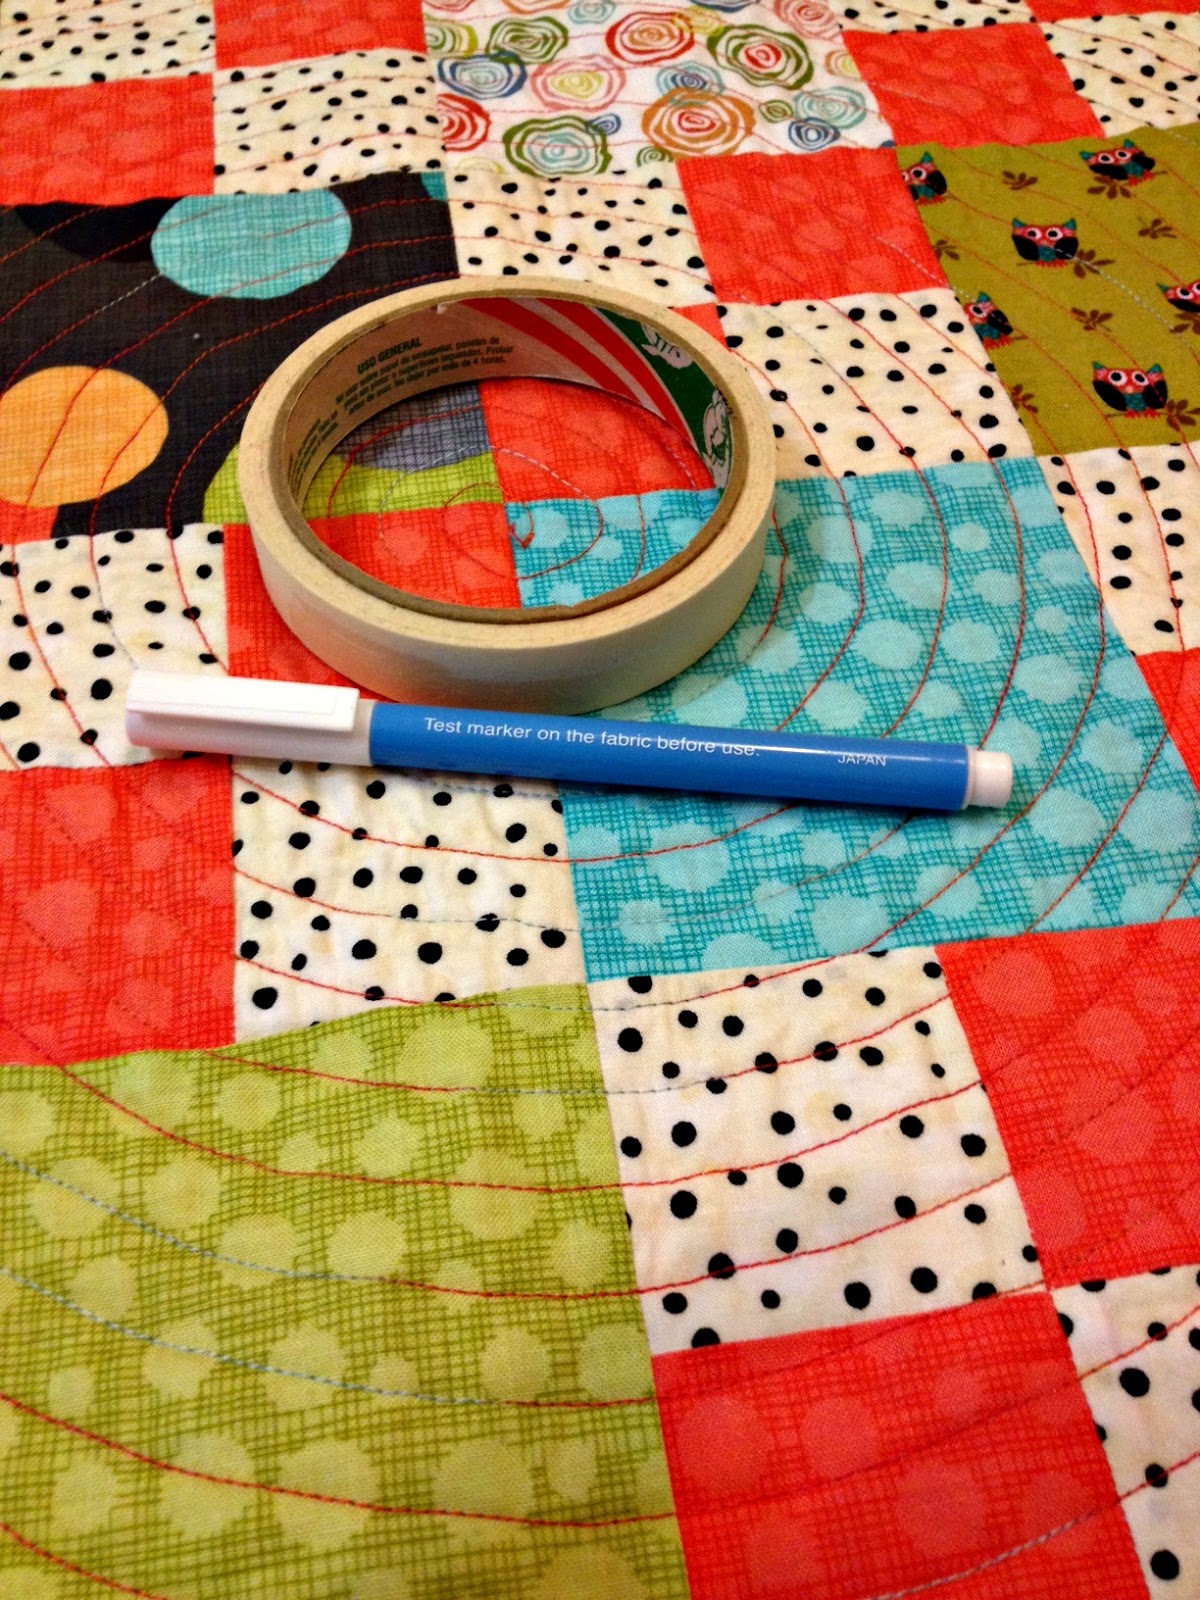
The font I chose is "Georgia". It is a common serif font and usually available on most word processors. I suppose I should have printed the page and taped it to a window to be able to see it. Since I was making this after dark, I did the next best thing and traced it straight off the computer screen.


Yes, I used tape and taped it directly to the screen. A blue, water soluble marker did the trick for the tracing.


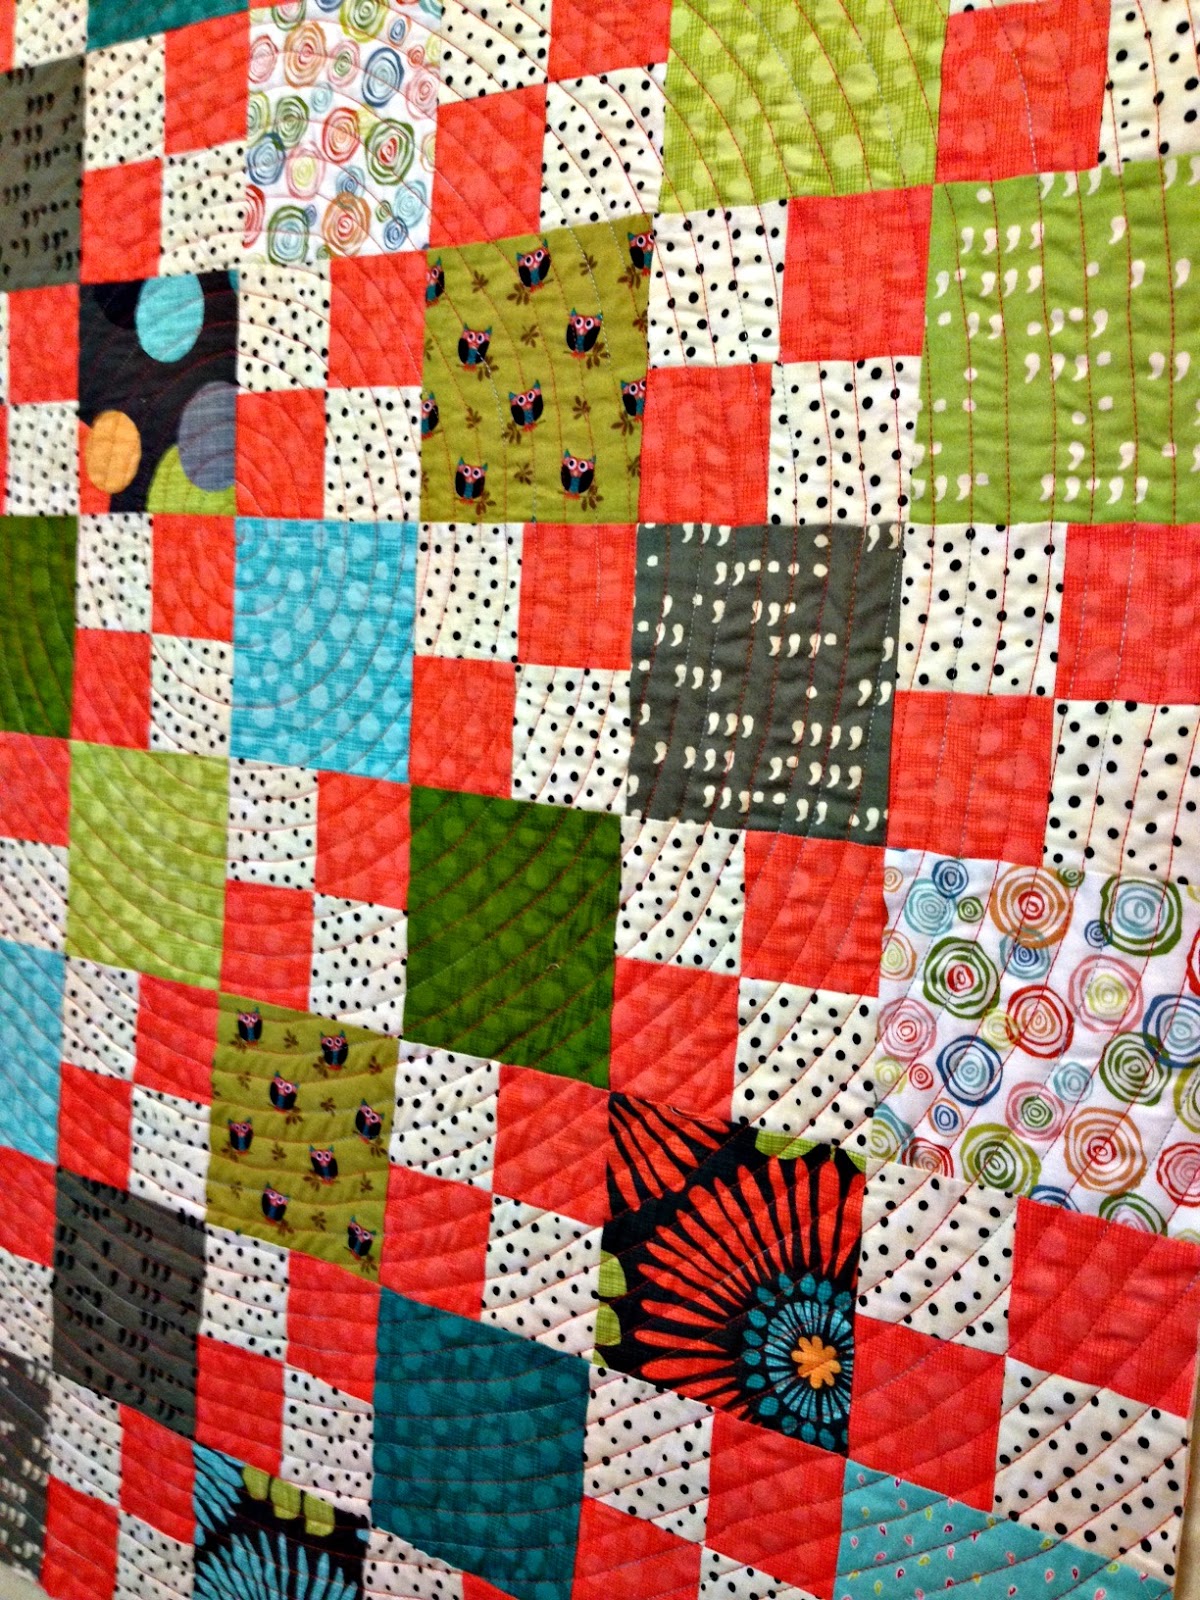
Next, stitch the three pieces together to form the top using a 1/4 inch seam. Cut batting and backing at least 7 inches by 10 inches. Layer the top with batting and backing and quilt in any way you desire. To make the letter stand out, use dense quilting to fill the background. I used a small meander stitch in matching thread and I also stitched directly on the lines that form the letter. In the small red rectangle on the right, I free motion stitched a back and forth horizontal(ish) line. I switched to my walking foot for the light accent fabric and stitched vertical lines about 3/8 inch apart.


Here it is from the back. There were a few tension issues, but not horrible.


If you wanted to skip the initial in this project, you could easily choose three pretty prints and do some simple all over quilting. I am hoping to make quite a few of these to use as gifts for my office mates. The initial personalizes it and makes it special just for them.


I wasn't sure if I wanted traditional binding or if I wanted to do a sew and turn method for this project. I'm glad I went with binding. I like the way it frames up the project.

There are so many variations that can be made with this project. For the light accent fabric, you could stitch together some smaller scraps to make an improv stripe. You could choose to quilt in a motif instead of an initial, like a snowflake or holly leaves. If we push past Christmas, wouldn't this be cute in Valentine's Day fabric with a heart quilted in the big square. The possibilities are endless.


Other posts that feature gift ideas:

Wednesday, October 28, 2015

Blogger's Quilt Festival - An Art Quilt


It is that exciting time of year when the Blogger's Quilt Festival occurs. This will be my first year entering. It will be fun to be a part of the festivities. I decided to enter this tiny quilt in the Art category. It started as an experiment for my October bee blocks but I loved it so much that I turned it into a small quilt of it's own. It is only 12 1/2 inches square finished. I love that there are so many things to see in it, which is why I decided it was a better fit in the art quilt category.

It was originally supposed to look like a flower. Now when I look at it I see a sunrise/sunset over water. My son says it looks like a staircase that descends into a pit of fire. One blog reader said it looks like you are looking down into a valley at the setting sun in the darkening sky. Another said it looked like a tunnel with light at the end. It is so cool that it looks like so many different things. What do you see?

This is where I originally wrote about the creation of this block turned quilt.


Thank you to Amy over at Amy's Creative Side for hosting.

Blogger's Quilt Festival - A Mini Quilt


It is that exciting time of year when the Blogger's Quilt Festival occurs. This will be my first year entering. It will be fun to be a part of the festivities. I decided to enter my Shadow Block Mini Quilt in the Mini category. It is just small enough to qualify since the maximum perimeter is 80 inches. This quilt is 17 1/2 inches by 20 inches, so it is 75 inches around.

I've written about this quilt twice before, here when I first finished it, and here when I wrote a tutorial for it. There are lots more pictures in those posts.

Thank you to Amy over at Amy's Creative Side for hosting.

Monday, October 26, 2015

Did You Find Quilting or Did Quilting Find You?

I always love hearing stories about quilters and what drew them to become quilt makers. Here's my story:

All my life I have been drawn to textiles and fiber. I'm not sure where it came from. Here is the first thing I ever made. I was five or six years old. I don't know if I asked for this or if it was given to me to see if I had interest. Some of the yarn has started to deteriorate. I suppose that speaks to just how old this is. Ahem.


Here's the second thing I made. I was maybe seven. I know that I asked for more once I had completed that first piece but I don't think I selected this for myself. You can see where I had no idea what to do where the colors changed. There are a few spots with no stitching. Buy hey, pretty good for a kid!


There were always quilts at my grandmother's house. I asked her about them regularly but she always downplayed their significance. They were made for utility and weren't considered any sort of artistic endeavor. I have five of those quilts now, and they are real treasures.


What I love most about them is that even in all their vintage traditional goodness, there are some modern elements. I plan to do a more detailed post about these quilts in the near future. They are definitely worthy of more than a single picture.

My mom dabbles in all sorts of arts and crafts, including quilt making. She does not have the burning passion for quilt making like I do, but there are a few quilts around that were made by her hand.

There was a quilt shop in Stone Mountain, Georgia, which isn't far from where I grew up. We would stop in anytime we were shopping in town. One day, as we were leaving, I told my mom that I could lay on the floor in that store, gaze at the fabric, and be happy forever. She thought I was crazy. I was probably twelve or thirteen then.

One of my first opportunities to make a quilt was in home economics class in high school. I cannot find it now but it was a simple table topper, using fabric scraps I had on hand. It resembled a trip around the world design and was hand quilted.

Later in high school, I got my first sewing machine. The theory was that it would hold my interest and keep me out of typical teenage trouble. It mostly worked. I made clothes more than anything else on that machine. This is the outfit I wore to my high school graduation.


I was very proud of the hand embroidery on the top. We were required to wear a white dress.


I did not really start making quilts until I had children. So, I think I found quilting, even though it had been tapping me on the shoulder for a long time. I knew it was out there, and I was searching, and reaching, and finally I got a hold of it. And once I found it, I knew I would never let it go. This is one of the first large quilts I ever made.


The funny thing is that this is so not my style. I made it for my daughter and it isn't her style either. We must have been having a traditional moment when we picked this one out. The other thing is that I am hand quilting it.


It isn't finished, even though I went ahead and bound it. It is fine folded on my shelf for now. Someday, all that hand quilting will get done. And I do love it, even if it isn't something I would choose to make today.

Sometimes, I make quilts because I love being absorbed in the creative process. Sometimes I make quilts because I want to forget other parts of my life for a while and quilt making is the perfect outlet for that. Sometimes, I make quilts as a way to help others. Sometimes, it is as if quilting possesses me and I am compelled to try a new idea or project. For me, quilt making is a passion.

So, what's your story? Did you find quilting or did quilting find you? What is it that you love most about quilt making? I'd really love to hear your story.

Other posts that might interest you:
Old Family Quilts 
Works in Progress: Treadle Piecing and Machine Quilting

Friday, October 23, 2015

The Real October Bee Blocks


Earlier this month, I attempted to make a block for the Believe Circle's October quilt. I really like what I made and have since decided that it isn't child like enough so I am keeping it and made two to replace it. The quilts we make go to an organization that helps foster children, My Very Own Blanket, so being child like is very important.


It was a lot harder to choose fabric for the blocks when it wasn't conveniently all in the same fabric like my first attempt. Once I had settled on fabric choices, it was time to sew.


Since this wasn't my first quilt as you go block, I just stitched along without referring to the tutorial at all. Somewhere along the way my shape got out of whack so instead of looking somewhat flowerish, my blue block looks like a bad crazy quilting experiment.


The white fabric stands out way too much in the blue block, too. I was very happy that I had to make two blocks so that maybe I could redeem myself with the purple block.


This time, I pulled up the tutorial and referred back to it many times while making it.


I like the purple block much better. The tutorial for this quilt as you go method can be found here. These will be shipped off to Jennifer next week. Thanks, Jennifer, for stretching my quilting muscle this month. For me, this is the most challenging block I've made as part of the Believe Circle. It is always fun to see what each new month brings for our quilt making circle.


Linking up with Whoop Whoop with Confesssions of a Fabric Addict and Fabric Frenzy Friday Fort Worth Fabric Studio. Also linking up with Design Wall Monday at Patchwork Times and Main Crush Monday at Cooking Up Quilts. And one more link up with Fabric Tuesday at Quilt Story.

Other posts about the Believe Circle:
Believe Circle Quilts 2015
Believe Circle Finished Quilt for May
Believe Circle Half Way Through the Year

Wednesday, October 21, 2015

Challenge Accepted - A Free Motion Pumpkin Pillow


There is a challenge going on over at Quilt Shop Gal involving pumpkins, pillows, and free motion quilting. Of course I had to join in on the fun. I discovered this challenge by way of Lori Kennedy of The Inbox Jaunt. She contributed to the challenge by writing a tutorial for the project. And since I'm already enrolled in her Divide and Conquer class over at Craftsy, I couldn't resist the opportunity to learn even more. 

The first step is to draw out your ideas. As you can see, I'm quite sketchy about this stage. A few scribbles and I'm ready to sew.


Once I had a concept of what I wanted to do, I used a blue water soluble pen and marked my fabric.


I spent a lot of time on Lori's blog, browsing through all of her tutorials. I think choosing which designs to use took longer than the actual quilting. I learned a few lessons along the way with this project. The first is to not choose such busy fabric. I just love this picture, but guess what. This is from the back. The nice, plain, solid back.


The spider web looks cool. Can you see the spider on the left side?


The dragonfly turned out good. It doesn't matter what season it is. You know I have to have a dragonfly somewhere on almost every project.


The details show up so nicely on the BACK!


The front... well, the front is a little busy.


It's not horrible. It's simply a lesson learned. I suppose it partially comes from the concept that busy fabric hides quilting mistakes but I really did think it was plain enough when I chose it. Here's the dragonfly.


Once the quilting was completed, it was squared up, layered and bound just like a regular quilt. The only difference is the back is two pieces that overlap so that a pillow form can be stuffed inside.


I liked it a little better once it became a pillow. And I was very pleased with my quilting. One of the things Lori said in her tutorial is that you wouldn't want to stop at just one. And she might be right. This project took about three hours from start to finish. I'm hoping to find a few free hours lurking in my weekend. We will see.


Other posts with free motion quilting
A Few Quilted Flowers
Collaborative Quilt for a Teacher
Believe Circle Quilt Finish

Monday, October 19, 2015

Quilting Practice from Craftsy's Divide and Conquer Class


Divide & Conquer: Creative Quilting for Any Space
Click on the class picture to sign up!
This week I started taking a class at Craftsy. It is the Divide and Conquer class taught by Lori Kennedy who blogs over at The Inbox Jaunt. I don't take classes often but when I do, I seem to be drawn to free motion quilting classes. Free motion quilting is something I really enjoy because the possibilities seem endless. It is also something I get really nervous about if I haven't done it in a while. Practice, practice, practice. That is always the rule when it comes to free motion quilting. And no matter how many classes I take, there is always more to learn. Different tools, new tips, new quilting designs.


Lori's class takes a look at different ways to divide space when planning the quilting design. The first composition she teaches is rows. She demonstrates waves, a sun motif, and sailboats. I decided to attempt the waves. Just in case you weren't sure, those are definitely waves in the gray. Squint if you have to. My waves need more practice and it didn't help that my row wasn't straight. I had to improvise a bit with the ups and downs. But not too bad for a first try.


I really like watching Lori demonstrate each motif. She does a good job talking through the details for each one. As an example, those waves have several places where, if you aren't careful, you can end up with a lot of stitching in one place, which can become distracting. It is one of those things I wouldn't notice in the details of stitching a single motif, but it does make a difference in the overall look of the project. That was a great tip.

I like the way this design looks on the back of the block, too. I knew that it would be difficult to see any quilting on the printed fabric, so I used that opportunity to practice some straight line quilting.


The threads I used were from those I had on hand. All worked well. I had a few broken threads when the weight on top was different than the thread weight in the bottom. That has always been a challenge for me but it is one that is usually overcome with a little bit of trial and error.


The blocks I am using for quilting practice come from another Craftsy class, the 2012 Block of the Month. I really liked that class, too, but did not want to put all my blocks together sampler style. I have been slowly using them for various free motion quilting practice, and will probably finish them individually. They may hang as a set someday.

The second way Lori divides composition is in a grid format. She offered several grid style quilting motifs and my absolute favorite is the square flower. I love how nicely it fit in the four corners of this star block.


I stitched one up in the center square, too, but that busy fabric makes it hard to stitch and impossible to see. I made up the curved lines in the triangle blocks and can see that I need to either embrace my whimsical, wonky, imperfect style or I need to practice a whole lot more. I'll take a mix of both, thank you.


I really like the way this block turned out.


There are eight lessons in the Divide and Conquer class. I am half way through the class and cannot wait to learn more. The remaining four lessons cover medallion composition, radiating composition, diagonal composition, and framed composition. There are still motifs from the first four lessons I want to try.

Lori also encourages doodling before quilting to get a good feel for the flow of the design. I have been a big fan of doodling for quite a while.

If you are interested in improving your free motion quilting skills, then consider this class. It is not a class intended for a beginner but is perfect once you have the basics down. This class is a great way to stretch your free motion quilting muscle.

You can register for the class here:

Divide & Conquer: Creative Quilting for Any Space


Linking up to:
Design Wall Monday at Patchwork Times
Monday Making at Love Life Quilt
Main Crush Monday at Cooking Up Quilts
Fabric Tuesday at Quilt Story

Other posts that feature free motion quilting:
Doodling to Improve Free Motion Quilting
Mother's Day Gift Making - Improv Pot Holders
Quilting Practice - Swirls
Quilting Practice - Leaves
Quilting Practice - Circles

Friday, October 16, 2015

Cradle Quilt - Finished


Sometimes small projects are just right. I had the best time quilting this project.


I have attempted (and struggled with) spirals and concentric circles using my walking foot several times before and I really wanted to be successful this time. The frustration usually occurs right at the beginning so this time I used my blue water soluble pen to draw the exact spiral to get me started. The masking tape made sure I had an almost perfect circle as a starting point. I'm not opposed to ovals and egg shapes and other curvy shapes. They just weren't what I was going for this time around!


I used a Sulky Blendable on the top and Aurifil 50 wt in white on the bottom for the quilting. On the spool, the Sulky thread looks more red but once it is on the quilt, it blends nicely with the bright orange squares. The "blendable" part of this thread is a nice aqua blue which almost perfectly matches the blue in the quilt top.


There are a few wobbles in the quilting along the way but overall the circle stayed a circle and the quilting is just right for this project.


 My favorite part is the texture that the quilting added. I haven't washed it yet but that is what it feels like... very soft and drapy, like a well loved quilt ought to feel.


The back is just as fun as the front with an orange print down the center of the back and white with black dots/spots on either side.


The solid blue binding works nicely with this quilt, offering a calm finish to a very bright quilt.


This quilt finishes at 24 inches x 32 inches. I'm so glad I went for a second project from the scraps of an earlier project. The colors may be the same, but the result is totally different.


This quilt is available for purchase.

Linking up with:
Fabric Frenzy Friday at Fort Worth Fabric Studio
Whoop Whoop at Confessions of a Fabric Addict
Finish It Up Friday at Crazy Mom Quilts

Other posts related to this project:
Funky Quarter Cabins Quilt
Cradle Quilt - Work in Progress
Choosing Fabric for a New Quilt
Related Posts Plugin for WordPress, Blogger...