Saturday, March 30, 2013

Quilting Practice - Paisleys

This week I used another pieced block from the 2012  Craftsy Block of the Month for quilting practice.


Paisley practice from Angela Walters Quilting Negative Spaces class was the goal. Before getting started with the paisleys, the center needed some quilting.


Those flowers in the center were worthy of some special attention so I outline quilted around them, then filled in the rest with a small meander.


I think that if I had it to do over again, I might have chosen a darker thread. This was a Sulky Blendable that was in my thread stash.


Once the center area was quilted, it was time to quilt some paisleys!


These were fun and easy to quilt. I like that the shape is smooth and flowing so it was easy to get into a rhythm.


I'm not sure how paisley-ish these look; raindrops or teardrops might be a better description. 


It's nice to practice on such a small piece. I found myself spinning the block around often in order to hit the paisley at just the right angle. I wouldn't be able to do that with a big quilt.


Here it is from the back. The stitching is easier to see with the contrasting color.


I'm happy with the way this block turned out.


Next time I practice, it will be time to start experimenting with combining designs...circles and swirls maybe.

Wednesday, March 27, 2013

A Lovely Year of Finishes - March Finish


For March, I committed to finish this quilt top, and finish I did.


The top is from a class I taught some years back based on a Debbie Caffrey pattern. You can check out my commitment post 
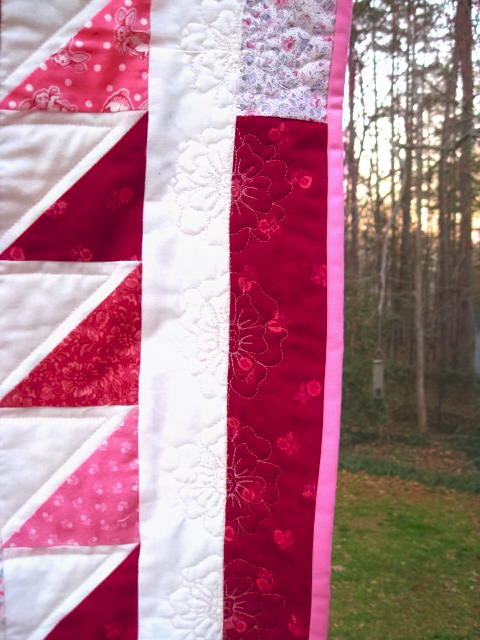
here. I found a quilt design on Pinterest to use for inspiration. Of course I didn't pin it and now can't find it. Sigh. That inspiration formed the basis for the four cream squares in the center. This quilt top is a little more formal than most that I quilt; there's even a bit of metallic in that border fabric. I decided that it deserved something a little more structured and formal.


From there, I mimicked the double loop design on all of the other cream areas.


Other than the four cream squares in the center, I had no idea how this project would be quilted. It was simply a step at the time. Those double loops served me well throughout the quilt. They are featured in the center block.


They are featured in a bigger scale on the 16-patch blocks.


All of the triangles that form the points on all of the blocks were quilted with a trio of double loops, too.


I had to take a break when it came time to quilt the border; I had no idea what to do. More double-loop flower thingies? Pebbles? Wavy lines? Nothing sounded right. So I walked away for a bit and then it hit me...feathers; the outer border needed feathers.


I had never quilted a feather before so I went back to Angela Walter's Quilting Negative Spaces class that I took on Craftsy. I just love that I can go back and watch those videos over and over again. One of the last lessons showed how to quilt this awesome peacock feather.


I was so anxious to get this finished that I didn't even practice before trying them on the quilt. I did draw some on paper to get familiar with the design and motion, but these feathers are the first I've ever sewn. They were FUN to sew and were a good way to finish this quilt.


The plan was for the feathers to extend over the entire border but when I was finished, there were little bare triangles on each corner of the quilt. Those blank spaces were just the right size for another double-loop flower.

The quilting is a bit easier to see from the back, which is made from a Robert Kaufman Fusion fabric.


It's hard to see here, but one of the challenges I faced was when to stop and start the quilting versus when to travel to the next location. I started out doing lots of starts and stops, but about half way through I switched to traveling. You can see a few lines on the back where I was sewing around the outside of the star points to get to the next location.


And, for me, one of the most important parts of this quilt...the thread.


That green spool was a 40 wt Aurifil in a dark blue. It was a new spool and was *just* *enough* *to* *finish* *the* *quilt*. Yeah, I was sweating it a bit there at the end. The other two spools are 50 wt and were used for the lighter areas.


This was a good finish, though a tough one. I wasn't sure it was going to get done, but once I got started it began to flow. I've already selected a project for April...I'm gonna go a little easier on myself next month.
A Lovely Year of Finishes

Thank you, A Lovely Year of Finishes, for keeping me going strong.

Monday, March 25, 2013

Give Away Day - Aurifil Thread and More

Hey, did you notice the new Aurifil Thread Club page that recently showed up here on the blog? It's full of information about a great way to build your collection of Aurifil thread (go ahead; go peek ...I'll wait right here!). To celebrate the new page, I'm hosting my first give away. My Aurifil thread rep generously sent me this awesome sampler pack to pass along to you.

To sweeten the deal, I did a little destashing and am adding four fat quarters to the mix.
All you have to do to be eligible is leave a comment here. If you're an anonymous commenter, be sure to include an email address so I'll be able to get in touch with you if you're the lucky winner.
Thank you so much for sharing this tiny corner of blog land with me. In this busy, busy world, it's nice to be able to share some quilty love with you.

I'll draw a winner on Friday morning and update the bottom of this post with the name of the lucky person.
Maybe it will be you!!

Congratulations to Sue Viall! You are the winner of the fabric and Aurifil give away!
Please contact me at Debora.Exum@gmail.com with your mailing information.
Thanks to everyone who participated.

Sunday, March 17, 2013

A Shamrock for March


There was a point in time when I considered this a finished project. It is a pattern from one of Nancy Halvoren's books. Both the shamrock and the lettering had been quilted around with a sparkly gold thread. But after taking Angela Walters Quilting Negative Spaces class, the background became a blank negative space that needed something more.

I decided this quilt needed a pile of gold coins to make it more complete.


I used a blue water soluble marker to make a gentle curve for the top of the pile and lines radiating out above it.


The same gold, sparkly thread makes both the coins and the lines. It was great practice stitching all those gold coins. Because this was already a finished piece, the heavy quilting at the bottom and the lighter quilting at the top made it get a little out of square.


It's okay though. I consider myself very lucky to have all these projects to practice on and hopefully, improve upon. Here's a famous Irish saying to end this St. Patrick's Day post:

"May your pockets be heavy and your heart be light,May good luck pursue you each morning and night."

Saturday, March 16, 2013

Triple Irish Chain in Pink Finished


I suppose it is fitting that I finished my Triple Irish Chain quilt on St. Patrick's Day weekend. If there was ever a quilt sitting in my sewing room saying, "You're never going to finish me, are you?", this is it. Makes the finish all the more fulfilling.


The design of this quilt was figured out along the way. The intention was to experiment with Triple Irish Chain blocks while using up some stash. When the center was finished it seemed too skinny. Never fear, half square triangles here! Keep in mind that I pieced this quilt many, many years ago and am only now getting around to finishing it. I didn't even think through the size of the half square triangles. So when it came time to attach them to the sides of the quilt, I just whacked them off to match the length, leaving a tiny triangle in two corners.


I would handle that differently now, though it adds a bit of character to this quilt, I think. The quilting on this project was fun in that it was a great combination of free motion and straight line quilting.


The Triple Irish Chain has diagonal lines going in both directions through the off-white background squares for a pretty cross-hatch look.


The centers offered a good place to practice free motion flowers. When I finished quilting the main body of the quilt, it looked odd having the centers as the only area with free motion quilting.


To complement those centers and add balance between the straight line and free motion quilting, both borders were treated as one and smaller versions of the same flower were quilted all the way around the outer edge. I love the way the flowers really stand out against the darker fabric.


Sometimes I don't realize how much an unfinished project weighs on me. This finish has really set me free. I'm about to go put this quilt in the wash to give it even more of that soft, comfy, old fashioned quilt feel. This one will eventually be given away but for now I might just snuggle up under it for a bit
.

Thursday, March 7, 2013

Works in Progress - Treadle Piecing and Machine Quilting

No finishes to share yet this month, but certainly some fun in progress happenings are going on. First, I'm in love with my grandmother's treadle machine which returned very recently to working condition.


I'm making a scrappy trip around the world quilt using Bonnie Hunter's tutorial. I have a basket of strips next to the machine and every time I have a few minutes to spare, I sit down and sew a strip or two. This is going to be a fun, long term project that will hopefully, make a great dent in my scrap pile. My family is a little bit nervous about this one, since I am intentionally using fabric that might otherwise sit neglected for years. My husband, Duane, isn't so sure he wants to be sleeping under ladybug fabric, but he knows better than to judge a quilt by just one block. I'm looking forward to seeing how this one develops.

My other major work in progress is this triple Irish chain quilt.


I want to say this is the third quilt top I ever pieced, back in the 1990s, but I'm not positive about that. It's at least among the first five. My stash was very limited then and I remember deciding on the color scheme simply based on which color I had the most of. I pieced and layered this quilt, then promptly set it aside. The quilting step was way too scary back then. 


Since this is a year for finishes, it was time to get this one done. Also, the quilting step is becoming one of my favorite parts of quilt making these days. I decided to quilt a large flower in the center of each block. It is from Leah Day's Flower Ball free motion pattern.


The rest of this quilt will be taken care of with my walking foot. I plan to cross-hatch all the cream squares in the Irish chain, and then think about how to quilt the borders.


This shouldn't take too much longer to finish. I'll be sure and take some daytime pictures once this project is completed.

Monday, March 4, 2013

A Lovely Year of Finishes - March Commitment

 It's time to make a new commitment for another month of "A Lovely Year of Finishes". 


This month, I'm committing to finish this quilt top, which was made as a class sample for the "Classy Ladies" club back when the shop was open. Wow, we sure had some good times in that club. Our name came from the pattern set we were working with. They were all Debbie Caffrey's Classy Patterns, and the goal of each class was to improve cutting and accuracy while making small samples from those patterns. Fun, fun, fun.


My first thought was to quilt one big set of concentric circles over the whole piece, but I'm not sure how that will translate with the strong contrast from blue to cream. It would be a challenge to find just the right thread color. I'll probably end up doing a different quilt design on each color. We'll see. This project is still in the "thinking about it" stage.

Related Posts Plugin for WordPress, Blogger...